Update Overview
New Products
- D5 Lite for Rhino (beta)
- D5 Lite for Revit (beta)
- D5 LiveSync Plugin for Blender
New Features
- Interactive Presentation
- Seasonal Vegetation
- Custom Pivot
- ACEScg Working Color Space
- Stereoscopic Panorama
- HeightField Tracing
- MeasureLine Asset
- Launcher Notification Center
Experience Optimizations
- Added control parameters to AI Material Snap
- Optimized road network editing in City Generator
- Super Resolution Upgraded to DLSS 4.5
- Optimized VR visual quality, interaction & stability
- XR Tour optimization
- Spatial Tour - Dollhouse Mesh Reconstruction Optimization, VR Supports Depth Display
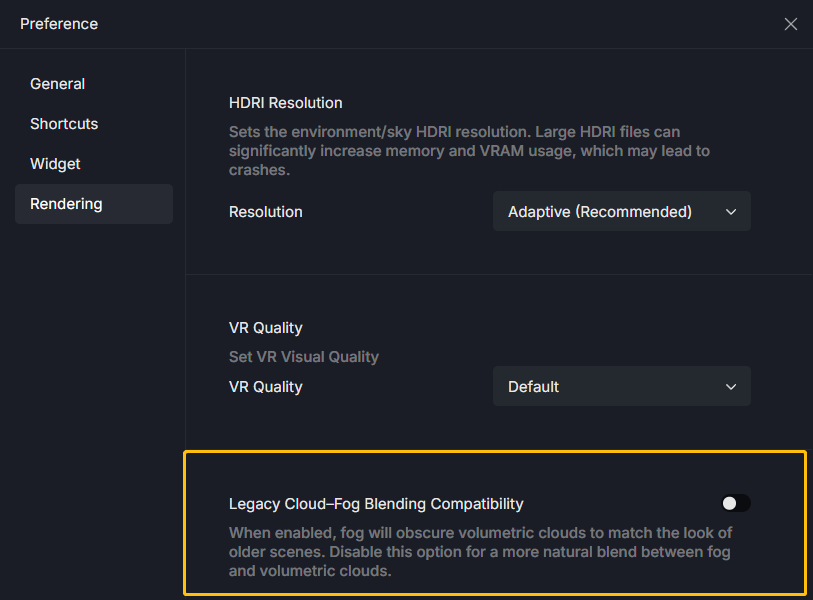
- Optimized blending effects between Fog & Volumetric Cloud
- Supports ray tracing for 3DGS models
- Added Color Linkage & Color Variation to Foliage Material
- Optimized Path Tool Display
- Supports value retention for Automatic Exposure
- Supports uploading in-scene models to D5 Works platform
- AMD & Intel graphics cards support D5 SR Widget
- Support proxy settings on the Launcher login page
Teams
- Supports multiple cloud drive integrations for Team Project Library - Google Drive, OneDrive, Egnyte, Autodesk Construction Cloud (ACC) & Dropbox.
- Optimized workflow for Team Project Library
- Optimized Worksets management & Multi-editing
- Optimized SSO Login
Fixes
- Fixed unexpected duplication and generation of Ocean Objects across Worksets in Multi-editing projects
- Fixed unexpected content overwriting when the same Worksets are simultaneously edited by multiple users in Multi-editing projects
- Fixed the failure of Scatter Cull Areas
- Fixed inability to select Vegetation Objects
- Fixed inability to mirror grouped models
- Fixed the loss of Terrain Presets and modified data
- Fixed incorrect display of Vegetation, Grass Materials in specific projects
- Fixed incorrect material display in specific scenes
- Fixed desynchronization of Focal Length parameters in Video Mode
- Fixed incorrect inheritance of aspect ratio in Video Clips
- Fixed incorrect playback effect of Two-point Perspective camera
- Fixed unexpected camera offset when frequently switching between Perspective and Parallel views
- Fixed inconsistency between video preview and playback/rendered results
- Fixed unexpected darkening of Video Clips during playback in specific HDR environments
- Fixed unexpected visual jitter when compositing video from Transparent Channel Sequence
- Fixed incorrect reflection effects on Ocean surfaces
- Fixed overly bright reflections on Water Materials
- Fixed disappearance of Material Textures with Triplanar when FPS Booster is active on AMD graphics cards
- Fixed unexpected FPS drop when moving emissive objects
- Fixed a crash when opening specific projects
Detailed introduction to some features
New Products
1. D5 Lite for Rhino (beta)
-
D5 Lite for Rhino is a real-time rendering plugin built-in Rhino, designed for Architecture, Landscape, and Interior design. It gives you realistic material and lighting feedback while modeling—no need to leave Rhino or wait to render. The viewport updates instantly as you adjust materials or lighting, making it perfect for rapid iteration. All parameters are saved directly within your .3dm file for easy sharing.
-
D5 Lite and D5 Render work seamlessly together in your workflow. Use D5 Lite for design iteration and real-time previews. For presentation-ready visuals, animations, and advanced detailing, switch to D5 Render. All materials, lighting, proxy models and Geo sky created in D5 Lite support a one-way sync to D5 Render, allowing you to easily finalize your scene.
-
D5 Lite for Rhino includes all features of the D5 LiveSync plugin for Rhino.
-
Supported versions: Rhino 6 / 7 / 8, D5 Render 2.7 and above
-
See the Help Center for full details>
2. D5 Lite for Revit (beta)
-
D5 Lite for Revit is a real-time rendering plugin built-in Revit, for architecture and interior designers. It gives you real-time feedback while modeling - no need to leave Revit. The visuals sync instantly as you modify materials or move the viewport, helping you speed up design iteration. All parameters are saved directly within your .rvt file, seamlessly integrating into your BIM workflow.
-
Use D5 Lite for real-time iteration in Revit. Once your design is set, switch to D5 Render to create high-end presentation visuals. All your materials, lighting, and proxy models support a one-way sync to D5 Render.
-
D5 Lite for Revit includes D5 LiveSync plugin for Revit.
-
Supported versions: Revit 2019–2027, D5 Render 2.7 and above
-
See the Help Center for full details>
3. D5 LiveSync Plugin for Blender
-
The new D5 LiveSync Plugin for Blender connects Blender and D5 Render in real time. Edits you make to models, materials, and lighting in Blender sync straight into your D5 scene - no repeated manual syncing or export/import. Modeling and rendering stay connected in one flow.
-
Supported versions: Blender 3.4–5.2, D5 Render 2.5 and above
-
See the Help Center for full details>
New Features
1. Interactive Presentation
-
The Interactive Presentation mode is a new presentation mode in D5 3.1 for building interactive content inside a D5 scene. Users can predefine multiple scene state combinations and dynamically switch between them during playback by clicking on interactive variable sets or 3D triggers, thereby achieving a presentation capability akin to “interactive PPT combined with real-time 3D scene control.”
-
Unlike a linear set of images or a video, Interactive Presentation brings design options and multi-state switching into a single playback flow, so you don’t have to re-edit and re-export each time. It works well for:
-
Design reviews for architecture and interiors — switch materials, furniture layouts, and more.
-
Day-to-night and seasonal or weather changes for landscape and planning design.
-
Immersive showcases for commercial real estate marketing (with VR headset and Pixel Streaming sharing).
-
Fast side-by-side comparison of design versions in internal reviews and client conversations.
-
-
Enter Interactive Presentation mode
- Click the “Presentation” button to enter the presentation editing/management interface. The bottom panel shows the show list and slide list; the right-hand panel holds the interaction settings.
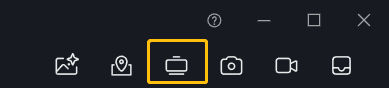
- Click the “Presentation” button to enter the presentation editing/management interface. The bottom panel shows the show list and slide list; the right-hand panel holds the interaction settings.
-
Create Interactive Variables
-
Interactive variables record state changes across different dimensions of the scene — swapping materials, adjusting light settings, showing or hiding objects, and so on. They are the foundation of every interactive presentation.
- Entry: in presentation mode, the right sidebar provides an entry to set up variable sets.
-
Variable Set Type: this defines which properties the variable set can control and record.
-
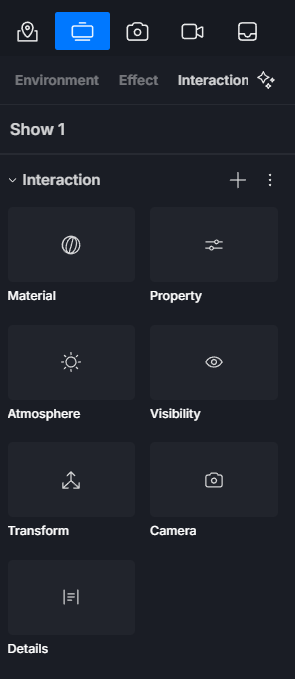
| Property Type | Description |
|---|---|
| Material | Object surface material |
| Property | Light source type, intensity, color temperature, etc.Unique and specific parameters for different objects |
| Atmosphere | Enviroment & Effect parameters such as sky, fog, and color grading |
| Visibility | Object show / hide status |
| Transform | Object position, rotation, and scale |
| Camera | FOV(Horizontal), Focal Length, and position |
- Add State: based on the variable set type, adjust the matching parameters in the scene (lighting, materials, camera, and so on), then click “Add State” to save that snapshot.
Note: When setting a Material variable, you can’t switch the Material Template to Displacement or Grass.
-
Set up 3D Triggers
3D trigger is an interactive point you place in the scene. During playback, clicking it triggers the state change tied to a variable set.-
Trigger Types:
-
Actor: An independent carrier displayed at the center of the current viewport by default for immediate visibility; position can be adjusted via gizmo.
-
Object: Designate a specific object in the scene as the trigger; supports selecting 1 object only.
-
-
Performance
-
Toggle: Click the trigger to cycle through states in order.
-
List: Click the trigger to open the Variable Set panel and freely choose a state.
-
-
Style
-
Icon: use the default icon style.
-
Text: Supports custom text input — handy for short notes and explanations.
-
-
Other options:
-
Always Face Camera: keep the trigger facing the current view so it stays visible from any angle.
-
Set Linked Object(Trigger Types): bind the trigger to a model so it moves with that model.
-
-
-
Add Slide
A slide sets the camera shot for playback (viewpoint & scene content) — and selects which variable sets take effect in that shot.-
Play Option:
- Set slide playback mode (Manual Play / Auto Play).
- Set transition animation effects for state switching.
-
Interactive Variable Set Binding:
-
Specify the effective variable set for the current slide, supports selecting multiple sets.
-
Unselected variable sets will not participate in state changes for this slide.
-
-
-
Variable Set Button: review every active variable set on the current slide, along with its list of states.
-
Play Presentation
Click the “Play Presentation” button to enter playback mode.-
Play Slides:
-
Click the left side to expand the slide list.
-
Click the arrow at the bottom menu bar to switch to the next/previous slide.
-
-
Trigger Interaction:
-
Click configured 3D triggers.
-
Click the Variable Set button in the bottom menu bar to call up the menu and manually select states.
-
-
-
Presentation Settings
-
Playback Settings
-
Auto/Manual Play, Transition Animation
-
Presentation quality and VR quality settings
- Navigation Tips: Click to view Navigation controls and corresponding shortcuts in playback mode.
-
-
VR mode:
- Supports immersive presentation experiences with headset interaction input.
-
-
Pixel Streaming:
-
Streams your Interactive Presentation to a browser in real time, so others can view and experience it without installing D5 Render.
-
Once streaming starts, two links are generated automatically:
-
Editor link: full control of the presentation — switch slides, trigger interactive variables, and more.
-
Viewer link: view-only access with no interaction, ideal for sharing with audiences who only need to watch.
-
-
2. Seasonal Vegetation
-
Seasonal Vegetation lets plant assets change foliage color and branch state with the seasons, for a more lifelike sense of how nature shifts across the year. You don’t need to swap in different seasonal models — just adjust the date, and you can preview spring, summer, autumn, and winter in the same scene.
-
Global Seasonal Settings
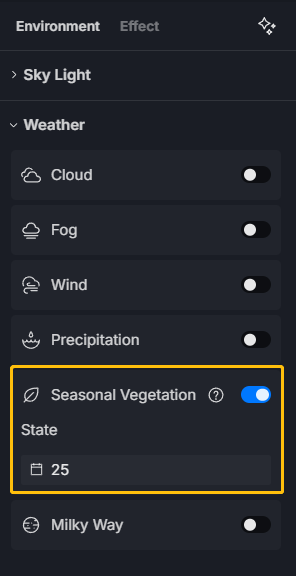
Added “Seasonal Vegetation” setting to the Environment - Weather for global control of all supported plant assets.- Once enabled, set the State as a day of the year (range 1–365) to fix where you are in the calendar.
- D5 then calculates each plant’s seasonal state from that date automatically.
-
Per-Plant Seasonal Settings
-
Select a single season-ready plant to set its parameters on its own in the right-hand Inspector.
-
State (days): the day range decides which seasonal look the plant shows.
-
| Day Range | Seasonal Effect |
|---|---|
| 1 - 135 | Spring |
| 136 - 213 | Summer |
| 214 - 270 | Autumn |
| 271 - 365 | Winter |
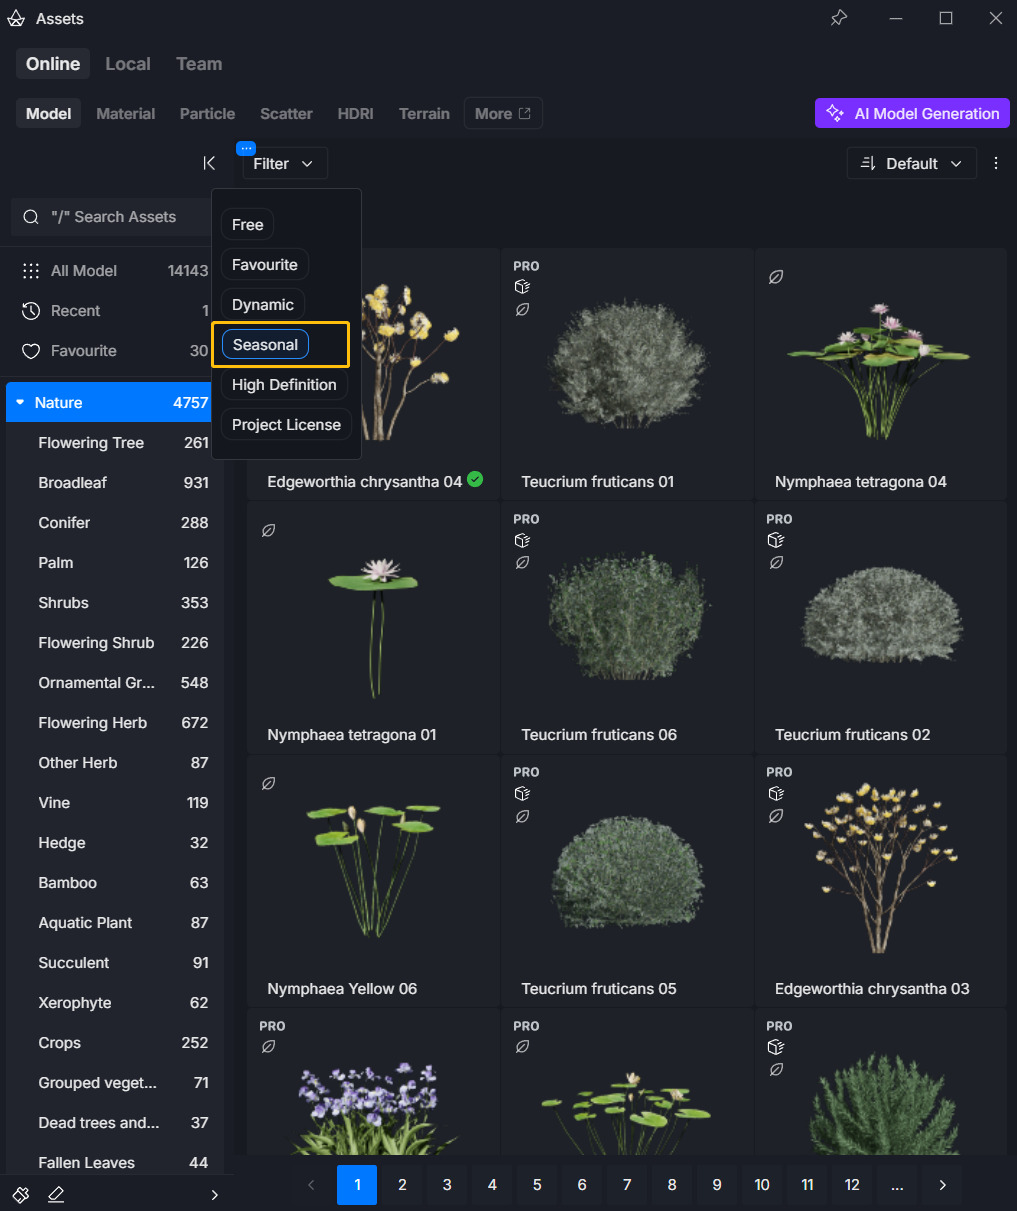
- Seasonal Colors: tune the plant’s color for each season independently to match different styles.
- Following Global Settings: when checked, the plant takes its date and seasonal effect from the global setting under Environment → Weather.
- Plants of the same type placed in a single batch share their Seasonal Vegetation parameters automatically.
- Multi-select batch editing of these parameters isn’t supported yet.
-
Foliage Variation Color
- The foliage material adds a Color Variation control that brings random color shifts and natural variation to leaves. It cuts the repeated look of large planted areas and adds realism and depth.
3. Custom Pivot
-
Customize Pivot lets you move a model’s pivot by hand, so rotation, scaling, and other transforms work from a base point that matches your design intent. Move a door’s pivot to its hinge, for example, and it swings open naturally when you rotate it.
-
It helps wherever you need precise control of the transform base — door and window animations, furniture rotated around a specific axis, and whole-group transforms.
-
Feature Access
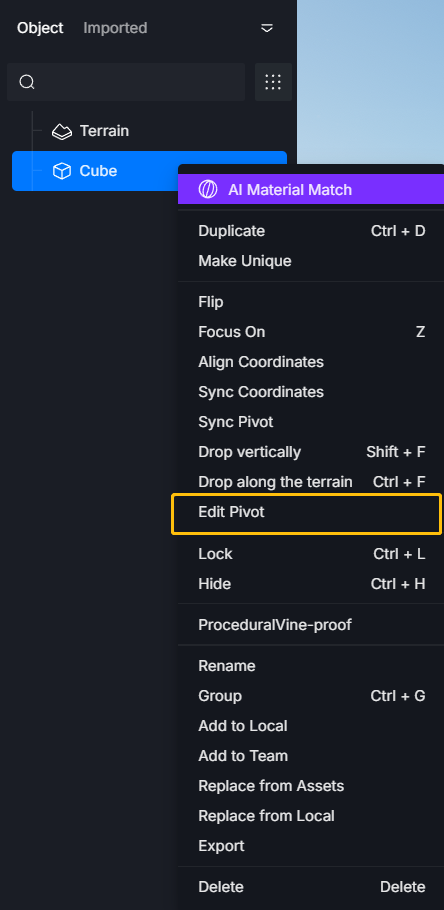
With a model selected, use one of the following methods:- Click the button on the right sidebar to make the settings
- Right-click Menu: Select Set “Edit Pivot”
- Adjustment Methods
| Method | Operation |
|---|---|
| Drag | Directly drag the pivot sphere in the scene; supports auto-snapping to the object surface. |
| Precise Input | Enter X / Y / Z coordinates and rotation angles in the right panel. |
| Feature Point Snapping | Key points such as the bounding box center and centroid will highlight and trigger auto-snapping when the cursor is nearby. |
All operations support Ctrl+Z to undo.
- Save & Exit
| Operation | Result |
|---|---|
| Click “Done” or press Enter | Save and Exit |
| Press Esc | Cancel and reset pivot to the original position |
| Right-click empty space | Save and Exit |
| Switch to another tool | Auto-save and Exit |
-
Groups & Hierarchy
- You can set a Customize Pivot on a group itself. Group a double door, move the group’s pivot to the hinge, and the whole group swings open naturally when rotated.
- Modifying a group’s pivot does not affect the individual pivots of the sub-objects within that group.
- When you ungroup, the coordinate data at the group level clears, but each sub-object keeps the pivot you set for it.
-
Reset Pivot
You can return the pivot to the model’s initial position at any time:- Right Sidebar → “Reset Pivot”
- Reset Pivot in the right-click menu bar
-
Notes
-
Keyframe data: Modifying the pivot of a model with keyframes will reset its keyframe data. A confirmation pop-up will appear; selecting "Continue " will clear keyframes and enter edit mode, while selecting "Cancel " will discard any changes.
-
Copy inheritance: Models created via
Ctrl+D,Alt+D,Shiftwill automatically inherit the custom pivot of the source model. -
Asset replacement: Replacing a model from the Asset Library will not inherit the old pivot; it will use the default pivot of the new asset .
-
Export: When saving as a
.d5afile or adding it to the Local Library, Custom Pivot information is saved. The Pivot will remain consistent when the asset is opened in other scenes.
-
4. ACEScg Working Color Space
-
D5 now supports the ACEScg Working Color Space, with a wider gamut than the standard Linear-sRGB (Rec.709). In high-dynamic-range and complex lighting, ACEScg holds on to more color detail and reduces clipping and shifts in bright areas, giving you steadier, more realistic color.
-
It suits color-critical work — interior lighting moods, high-contrast scenes such as sunsets, and pipelines that need to match the color space of compositing tools like Nuke and DaVinci Resolve.
-
Working Color Space Settings
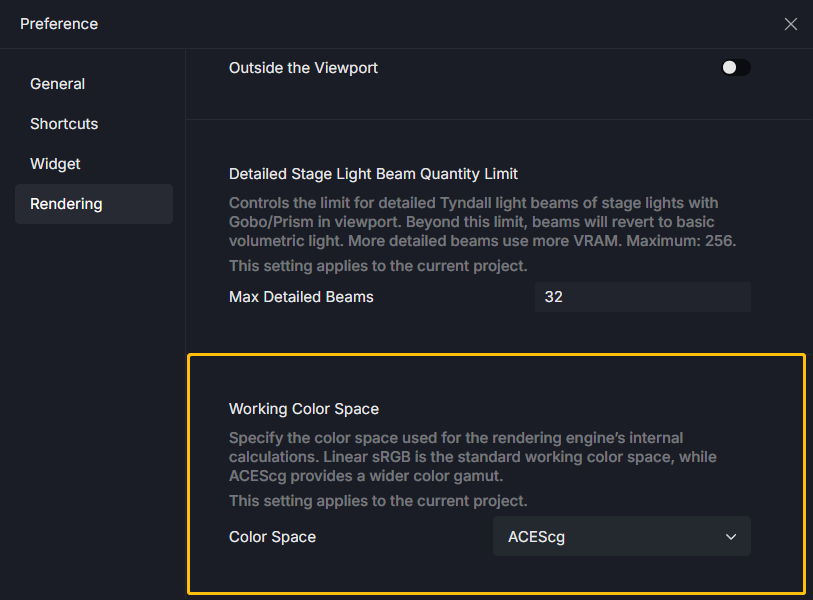
Added Working Color Space setting under Preference - Rendering. This defines the color gamut range for internal engine calculations.
-
Linear-sRGB (Rec.709): the traditional standard working color space.
-
ACEScg: offers a wider gamut that covers more of the visible spectrum — a good fit for high-quality rendering.
-
-
Material Color Controls
Material Color control supports switching between Linear-sRGB (Rec.709) and ACEScg.
-
It defaults to the sRGB color space.
-
This change applies to every color picker in the software.
-
5. Stereoscopic Panorama
-
D5 now supports the output of Stereoscopic Panorama. Compared to standard panoramas, S tereoscopic P anoramas provide a more pronounced sense of spatial depth and room scale.
-
It suits interior design showcases that give clients a VR experience, model-home walkthroughs for property marketing, and remote reviews where you share a Stereoscopic Panorama online.
-
Feature Access
- Added these new options at Image → Panorama.
- Stereo: when checked, D5 renders separate views for the left and right eye to produce a 360° image with real depth.
- IPD (interpupillary distance): sets the spacing between the two eye views to tune the depth effect.
- Slices: Balances image quality against render time.
- More slices produce smoother transitions across the image, but increase render time.
- Stitching seams tend to show up on objects close to the eye and on wide horizontal lines away from eye level. Raising the slice count helps reduce them.
- Added these new options at Image → Panorama.
-
How to View
The output Stereoscopic Panorama image can be viewed in the following ways:
-
VR headsets (such as Quest, PICO, etc.) devices for an immersive stereoscopic experience.
-
Stereoscopic Panorama players: open in any desktop or mobile player that supports the stereoscopic format.
-
D5 Showreel: create a Panorama Tour project, upload your Stereoscopic Panorama from local storage, and D5 handles the correct online stereoscopic rendering for you.
-

6. HeightField Tracing
-
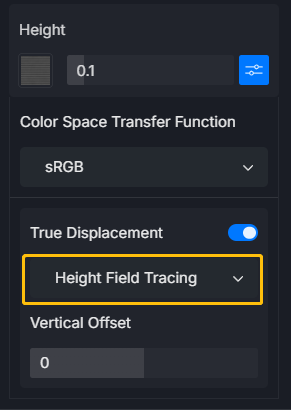
In the advanced options for the Displacement material height map, a new HeightField Tracing algorithm has been added alongside the existing Subdivision Displacement.
-
The edges of HeightField Tracing materials produce realistic bumps and undulations without increasing the model’s polygon count, significantly improving both the level of detail and the realism of the material.
-
It’s a good fit for materials with surface relief — brick, stone, wood grain, woven textures — and works as a lightweight alternative to Subdivision Displacement in large, performance-sensitive scenes.
7. MeasureLine Asset
-
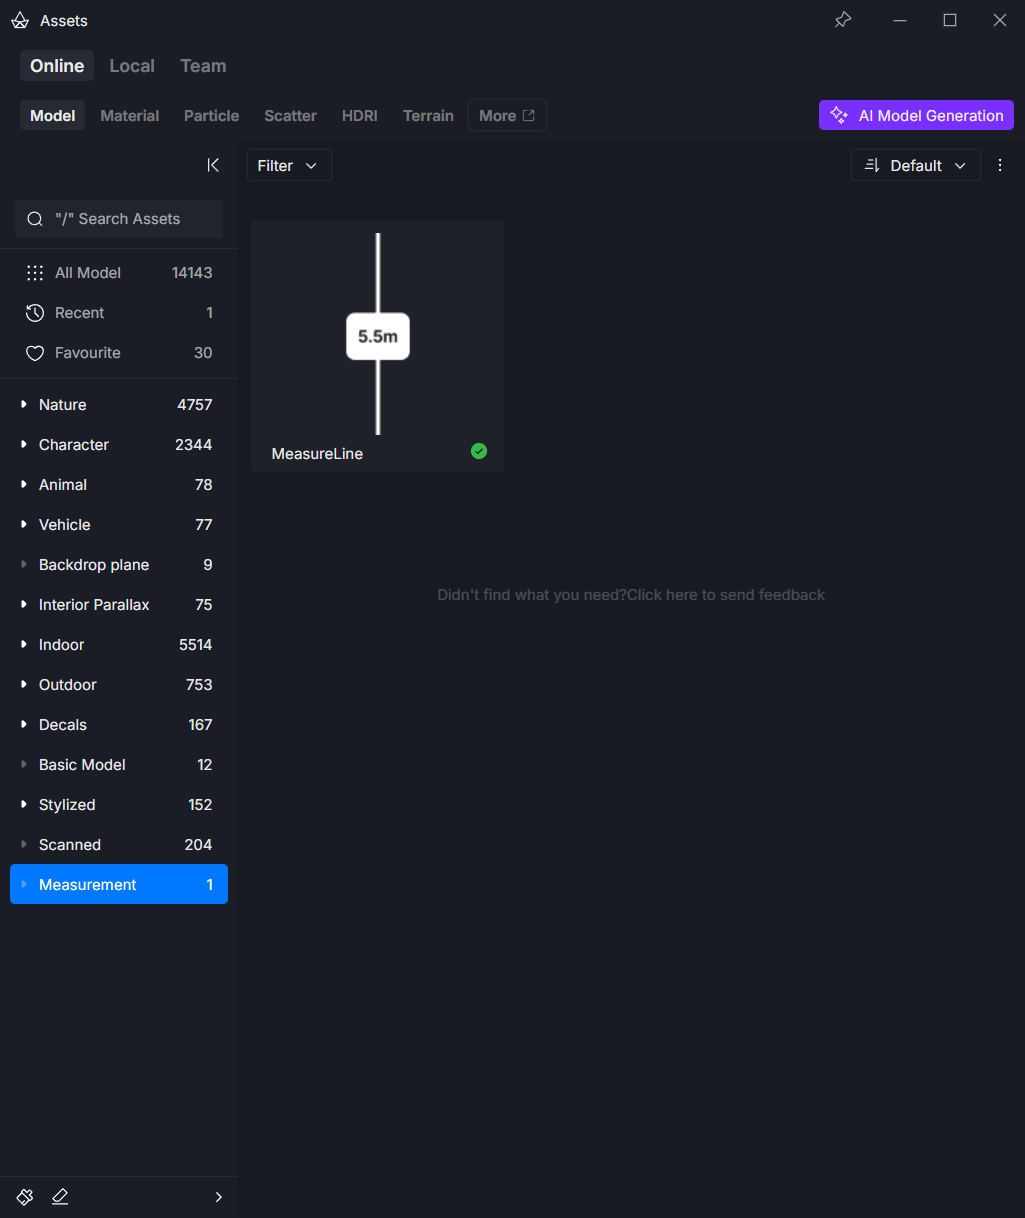
D5 Asset Library adds the MeasureLine tool, so you can measure real distances between models or across a model’s surface right in the scene. You can check dimensions inside D5 without switching back to your modeling software.
-
Feature Access
- Click D5 Asset Library→ Model → MeasureLine to activate the tool.
- Move your cursor into the viewport and the tool auto-snaps, sensing and locking onto the surfaces of models in the scene.
-
Properties
| Property | Description |
|---|---|
| Distance | Adjust the length of the line segment by hand. |
| Auto-snap | When enabled, it displays the exact distance between snap points. The value updates instantly as you move the mouse or change points. Turn it off for freehand measurement. |
| Label Position | Adjust the position of the measurement label along the line. |
| Label Scale | The size of the measurement label. |
| Line Style | The color and width of the line, and the size of its endpoints. |
8. Launcher Notification Center
-
The Launcher adds a Notification Center that brings product updates, task statuses, and account and service messages into one place.
-
See all your important notifications in one view.
-
Filter by type.
-
Manage read and unread states, and jump straight to whatever needs action.
-
Experience Optimizations
1. Added control parameters to AI Material Snap
-
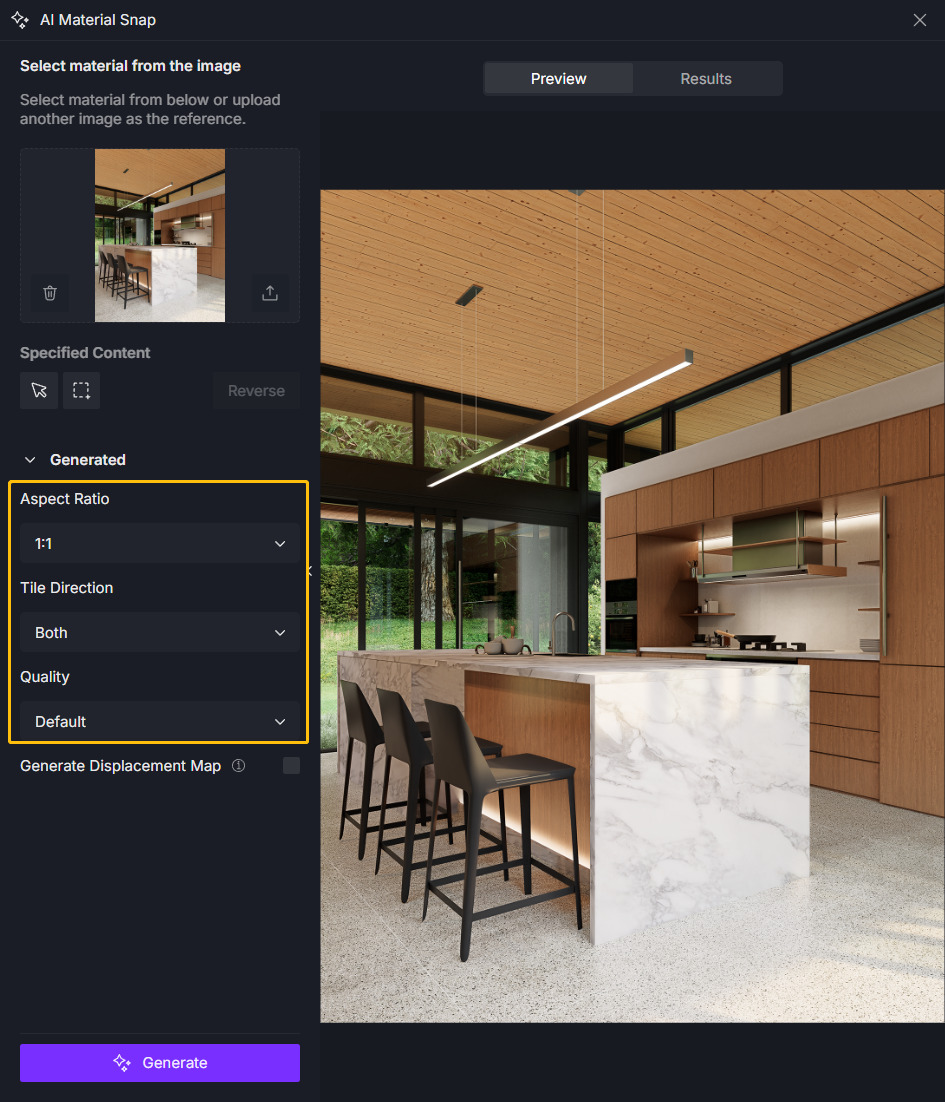
AI Material Snap adds several controls so you can shape the result more precisely:
-
Aspect Ratio: pick a preset such as 1:1, 16:9, or 3:4, so the result matches your target size out of the box.
-
Tile Direction: choose Both, Horizontal, Vertical, or None to control how the material tiles seamlessly.
-
Quality: choose Default or High Definition to trade off generation speed against detail.
-
2. Optimized road network editing in City Generator
-
City Generator gains several improvements to its road system and editing flexibility.
-
Road System:
-
Updated the road network data structure; legacy projects upgrade automatically.
-
Added new Road/Road group Style effectors with default styles and support for texture editing.
-
Added intersection as a new road type.
-
You can now edit road control points for more flexible control over a road’s path and shape.
-
-
Editing, management & fix
-
Batch-selected buildings or roads now support a right-click option to convert them into independent or separated groups.
-
Resolved the watermark issue on city models.
-
-
3. Super Resolution Upgraded to DLSS 4.5
- Resolved potential issues with ghosting, motion trails, and edge blurring during video rendering.
- Sharpens overall video output and preserves more detail.
4. Optimized VR visual quality, interaction & stability
-
This update introduces a comprehensive upgrade to the VR experience, focusing on four key areas: the introduction of smooth roaming, a new VR floating menu, support for quality preset switching, and improvements to streaming stability.
-
Movement modes
-
D5 VR now supports two movement modes, which can be toggled at any time within the VR menu.
-
Both modes support Teleportation (point at a target location and release to jump) and Smooth Roaming (continuous movement via the controller joystick).
-
| Mode | Description |
|---|---|
| Walk | Features collision detection; cannot pass through walls. Ideal for standard walkthroughs and browsing. |
| Fly | No collision limits; can pass through models. Ideal for scenarios requiring quick access to any location. |
- Controller instructions
| Left Controller | Feature |
|---|---|
| Joystick (Left/Right) | Strafe Left/Right |
| Joystick (Forward/Back) | Move Forward/Back |
| Joystick Press | Show / Hide VR Menu |
| Trigger | Switch Raycast Type |
| Grip (Hold) | Roaming Boost (Does not affect rotation speed) |
| Right Controller | Feature |
|---|---|
| Joystick (Left/Right) | Rotate View Left/Right |
| Joystick (Forward/Back) | Ascend / Descend View |
| Joystick Press | Toggle Walk / Fly Mode |
| Trigger | Trigger Interaction / Confirm Teleport |
-
VR Floating menu
- After entering VR mode, press the Left Joystick to call up the floating menu, which includes the following features:
| Menu Item | Description |
|---|---|
| Movement Mode Toggle | Switch between Walk and Fly modes |
| Controller Mapping | View button instructions to help new users get started quickly |
| Settings | Adjust VR-related parameters |
| Exit VR | Return to Desktop mode |
-
VR Quality Settings
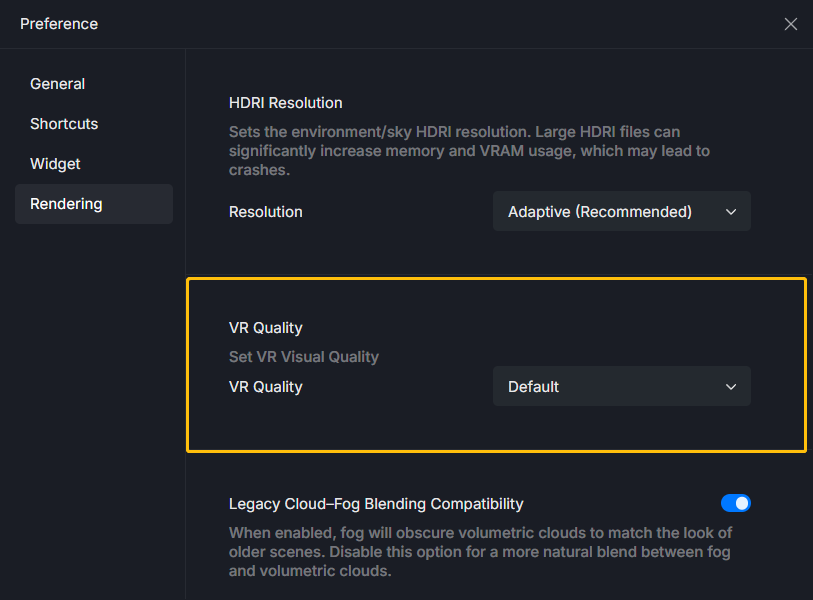
- New VR quality presets have been added, which can be toggled in the Settings menu.
- New VR quality presets have been added, which can be toggled in the Settings menu.
| Preset | Best for |
|---|---|
| Default | Suitable for most devices; provides a balance between performance and visual quality. |
| HD | Higher rendering precision with improved lighting and reflections; suits powerful hardware or static showcases. |
-
Stability Optimizations
-
Streaming Link Optimization: Improved streaming stability between the PC and VR devices, reducing latency and disconnection issues.
-
Crash Fix: Resolved an issue where an abnormal VR exit would cause the D5 main program to crash simultaneously.
-
5. XR Tour optimization
-
XR Tour is upgraded across three areas: rendering speed, file size, and web experience.
-
Faster rendering: AI-enhanced screenshots replace the traditional rendering process, sharply cutting local render time during XR preparation. The same project now renders in a quarter of the time it took before.
-
More efficient training: The XR Tour training service adopts a new .sog file format, which is just one-tenth the size of a traditional .ply file.
-
Web editor rebuild
-
Powered by D5’s custom WebGPU framework, XR projects open smoothly in the browser.
-
Supports custom camera transitions.
-
Generates iframe embed code for embedding on web pages or third-party platforms.
-
-
6. Spatial Tour - Dollhouse Mesh Reconstruction Optimization, VR Supports Depth Display
-
In previous versions, rendering spatial tour panoramas with both indoor and outdoor positions often caused degradation in Dollhouse mesh reconstruction. The new algorithm optimizes reconstruction quality when indoor and outdoor positions coexist.
-
Fixed an issue where custom hotspots and ground hotspots failed to display after entering VR browsing mode on VR headset devices in Spatial Tour.
-
The new Spatial Tour VR supports depth-map rendering, delivering more realistic and immersive VR visuals.
7. Optimized blending effects between Fog & Volumetric Cloud
-
In the legacy version (v3.0), fog was rendered directly between the clouds and the camera. As a result, once fog was enabled, volumetric clouds would easily be occluded—an issue that was most apparent in bird’s-eye views.
-
Newly added Cloud & Fog Blending Mode under Preference - Rendering.
-
Enabled: Disables the blending effect between fog and Volumetric Clouds. Fog will occlude volumetric clouds to maintain compatibility with the appearance of legacy scenes.
-
Disabled: Fog and Volumetric Clouds blend naturally, providing superior visual quality.
-
8. Supports ray tracing for 3DGS models
-
Added Path Tracing support for .ply models. Gaussian Splatting assets now correctly participate in GI (Global Illumination), reflection, and shadow calculations in Ray Tracing mode.
-
Optimized the rendering pipeline for .ply scenes, achieving higher FPS in certain scenarios while reducing peak GPU usage and the probability of stuttering.
9. Added Color Linkage & Color Variation to Foliage Material
-
Added a new Color Linkage option to the Foliage Material Template. When checked, the subsurface color will be linked to the base color.
-
For the Variation Color parameter, see Seasonal Vegetation above.
10. Optimized Path Tool Display
- Improved the visual display effect of Path Tool styles. Path segments and control points read more clearly in the scene.
11. Supports value retention for Automatic Exposure
-
When Automatic Exposure is enabled, hovering over the Exposure Compensation slider will display the current total exposure value in real-time.Clicking the “Apply” button will retain the current metering result to maintain scene brightness and automatically switch to Manual Exposure mode.
-
This solves a long-standing pain: once you were happy with Automatic Exposure , switching to Manual meant re-matching the values. Now the handoff from auto to manual is seamless.
12. Supports uploading in-scene models to D5 Works platform
- You can now upload scene models from D5 Render straight to the D5 Works asset platform. Publish models from a .d5a scene in one click — including models made with AI model generation.
13. AMD & Intel graphics cards support D5 SR Widget
- The D5 SR (Super Resolution) Widget now also supports AMD and Intel graphics cards.
14. Support proxy settings on the Launcher login page
- The D5 Launcher login page adds a proxy setting. On restricted networks — a corporate or campus network, for example — you can enter proxy server details and sign in directly.
Teams
1. Supports multiple cloud drive integrations for Team Project Library - Google Drive, OneDrive, Egnyte, Autodesk Construction Cloud (ACC) & Dropbox.
-
The Team Project Library adds Cloud Drive integration, so you can manage project assets across cloud storage.
-
Connect Google Drive, OneDrive, Egnyte, Autodesk Construction Cloud (ACC), and Dropbox to the Team Project Library.
-
Open projects from a connected drive, and save projects back to it.
-
-
See the Help Center for setup details>
2. Optimized workflow for Team Project Library
-
A more efficient way to create and manage projects.
-
Create both standard and Multi-editing projects right in the Team Project Library.
-
Create new folders when saving a project to the Team Project Library from the D5 Launcher or D5 Render.
-
Removed View-only mode Access for Project Library projects.
-
3. Optimized Worksets management & Multi-editing
-
Refined how Worksets and their interactions behave in Multi-editing, for steadier and more flexible collaboration.
-
Ocean and Cesium content no longer take part in Workset assignment; they follow Terrain logic and can be edited only in the Central File.
-
When converting to a Multi-editing project, Sub-worksets generate automatically by Layer, and the assignment interface has been rebuilt.
-
With a Sub-workset open, you can switch between unoccupied worksets directly, without reopening the project (except in Performance mode).
-
Improved Workset lock loss on unstable networks.
-
4. Optimized SSO Login
- Improved the SSO Login interface.