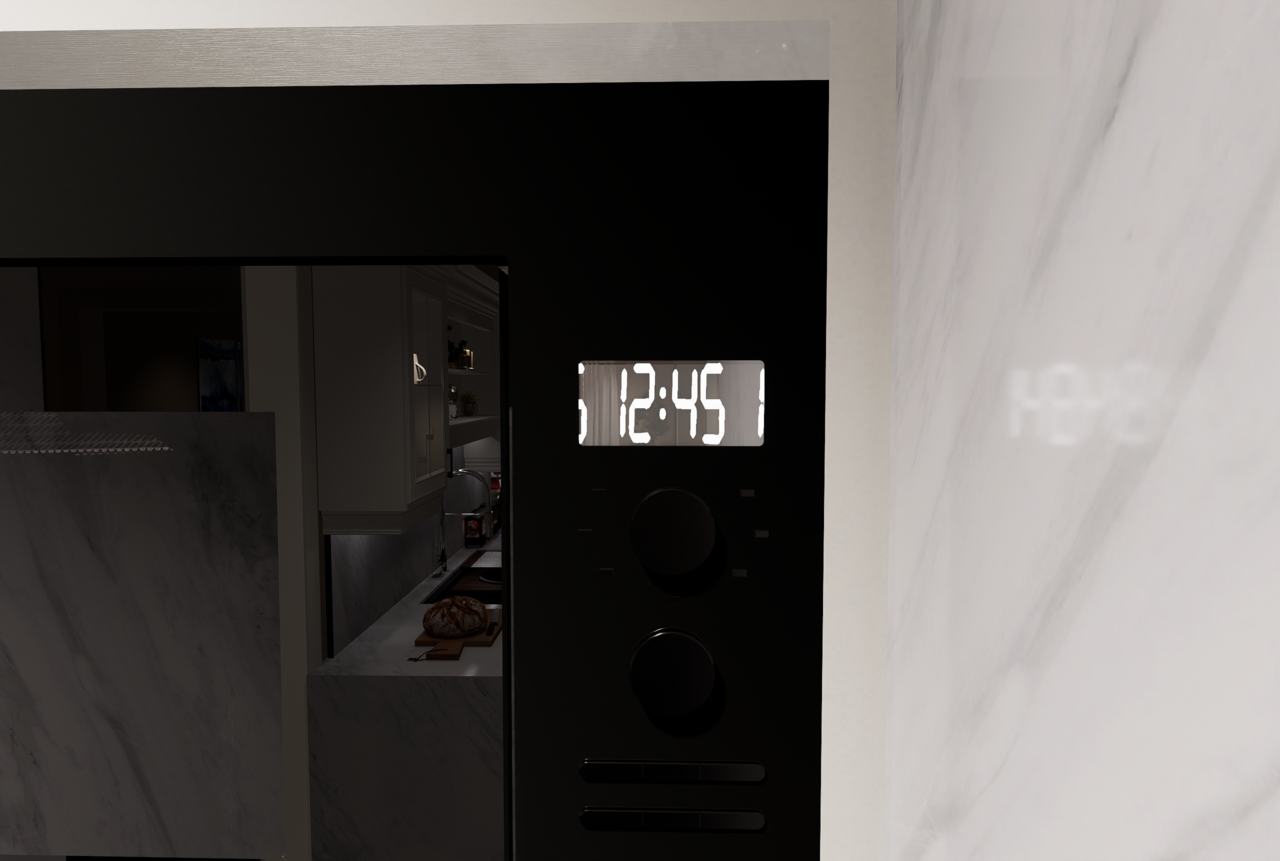
Hello, I am having difficulty optimizing a material for an appliance display in one of my kitchen renders. Please see the included images for reference of the issue.
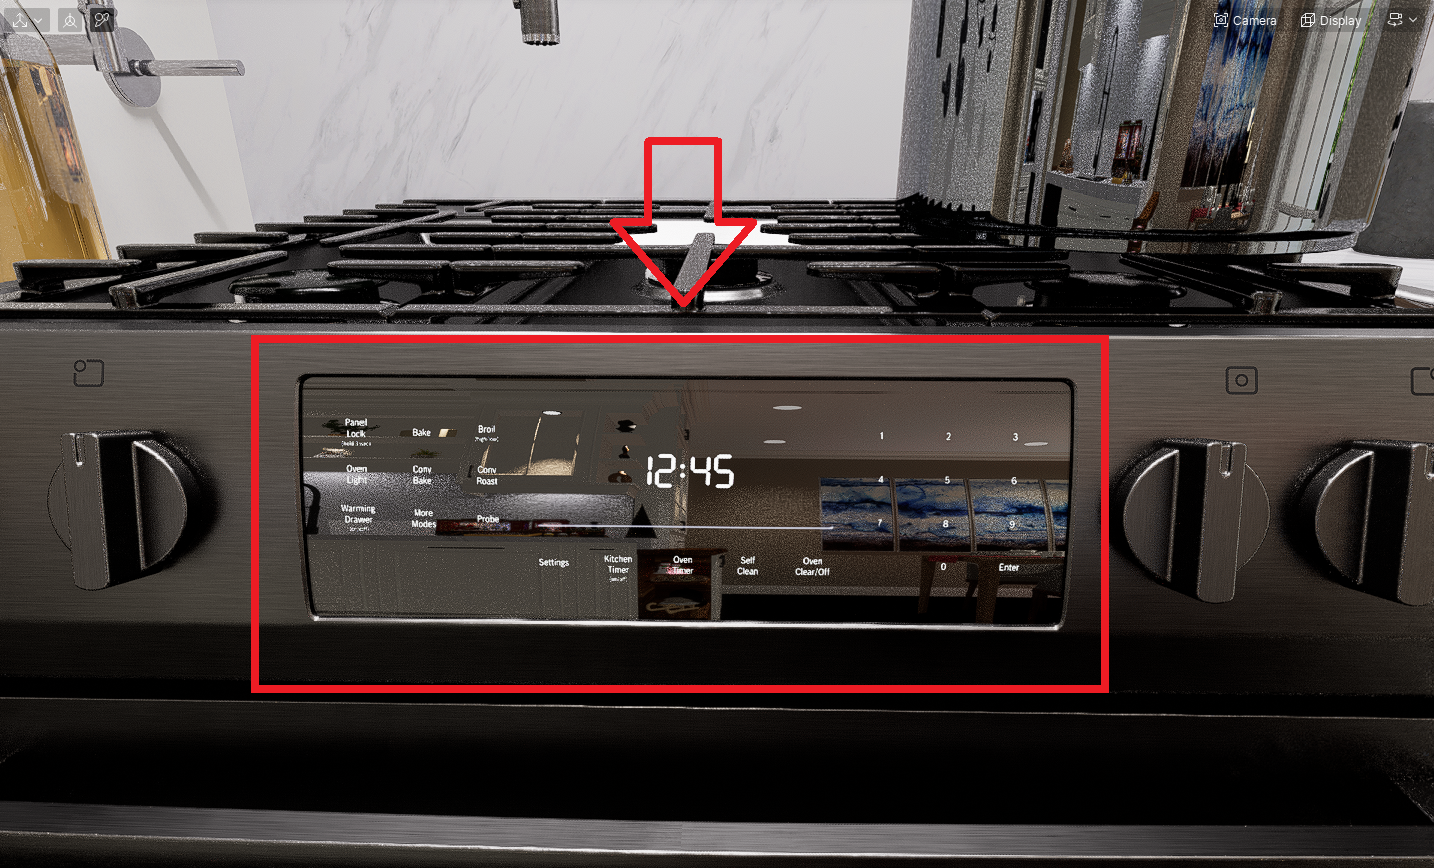
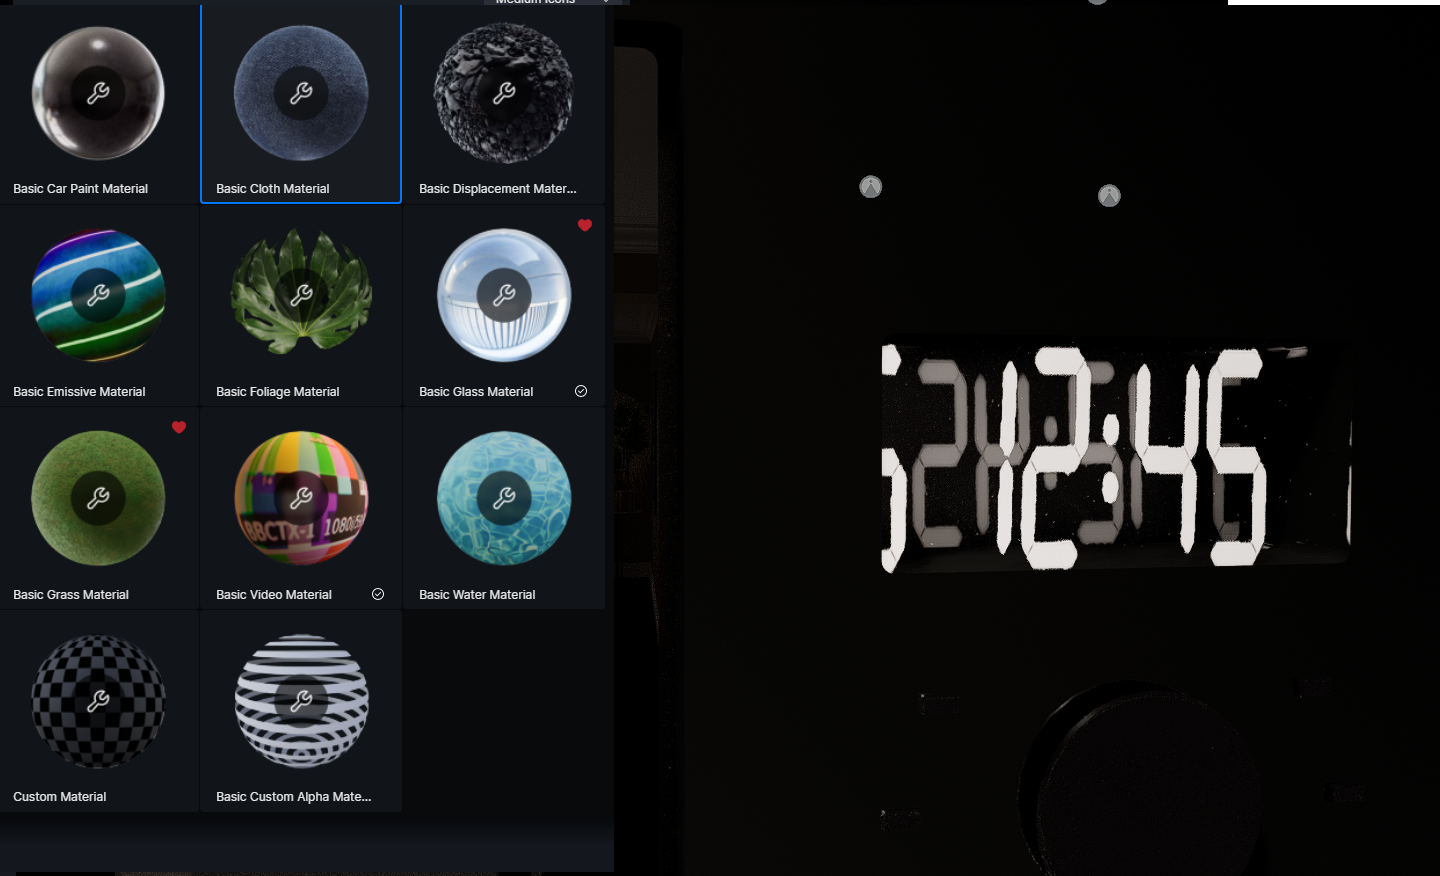
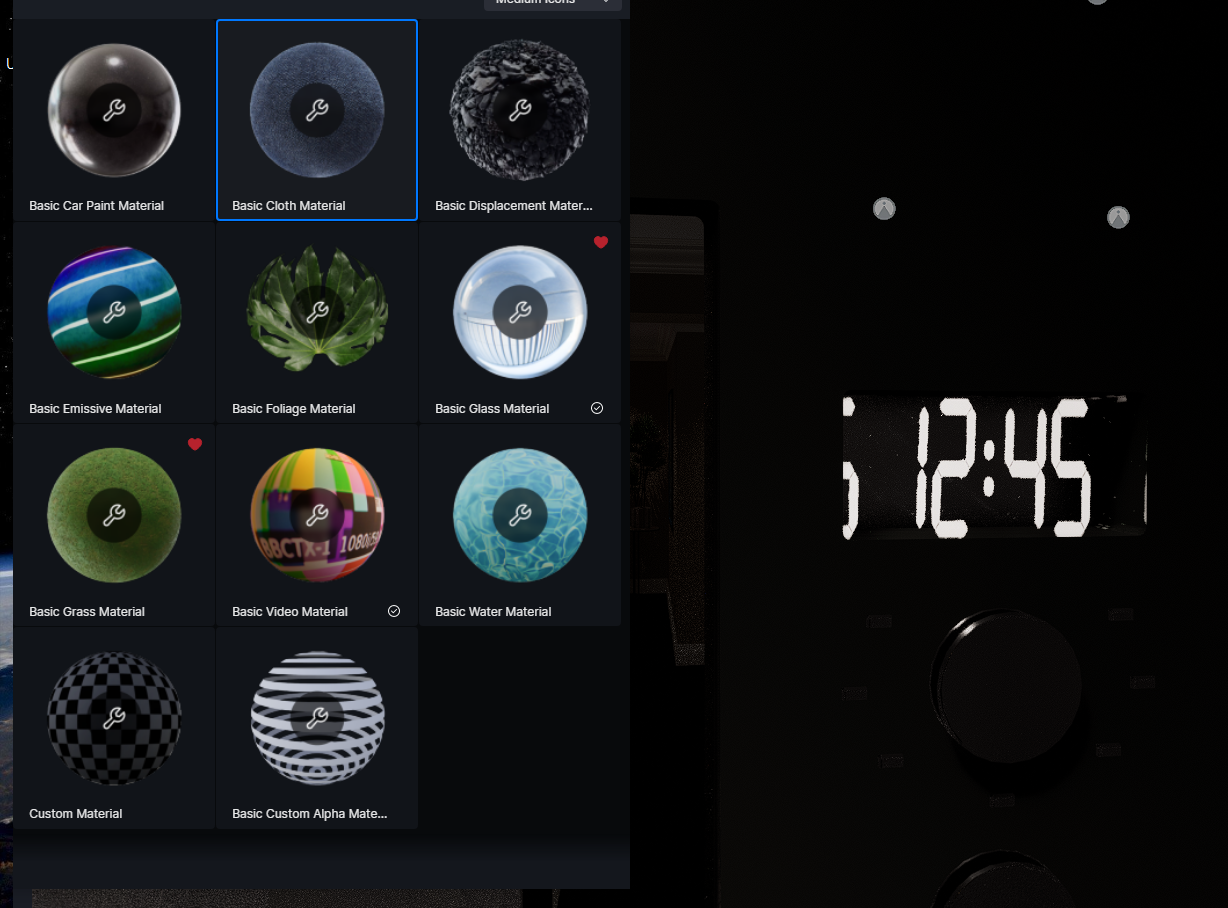
The main problem is that after selecting the “Custom Alpha” channel in the material inspector so that the applied material image’s background transparency properly shows in the microwave display, the material texture seems to be “tiling” itself rather then showing as a single image on a single plane. This is effectively causing a repetition to the texture’s image rather then it showing as a single one. Since this is a clock display, a repeated image is not realistic and must be removed.
The second problem is since the image now has transparency it is causing the image to appear “tiled” across all surfaces of the 3D geometry. In this case the 3D geometry is a rectangular prism that has 6 surfaces or “planes”. The interesting thing about this issue is that I applied the material to only the front surface of the 3D geometry prior to exporting into D5 Render to specifically avoid this issue, however, the material still seems to be applying to all surfaces. I suspect that after the “tiling” of the texture is eliminated, D5 Render might only apply the image to the front surface.
If anyone can help me with this issue it would be greatly appreciated. I have spent many hours wasted trying to match the realism of D5’s kitchen stove model asset. I have included an image of this as well for reference. Thanks in advance.
Hi inno-vision, I read about your problem, I would do it this way. In the first image I saw that you took a kitchen from the D5 library, in this case there are already the material settings of the kitchen touch screen panel, I saw that you know with the dropper you can select the materials which are 2. the first is a glass that already has its transparency settings, which you can change, I would make it specular a little less than 0.2, I would bring the reflection to 1.10 and the roughness to 0.05. Instead, I would give the image behind the glass more brightness from 5 to 10, then it depends on the Bloom effect, then I would give it heat with a temperature of 3000.
I made the image with any environment taken from the D5 library, to show you the reflection of the image:
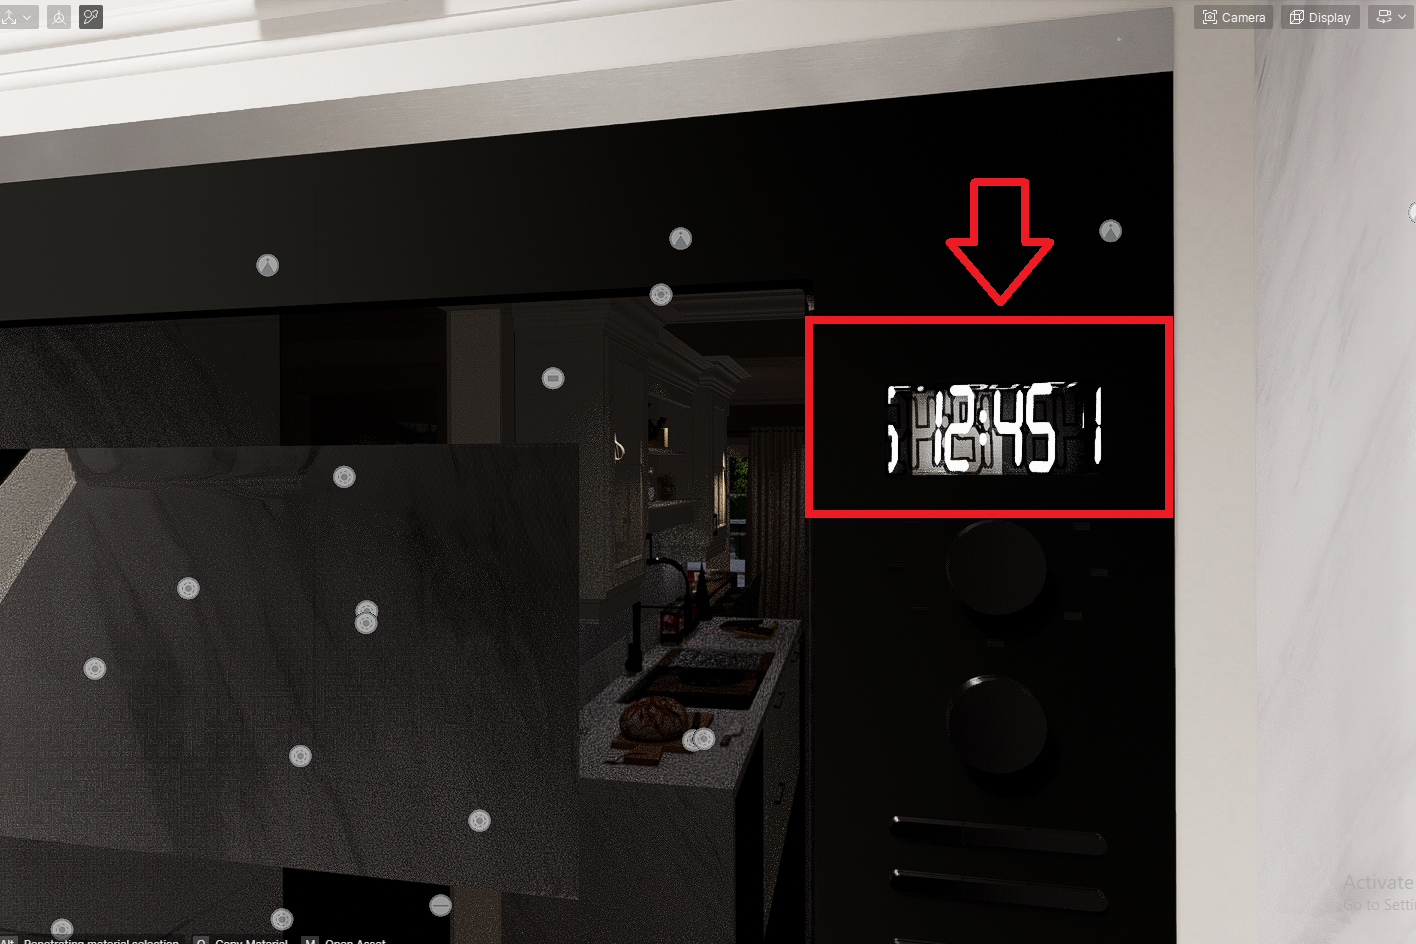
In the second image it seems that the glass is reflecting the image of the clock which is then mirrored, it makes me understand that the transparency settings are wrong. Or there is double glass, if the oven is not part of the D5 library, but an object of the graphics program you have to check if it has double glass, then the image of the clock must be attached from behind the glass, I’ll do this for you see.
or there is another method: remove the glass by selecting it and already giving it Cloth as material
and put Opacity zero 0 and give the clock image a mirroring of 0.05 or totally zero, you will see that the defect will be removed
Once you have checked this the settings are the same as in the kitchen.
I hope it gets resolved this way.
Thank you for your assistance @riccardofortelli I will try to explain what I did following your suggestions… Please see my images included for reference.
I attempted to apply the cloth material however this did not fully work. In one image you can see that it appears to have worked although, it jumps back and forth from reference image 4 and 5. Reference image 5 of course not appearing correctly.
Then your reminder that the display in the D5 asset was made from two materials made me realize that it was necessary to properly remodel the Microwave display with two separate planes and with two separate materials applied to each. I also made sure to model the glass surface realistically and make it thin so that D5 could render the light transference through the glass properly. This is very important I realized.
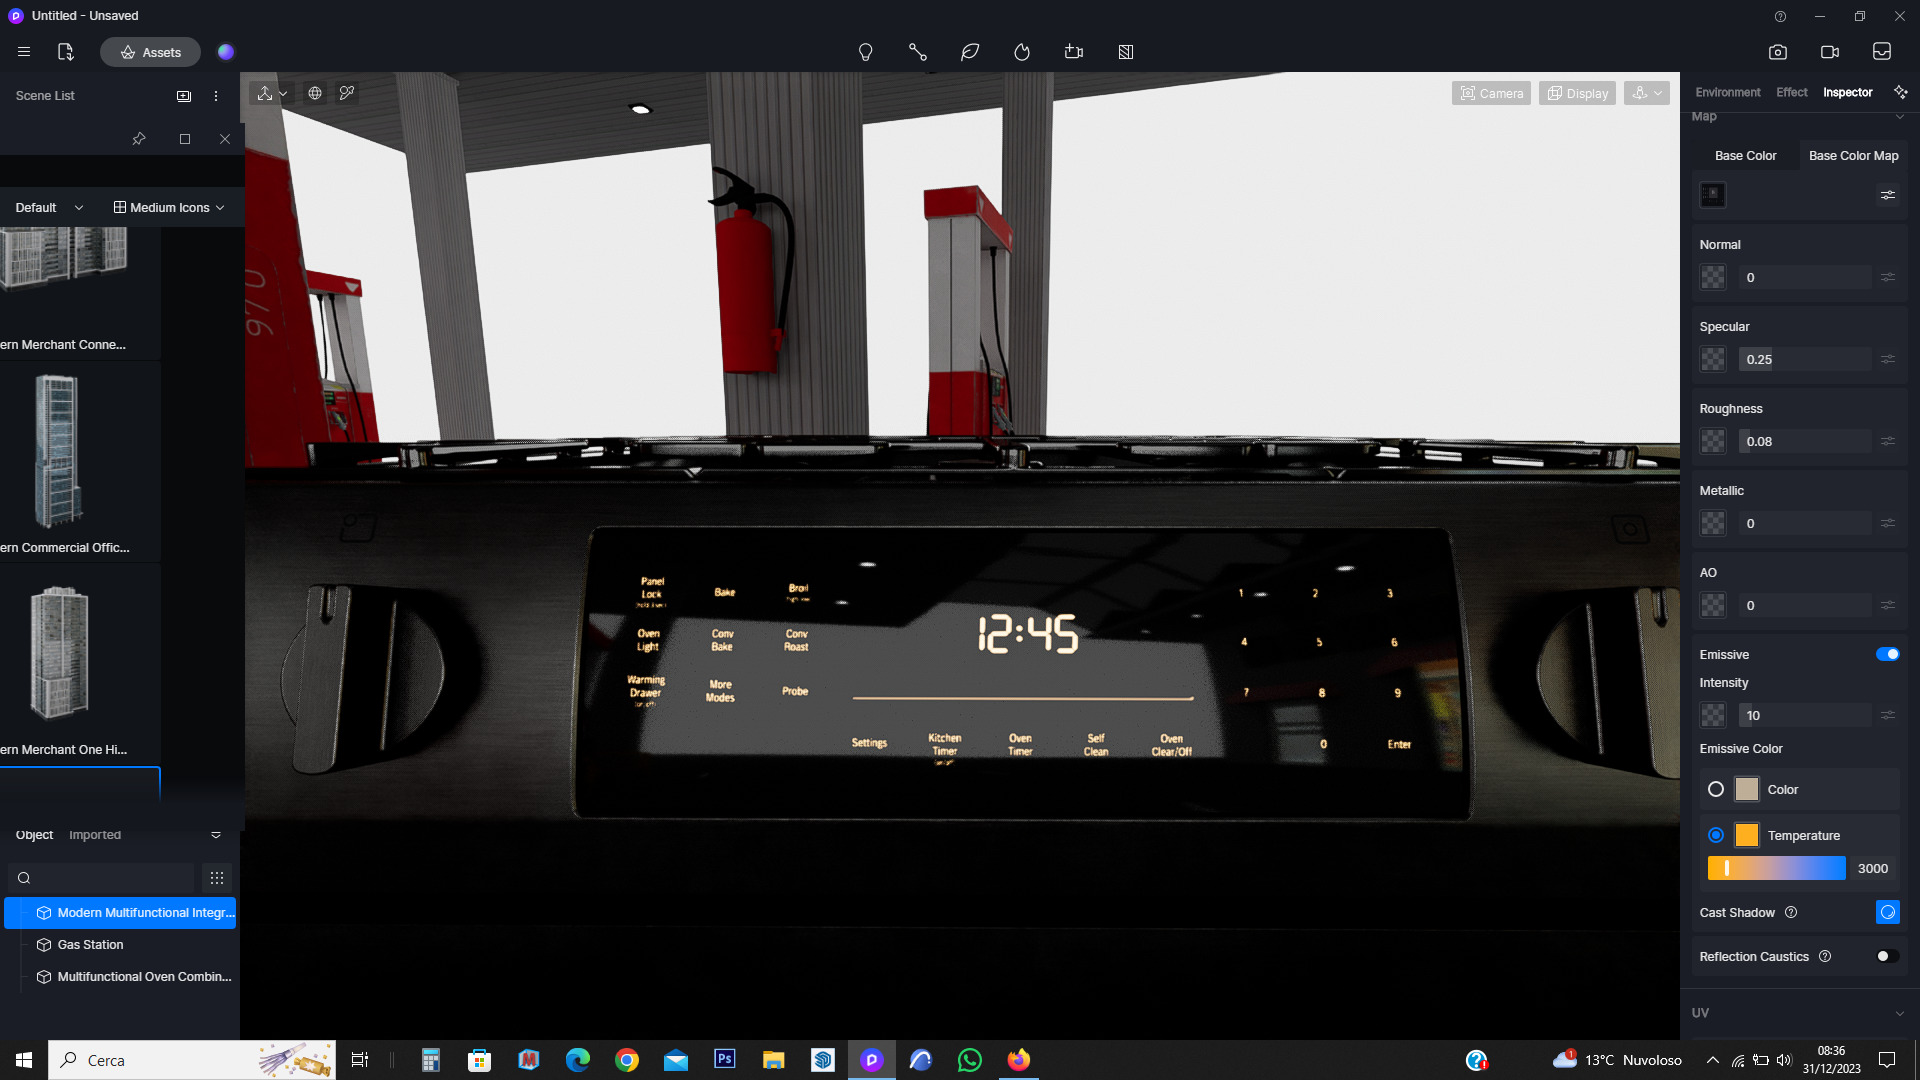
After I applied the materials in D5, I was able to achieve what you can see in “test image 19” and “test image 20”. You will notice in “test image 20” that after sizing the clock numbers so they fit properly, it is obvious that D5 is still “tiling” the image. So this is the remaining problem. Other then that, the glass panel is absorbing too much light from the emissivity of the clock behind but with some adjustments I think I can fix this.
If you know how to prevent D5 from tiling an image this would be very very helpful ! I would appreciate any help with this. Thanks again in advance !
Hello inno-vision, it’s HAPPY NEW YEAR 2024.
In my opinion, as I am a simple architect with more than thirty years of experience, this is the working approach that should be looked at. I don’t know what graphics programs you use, because I would start from the graphics to set everything, both the texture of the materials and the objects to insert. D5 has always been considered a rendering engine that has some functions that improve the image to be developed.
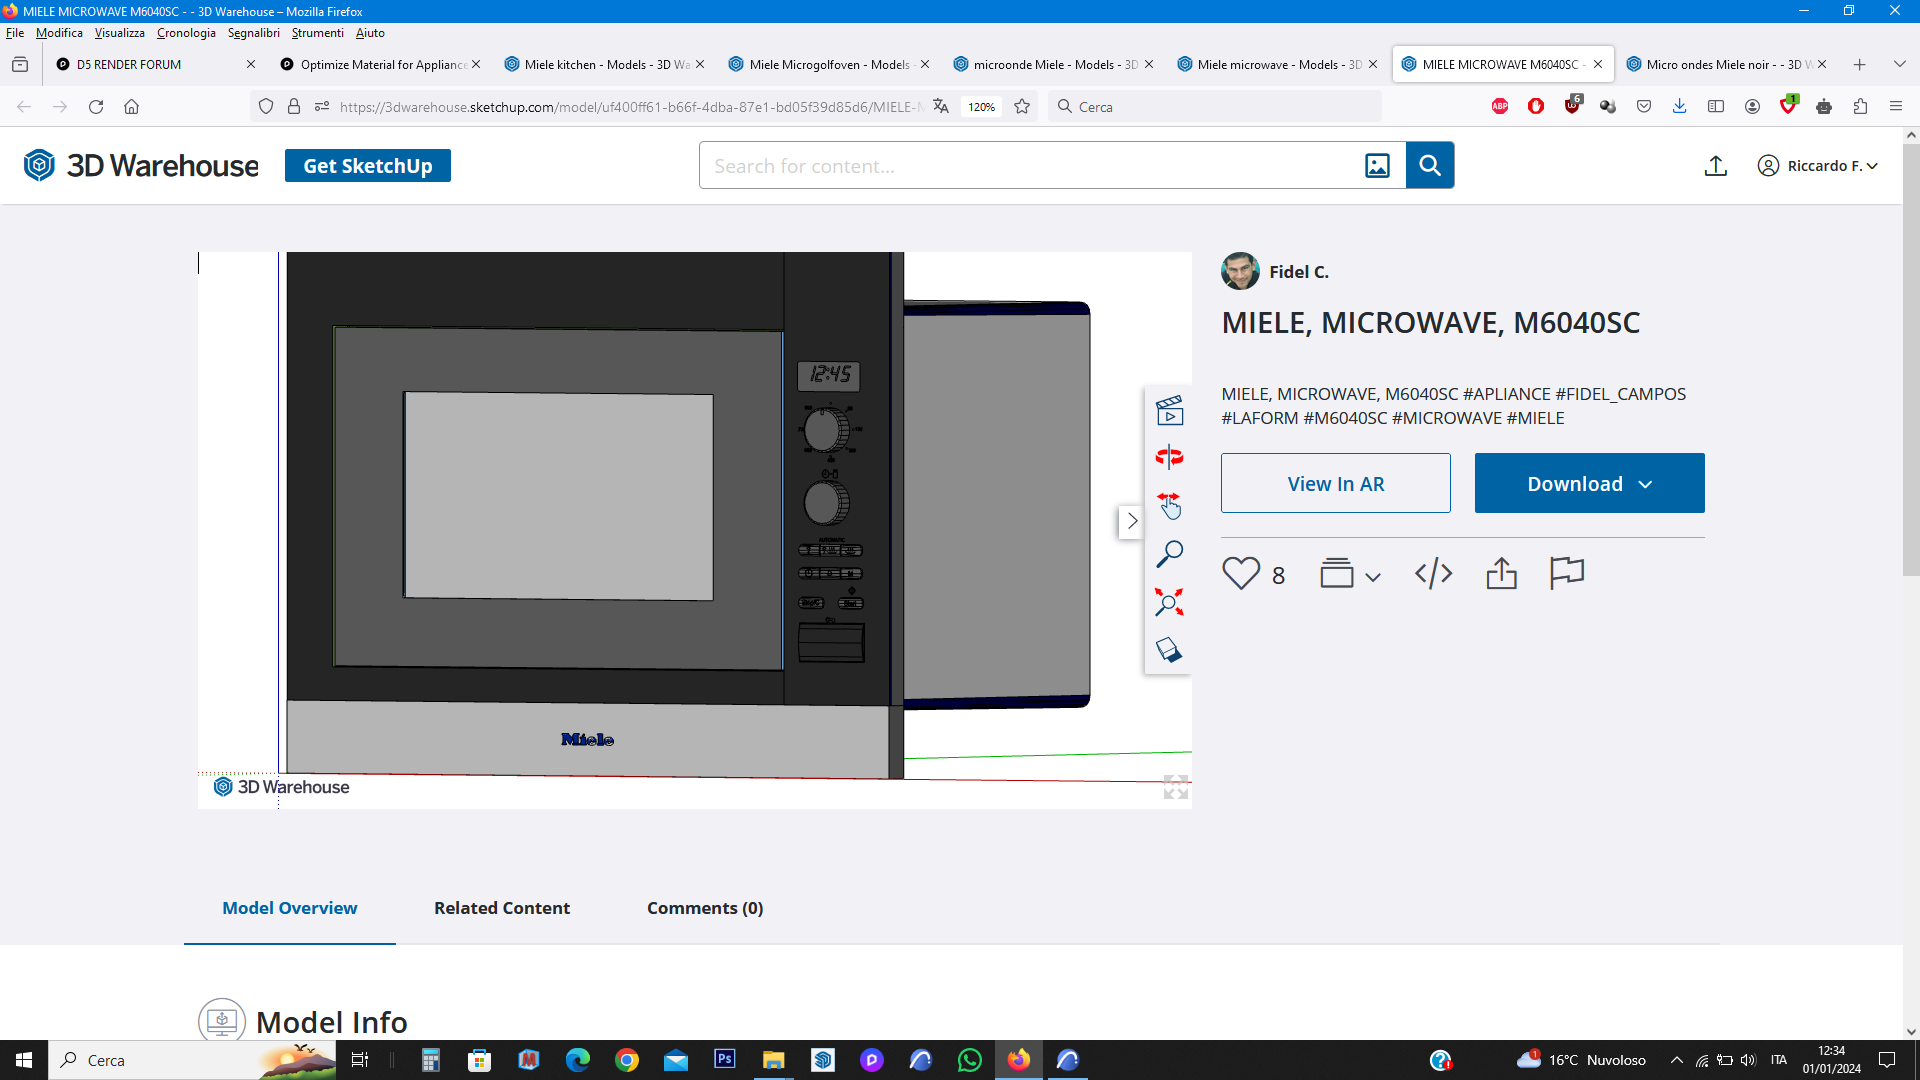
Sorry for the parenthesis, returning to the topic of the household appliance which is a great ‘Miele’ brand which I also often use in kitchens, I get it from 3D Warehouse
the oven and I insert it into the graphics program I use, for now ‘Archicad’, then I synchronize it, give it a little shine to the oven and a little light to the clock frame. I explained this yesterday, I never change the materials of objects, but I just give an adjustment. If glass bothers you, you can eliminate it by bringing it to zero with fabric or foliage material.
But for the clock image it seems to me that the properties of the size of the x - y scale of the image needs to be adjusted, so I never touch the object, only in rare cases I do it, just because I like that type of essence or color.
In the end you have to select the clock image go to the color make it darker or adjust to your liking, then give it less light but with temperature 3000, go to the scale of the clock image, unlock the size, only change one direction, Don’t touch the other one, you will see an improvement.
From here you can download the Miele object:
Open it SKP and give it the materials and fill the watch with emissive luminous texture, be careful, correct the object, the writings on the watch and the Mieli brand, they must be filled, then check the materials that are not set well throughout. object, both external and internal. Then insert it into your kitchen, you will see by adjusting with D5 it will be fine
I know it’s a lot of work, Strength and Courage
I hope I helped you, it’s Happy New Year again
Hello @riccardofortelli thank you for your response and Happy New Year to you as well !
In response to your suggestions, the Miele microwave was custom modelled already and edited through Revit (to note, Revit is the architectural drafting/modelling program I generally use) then imported into the overall kitchen model with the materials edited and optimized. So after optimizing the materials in D5 “Test_IMAGE19b” does showcase success with this situation, however, with some flaws still existing.
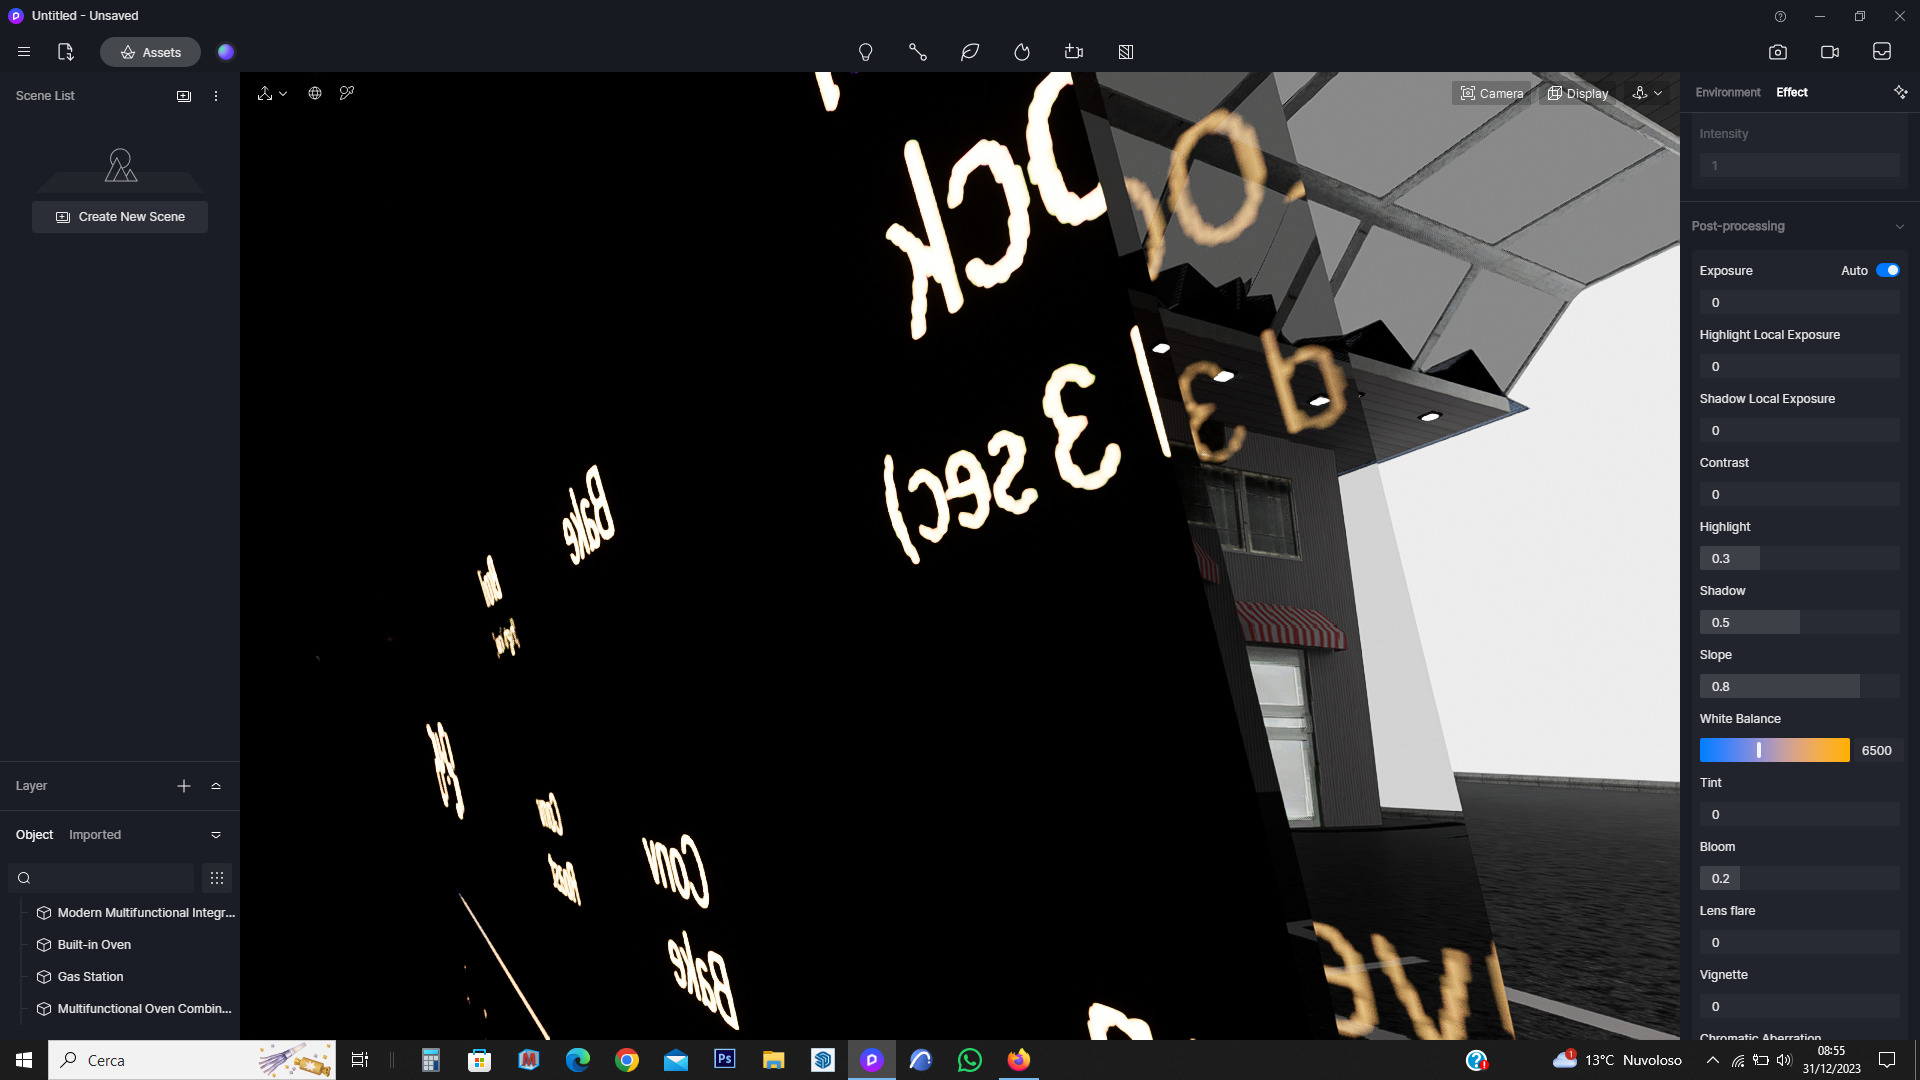
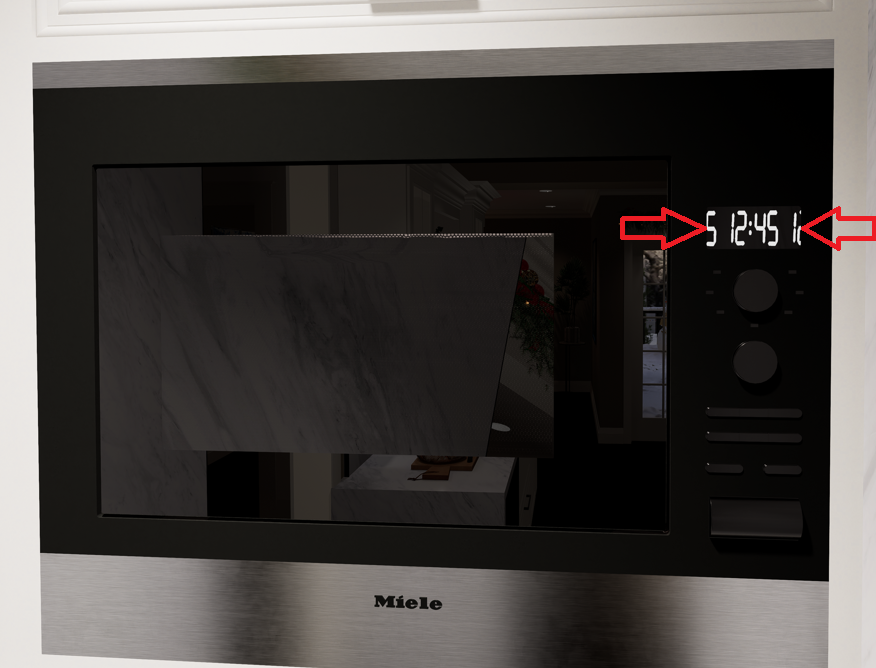
- The image used to create the clock time texture material is being “tilled” (repeated), so when I adjust the size of the time properly you can see the repeated image at the edges of the time display. This is a problem…
- The emissivity of the clock seems to be illuminating the clock glass display causing it to look more bright then it should be… (this I think I can fix by optimizing the settings)
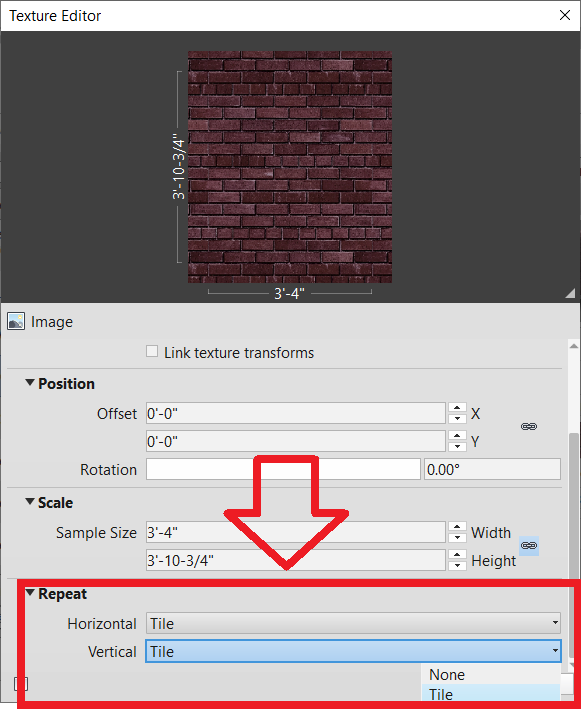
If someone can help me with the 1st problem this would be spectacular !!! I just want the material image to not “tile” (repeat) since this is a huge HUGE problem for someone like myself. D5 MUST have a setting to avoid this otherwise the program has a deficiency that MUST be corrected. Revit for example has a selection drop down in the texture editor should you want a texture to be tiled or not. (see “reference.image.6”) It should be this easy in D5 as well.
Any help would be great. Thanks in advance !
Hi! Sorry for my late reply.
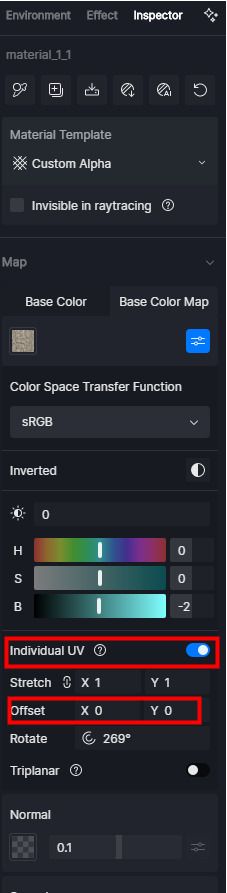
I suggest that you open the individual UV and adjust the offset, which can help you move the location of your texture.
The answer from
riccardofortelli is also very helpful.
1 Like
This issue required many adjustments. I will list them for anyone in the future struggling with the same issue.
- The glass display must be modelled thin not thick. The thicker the display is modeled the more light it can absorb making the render appear unrealistic.
- There must be a separate material plane modelled behind the glass display so that a separate material from the glass facing material can be applied. (this becomes the “time” material)
- Ideally a backing material should be 3d modelled behind the time/clock material. This is a separate plane from both the glass display and time material. This material should be a matt material that does not reflect light. In total there is 3 different material planes but possibly 2 planes can also work.
- The glass display material should have a very low “Specular” setting (0.05 or less) and “Refraction” (1.05 or less).
- The base color of the clock material must be pure black and ideally have a zero value (0) set for the “Specular” setting. Emissivity should also be set fairly low but this is optional based on preference of how much you want the time to show.
Hello @riccardofortelli, thank you for your response. I agree with your thoughts many adjustments need to be made to various things such as the 3D model itself and material parameters in order to achieve a successful render. This includes edits made prior and after importing into the rendering program (D5 in this case). But that is just the thing, I know what setting I need to make the final adjustment, however, I cannot find this setting… This is why I am asking where this setting is. If anyone knows how to prevent the texture image from “tiling” (repeating) itself this would correct the issue. In any case, thank you kindly for all the assistance you have provided thus far, it is greatly appreciated.
@LunaLang Thank you for your response. Any help is always appreciated. I understand the offset parameter well and have been using it to help me with this issue, however, it is not capable of correcting this issue on its own… As soon as the clock texture is sized properly and offset so it is center to the clock display, the edges show the repeated clock texture… (see “Reference.Image.7b”) It is a simple adjustment that only requires setting the image so that it does not become “tiled” (repeated). If you know if D5 is capable of this setting or not please confirm so I can address this issue with D5 designers. Thanks in advance!
1 Like
Thank you for such a detailed response and advice. They are very helpful. I will convey your needs and suggestions to our team.
1 Like