Version:2.5.0.0824
Update time:2023-08-01
Release note:
- Multi-editor Editing
- Team Library
- D5 Studio
- Comments
- Member Management
- Data Analysis
Features
1. Multi-editor Editing
Preparation
-
To enable multi-editor editing, first you need to set up a team project library.How to deploy and manage team assets?
-
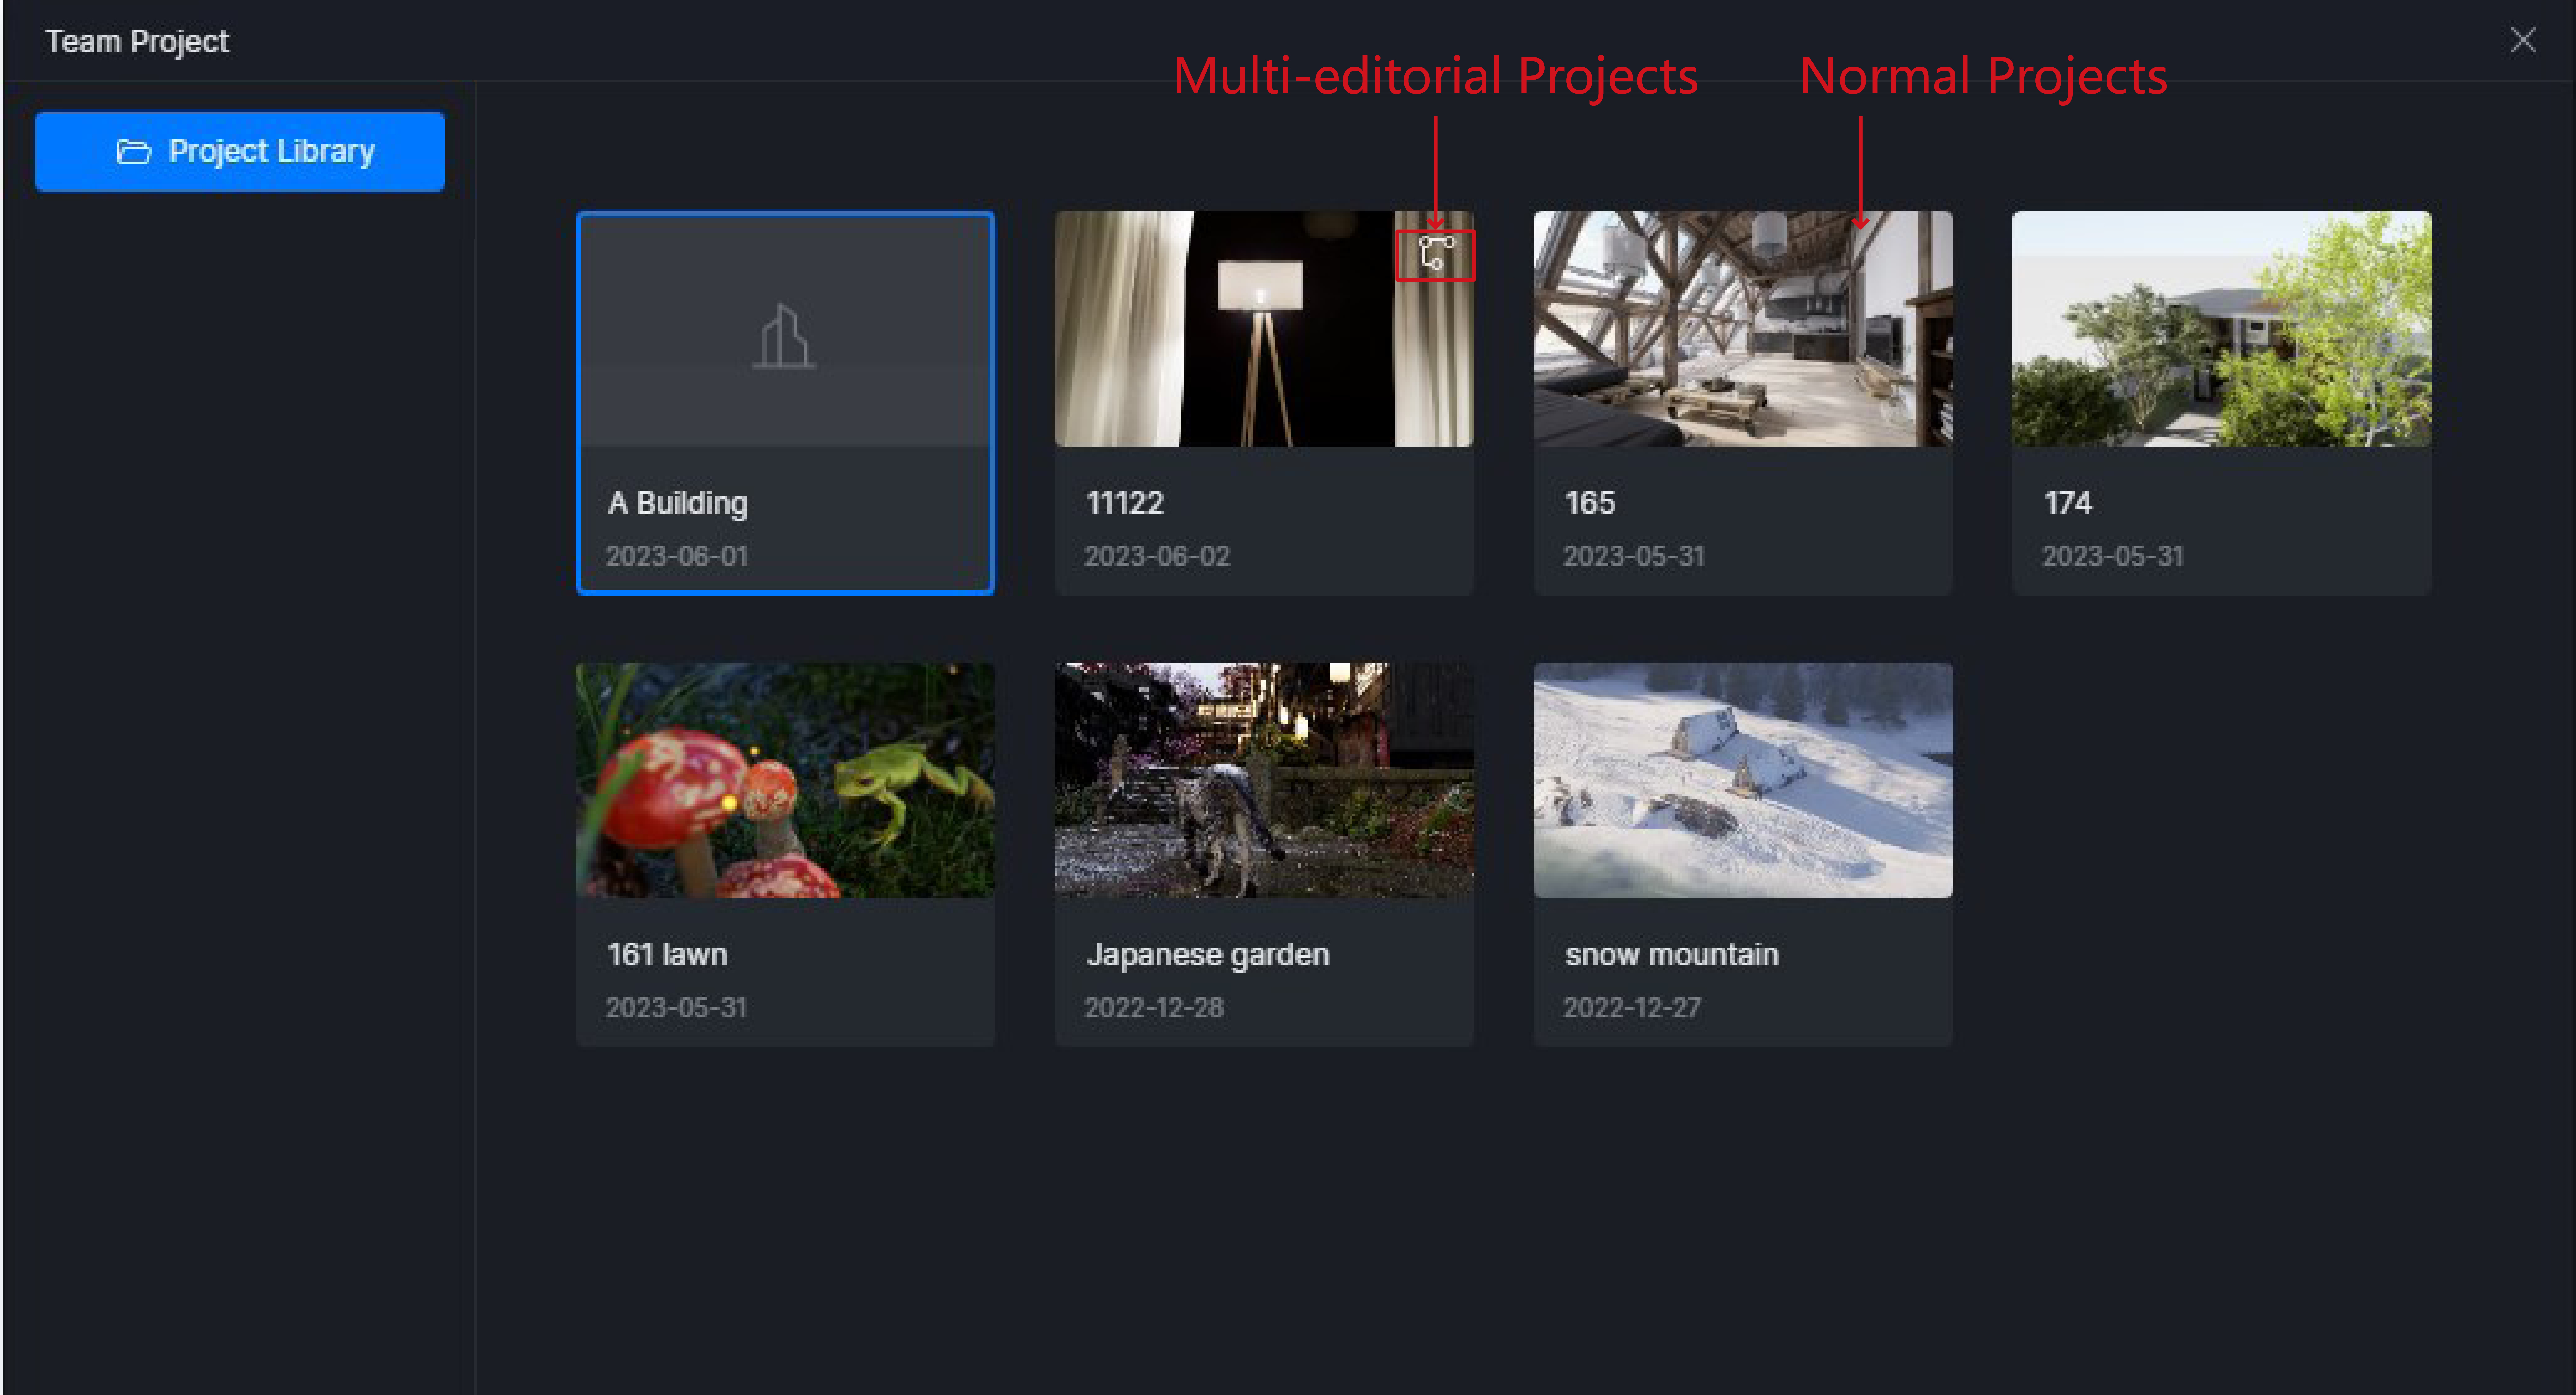
Team projects in the project library can be accessed by multiple members, but they can only be edited by one member at a time.
-
If multiple members need to edit a project simultaneously, you can convert it into a Workset and set which parts each member can edit and save to local.
-
Multiple worksets make up a central file, allowing multi-editor editing.
Convert projects to Worksets
-
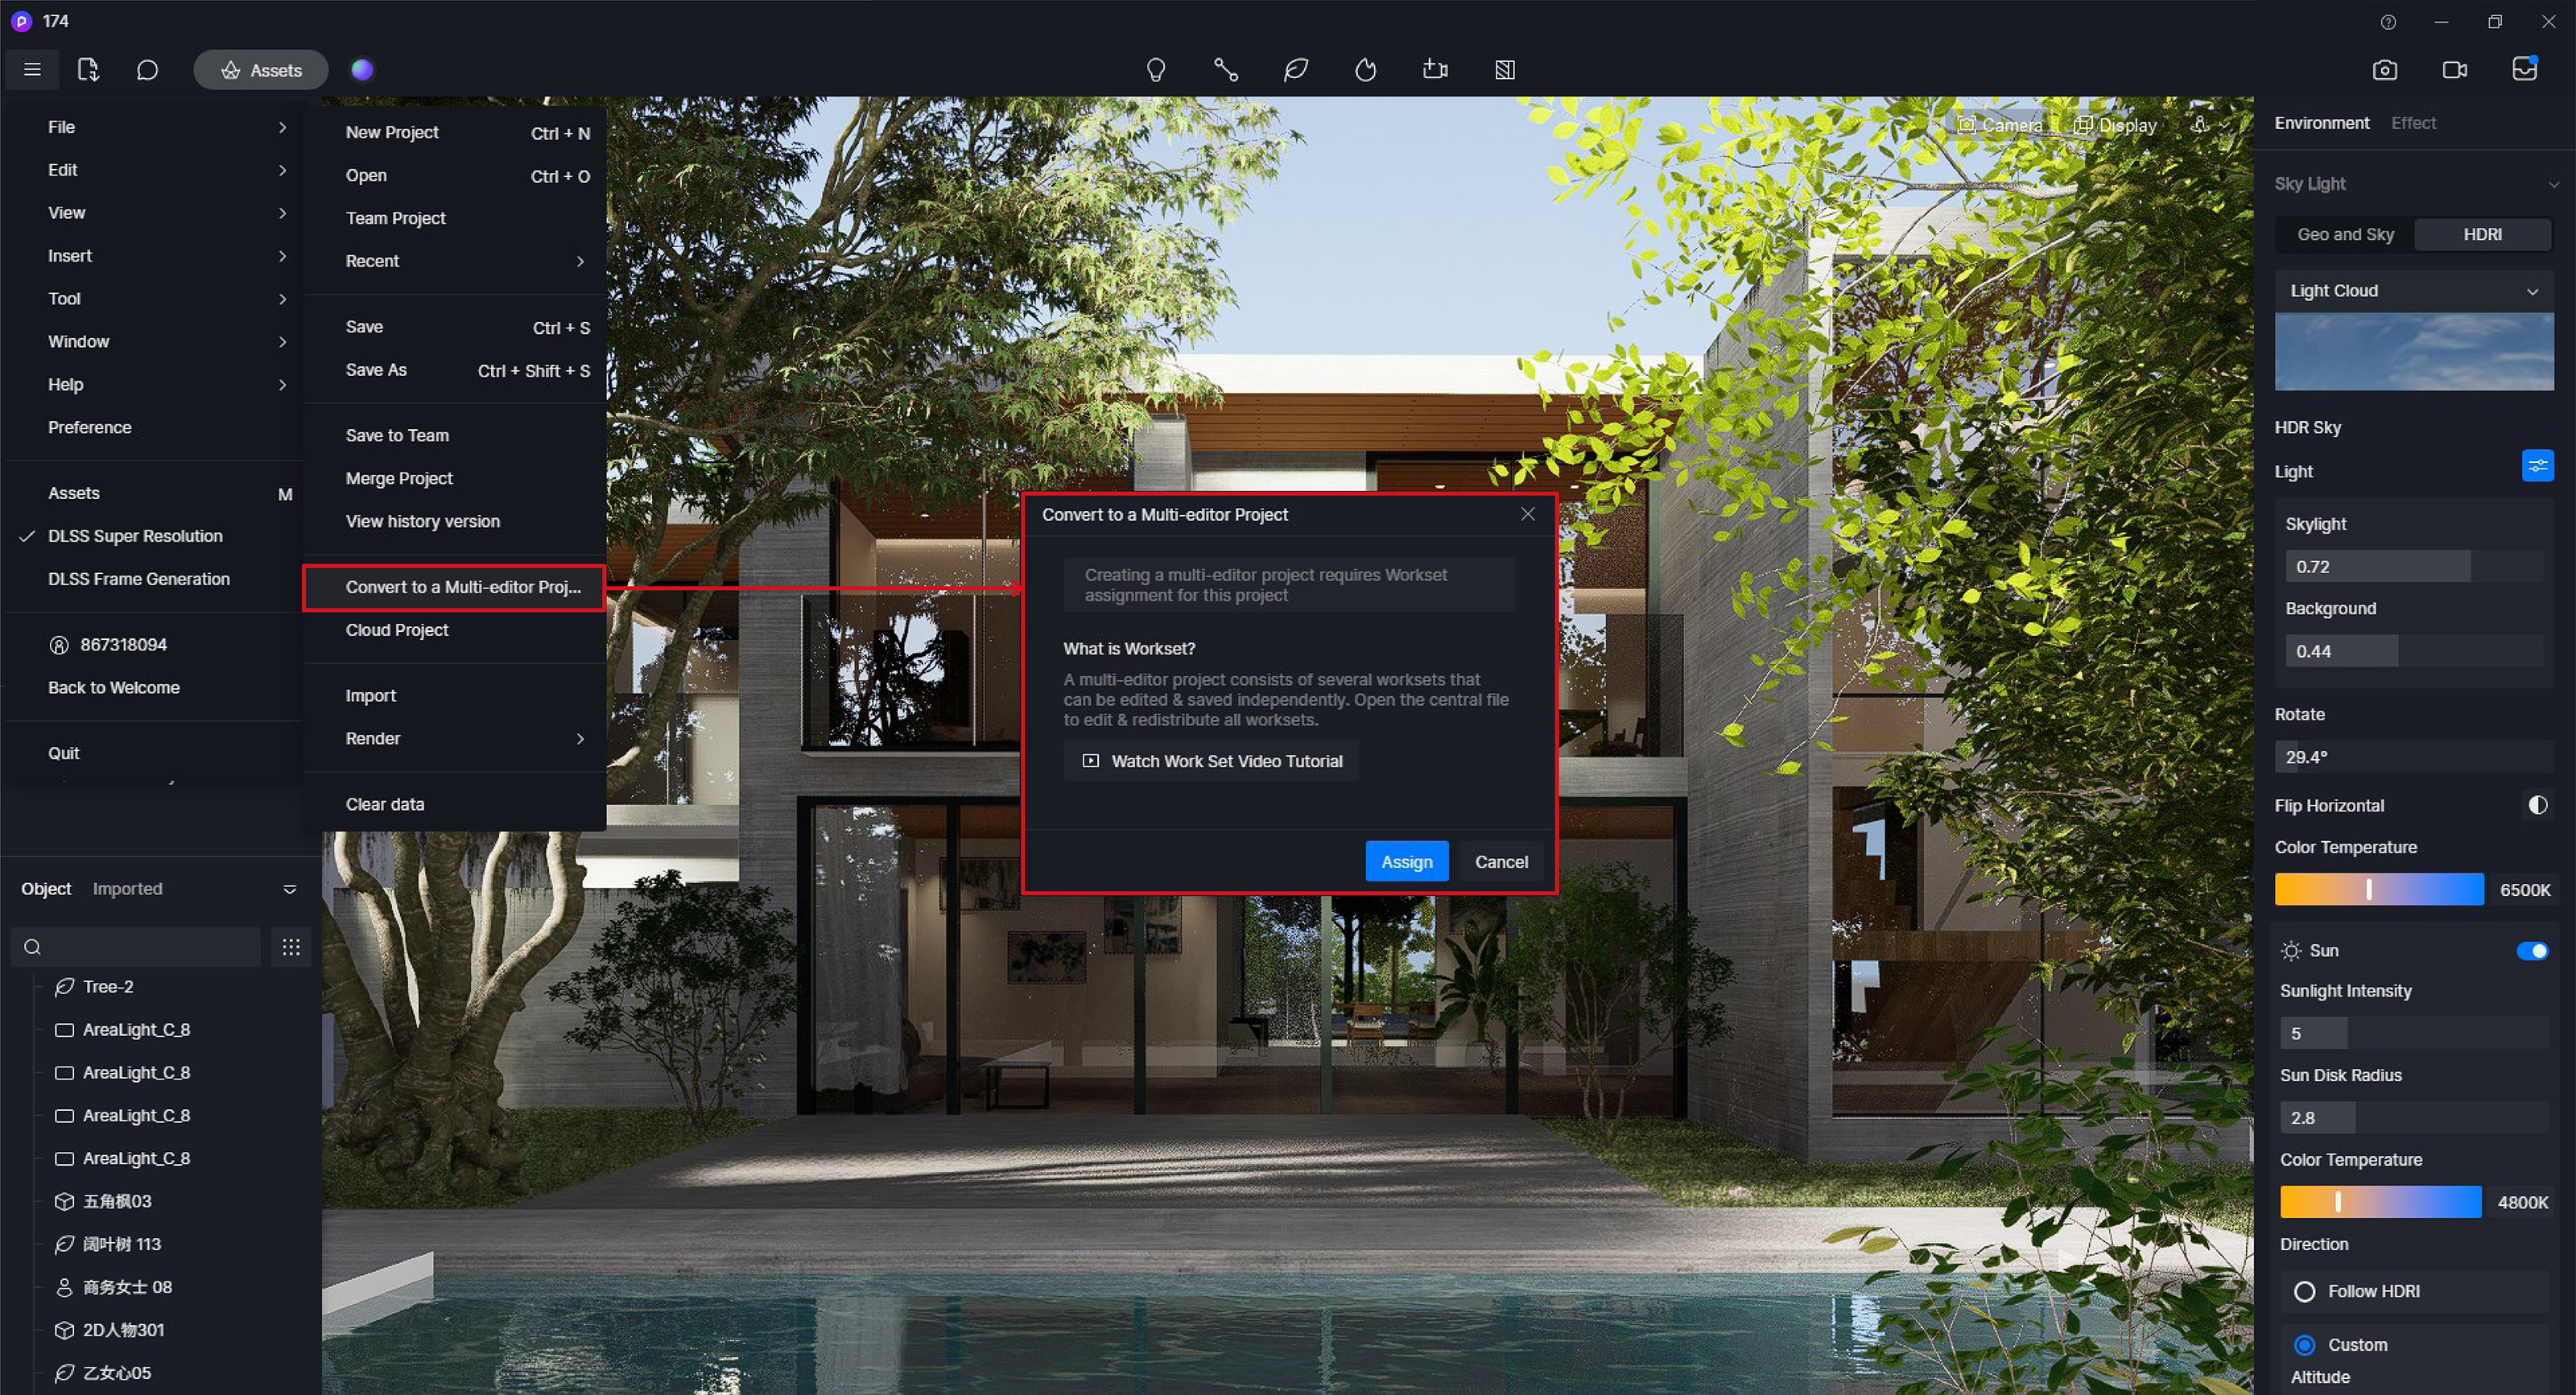
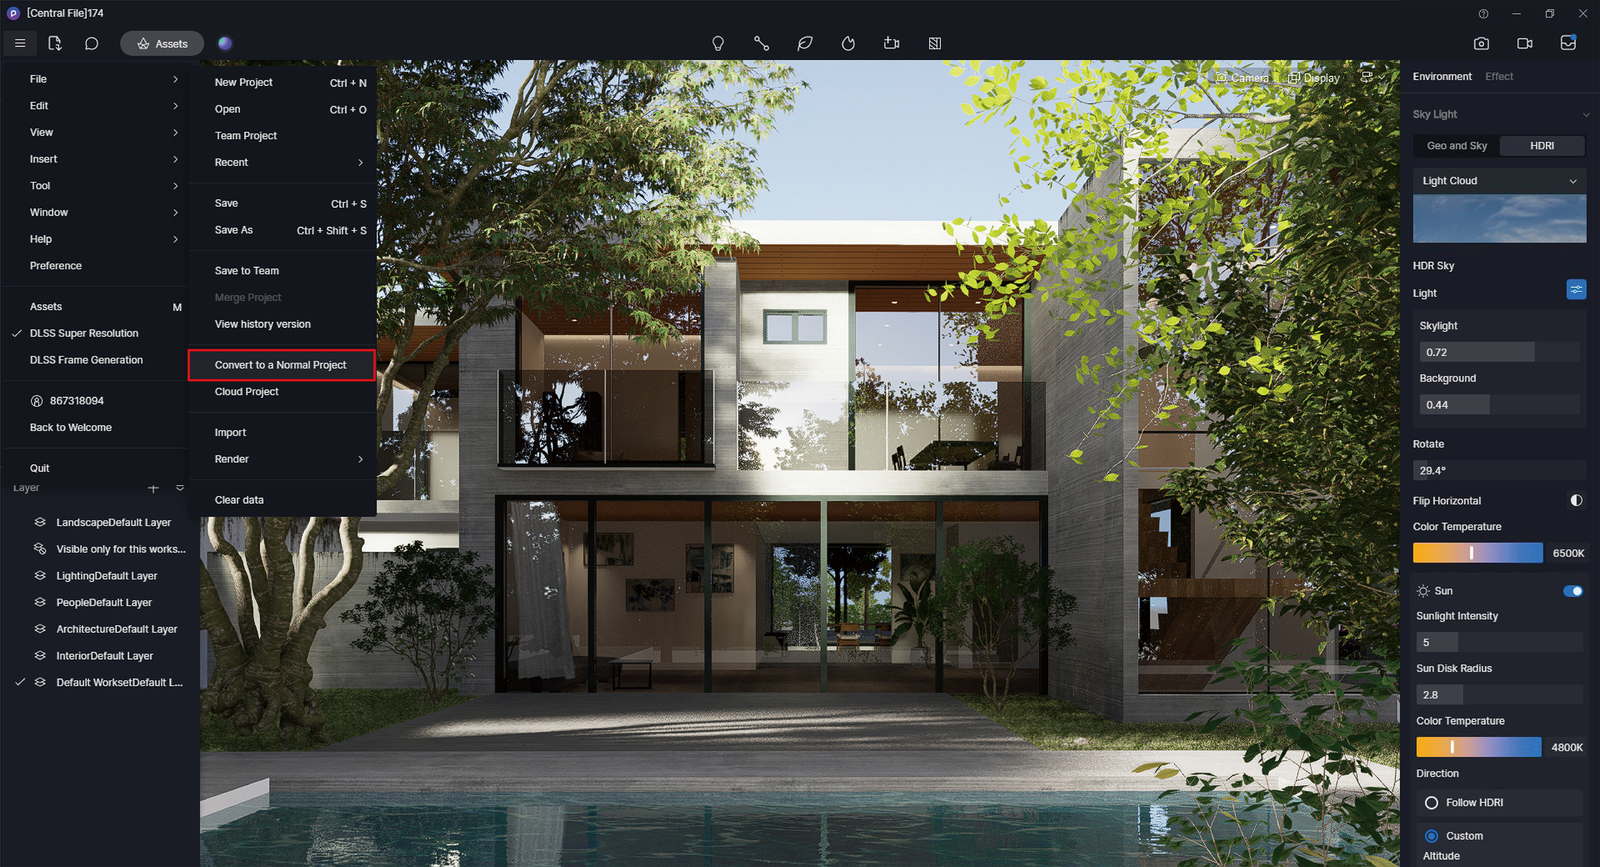
After opening a scene file from the team project library, you can select “File” >> “Convert to a Multi-editor Project” from the menu.
-
D5 Render will automatically classify all models in the scene file into the “Default Workset”. You can create custom worksets based on your project requirements and rename them, such as “Landscape”, “Architecture”, “Interior”, etc.
-
In the “Assign Worksets” window, you can assign default workset’s contents to custom worksets. Once the assignment is complete, click “Save & Convert project”.
-
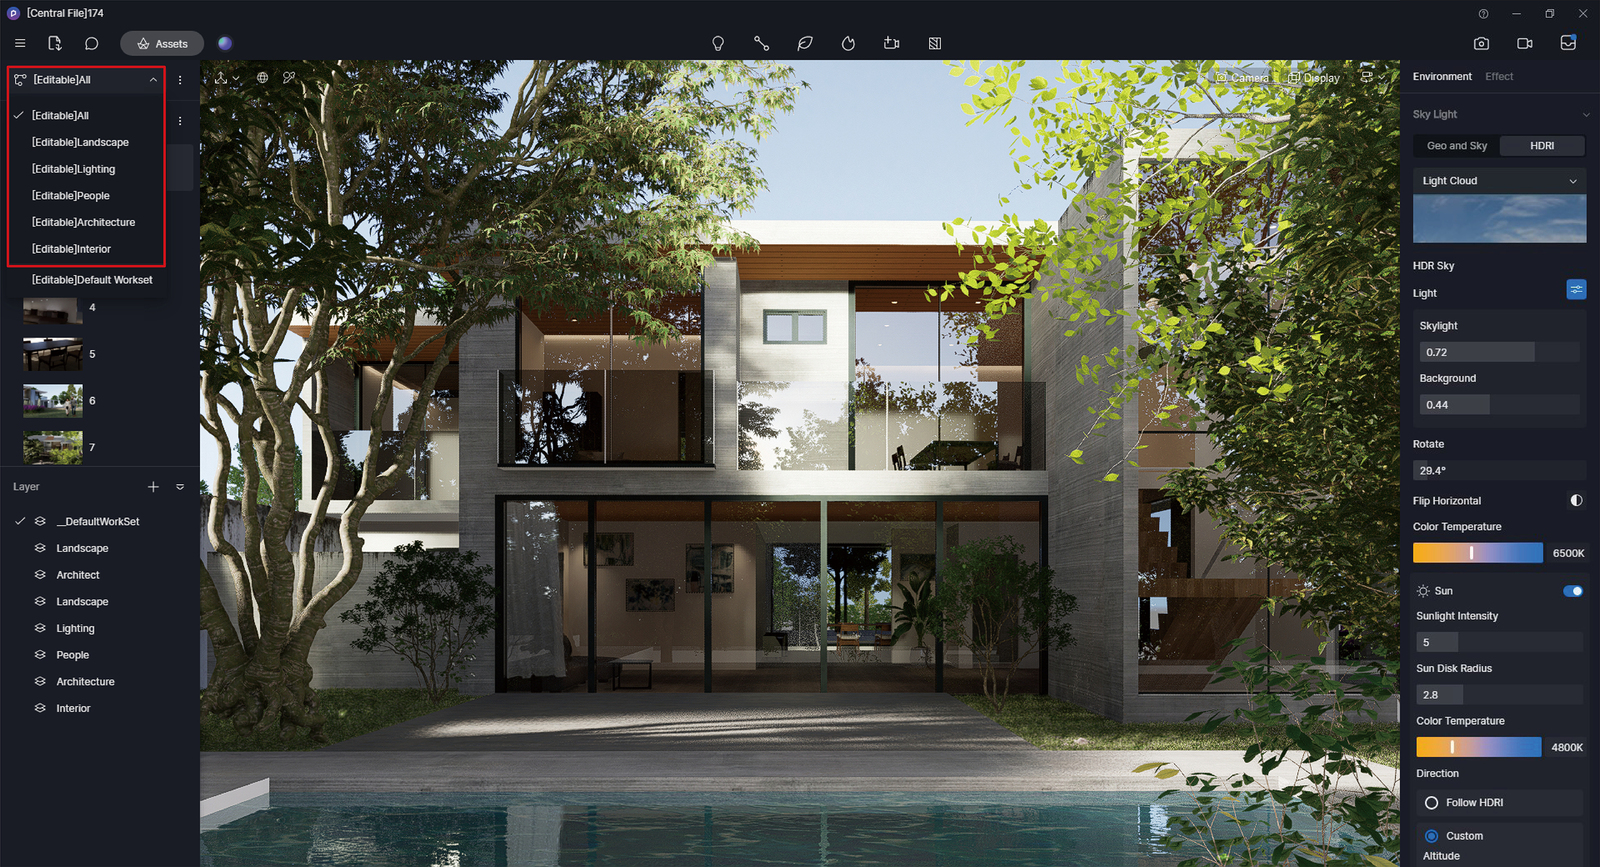
After saving, you’ll find more information about the worksets in the upper-left corner of the interface, and you can switch between different worksets. Once the workset assignment is complete, the central file will be in editing mode.


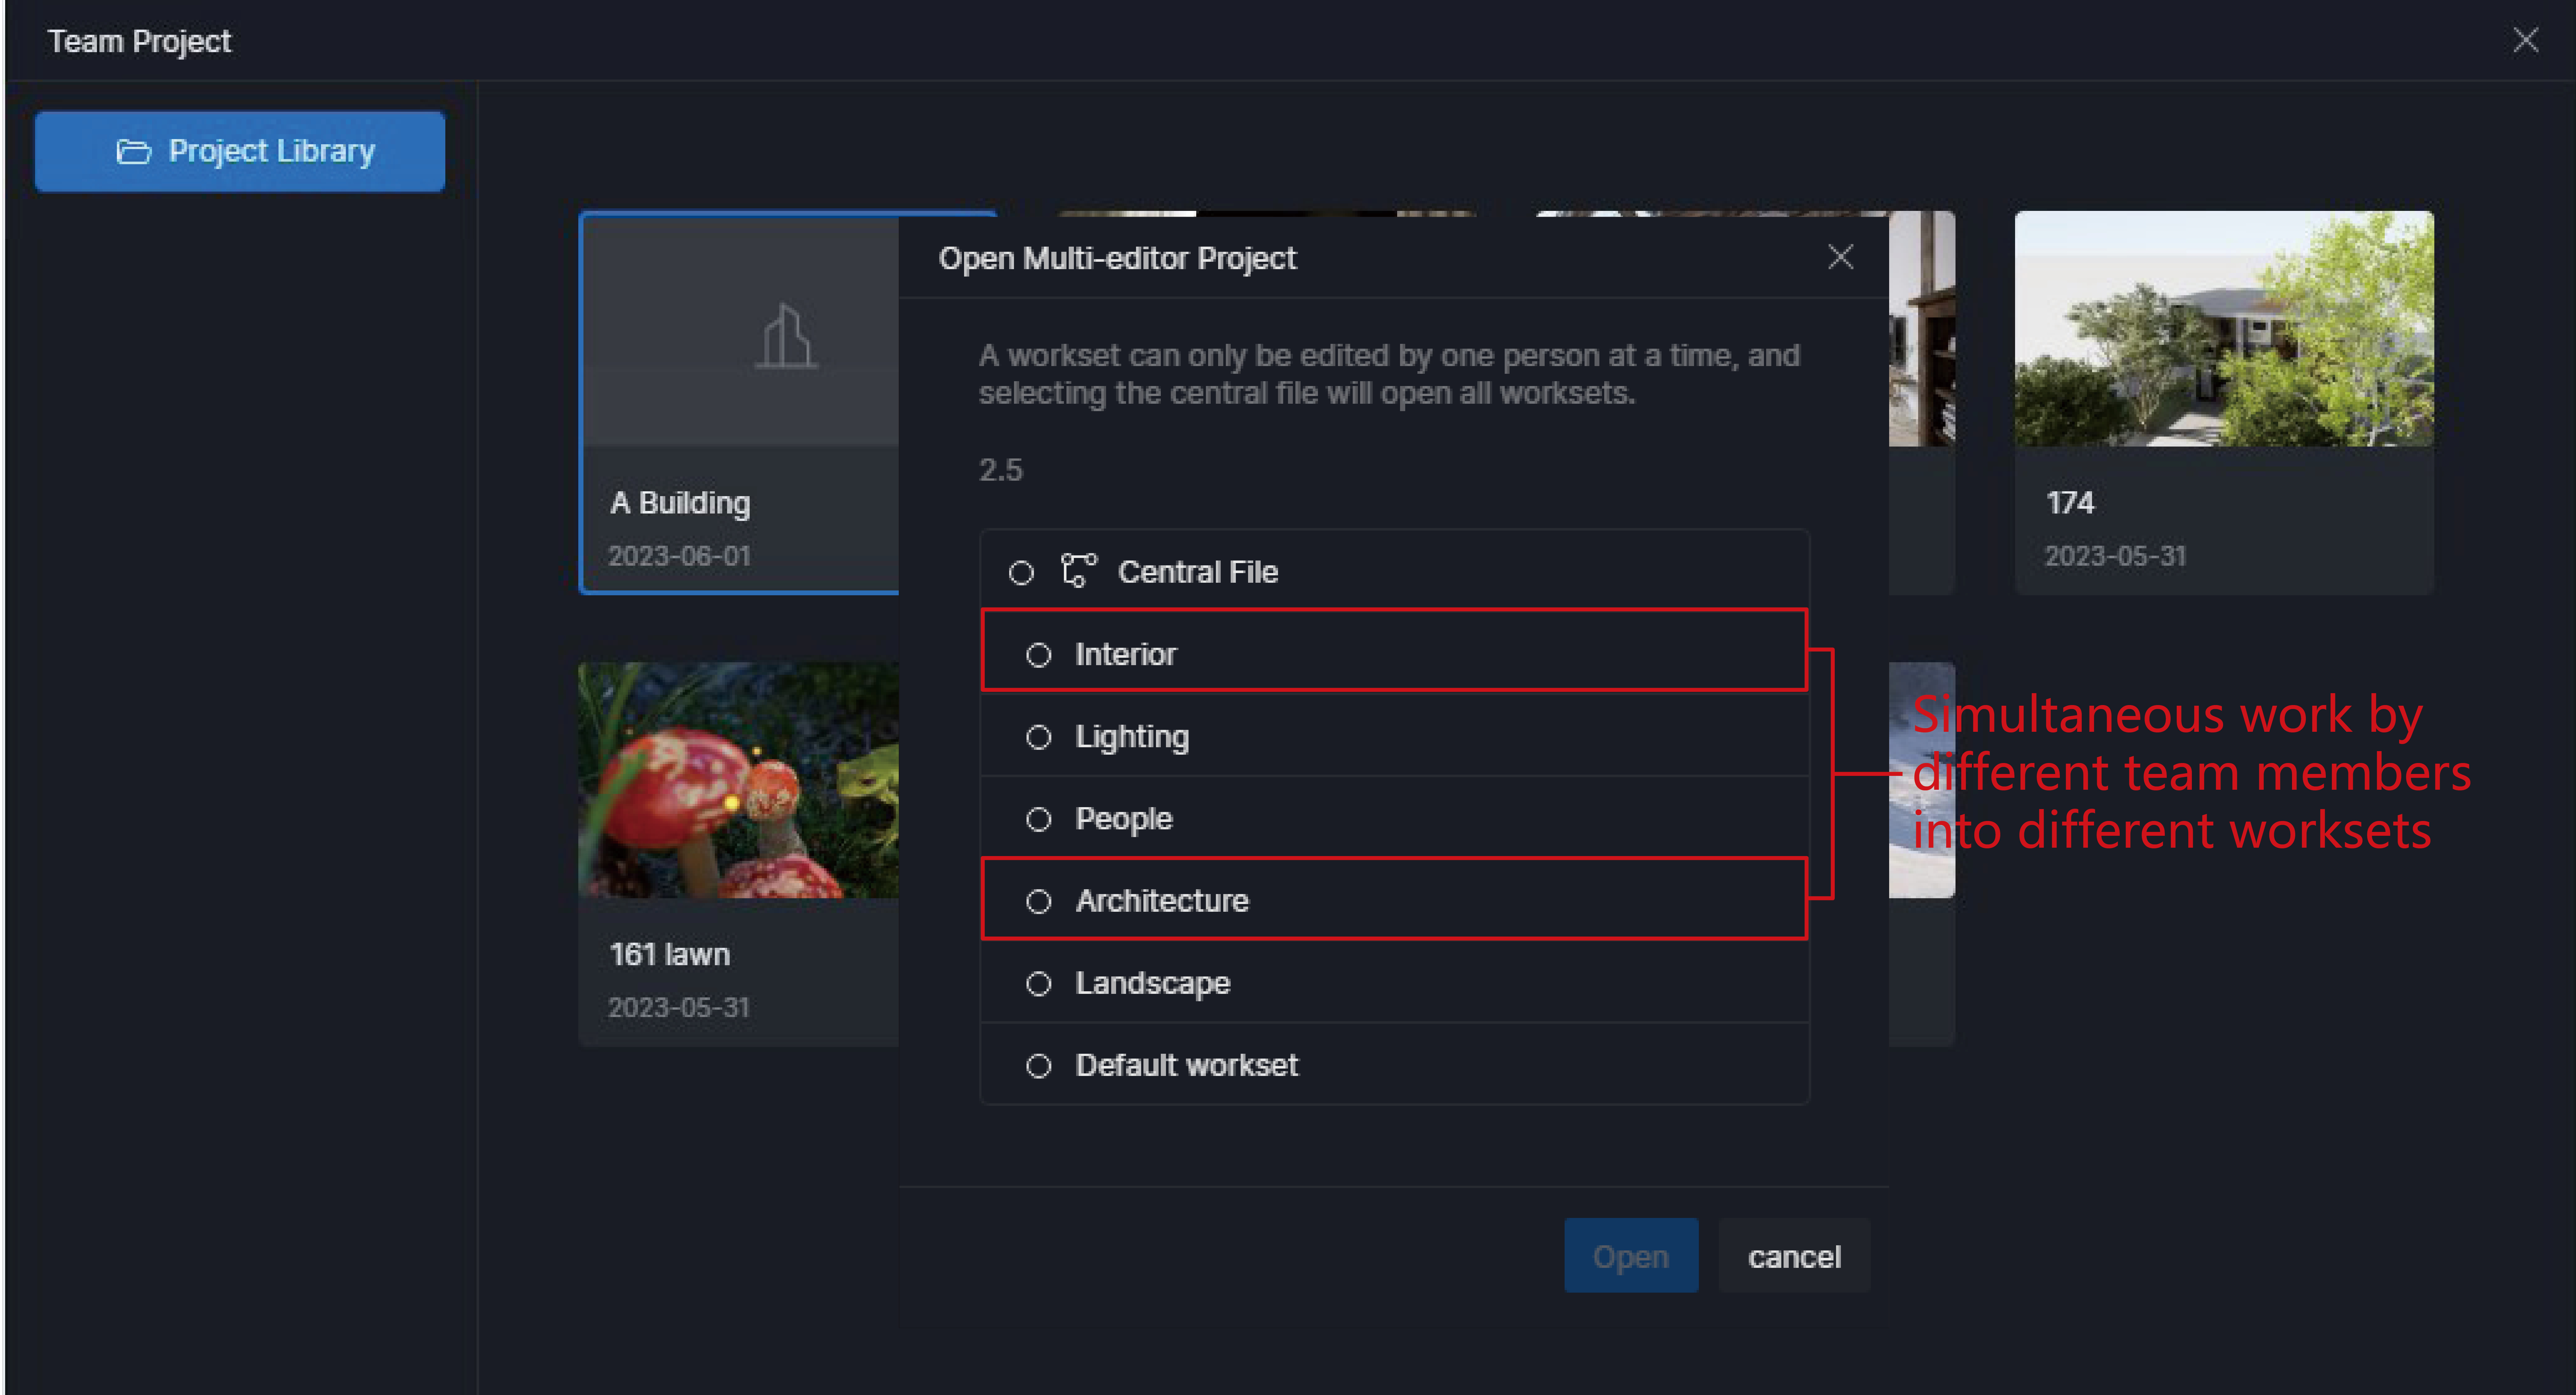
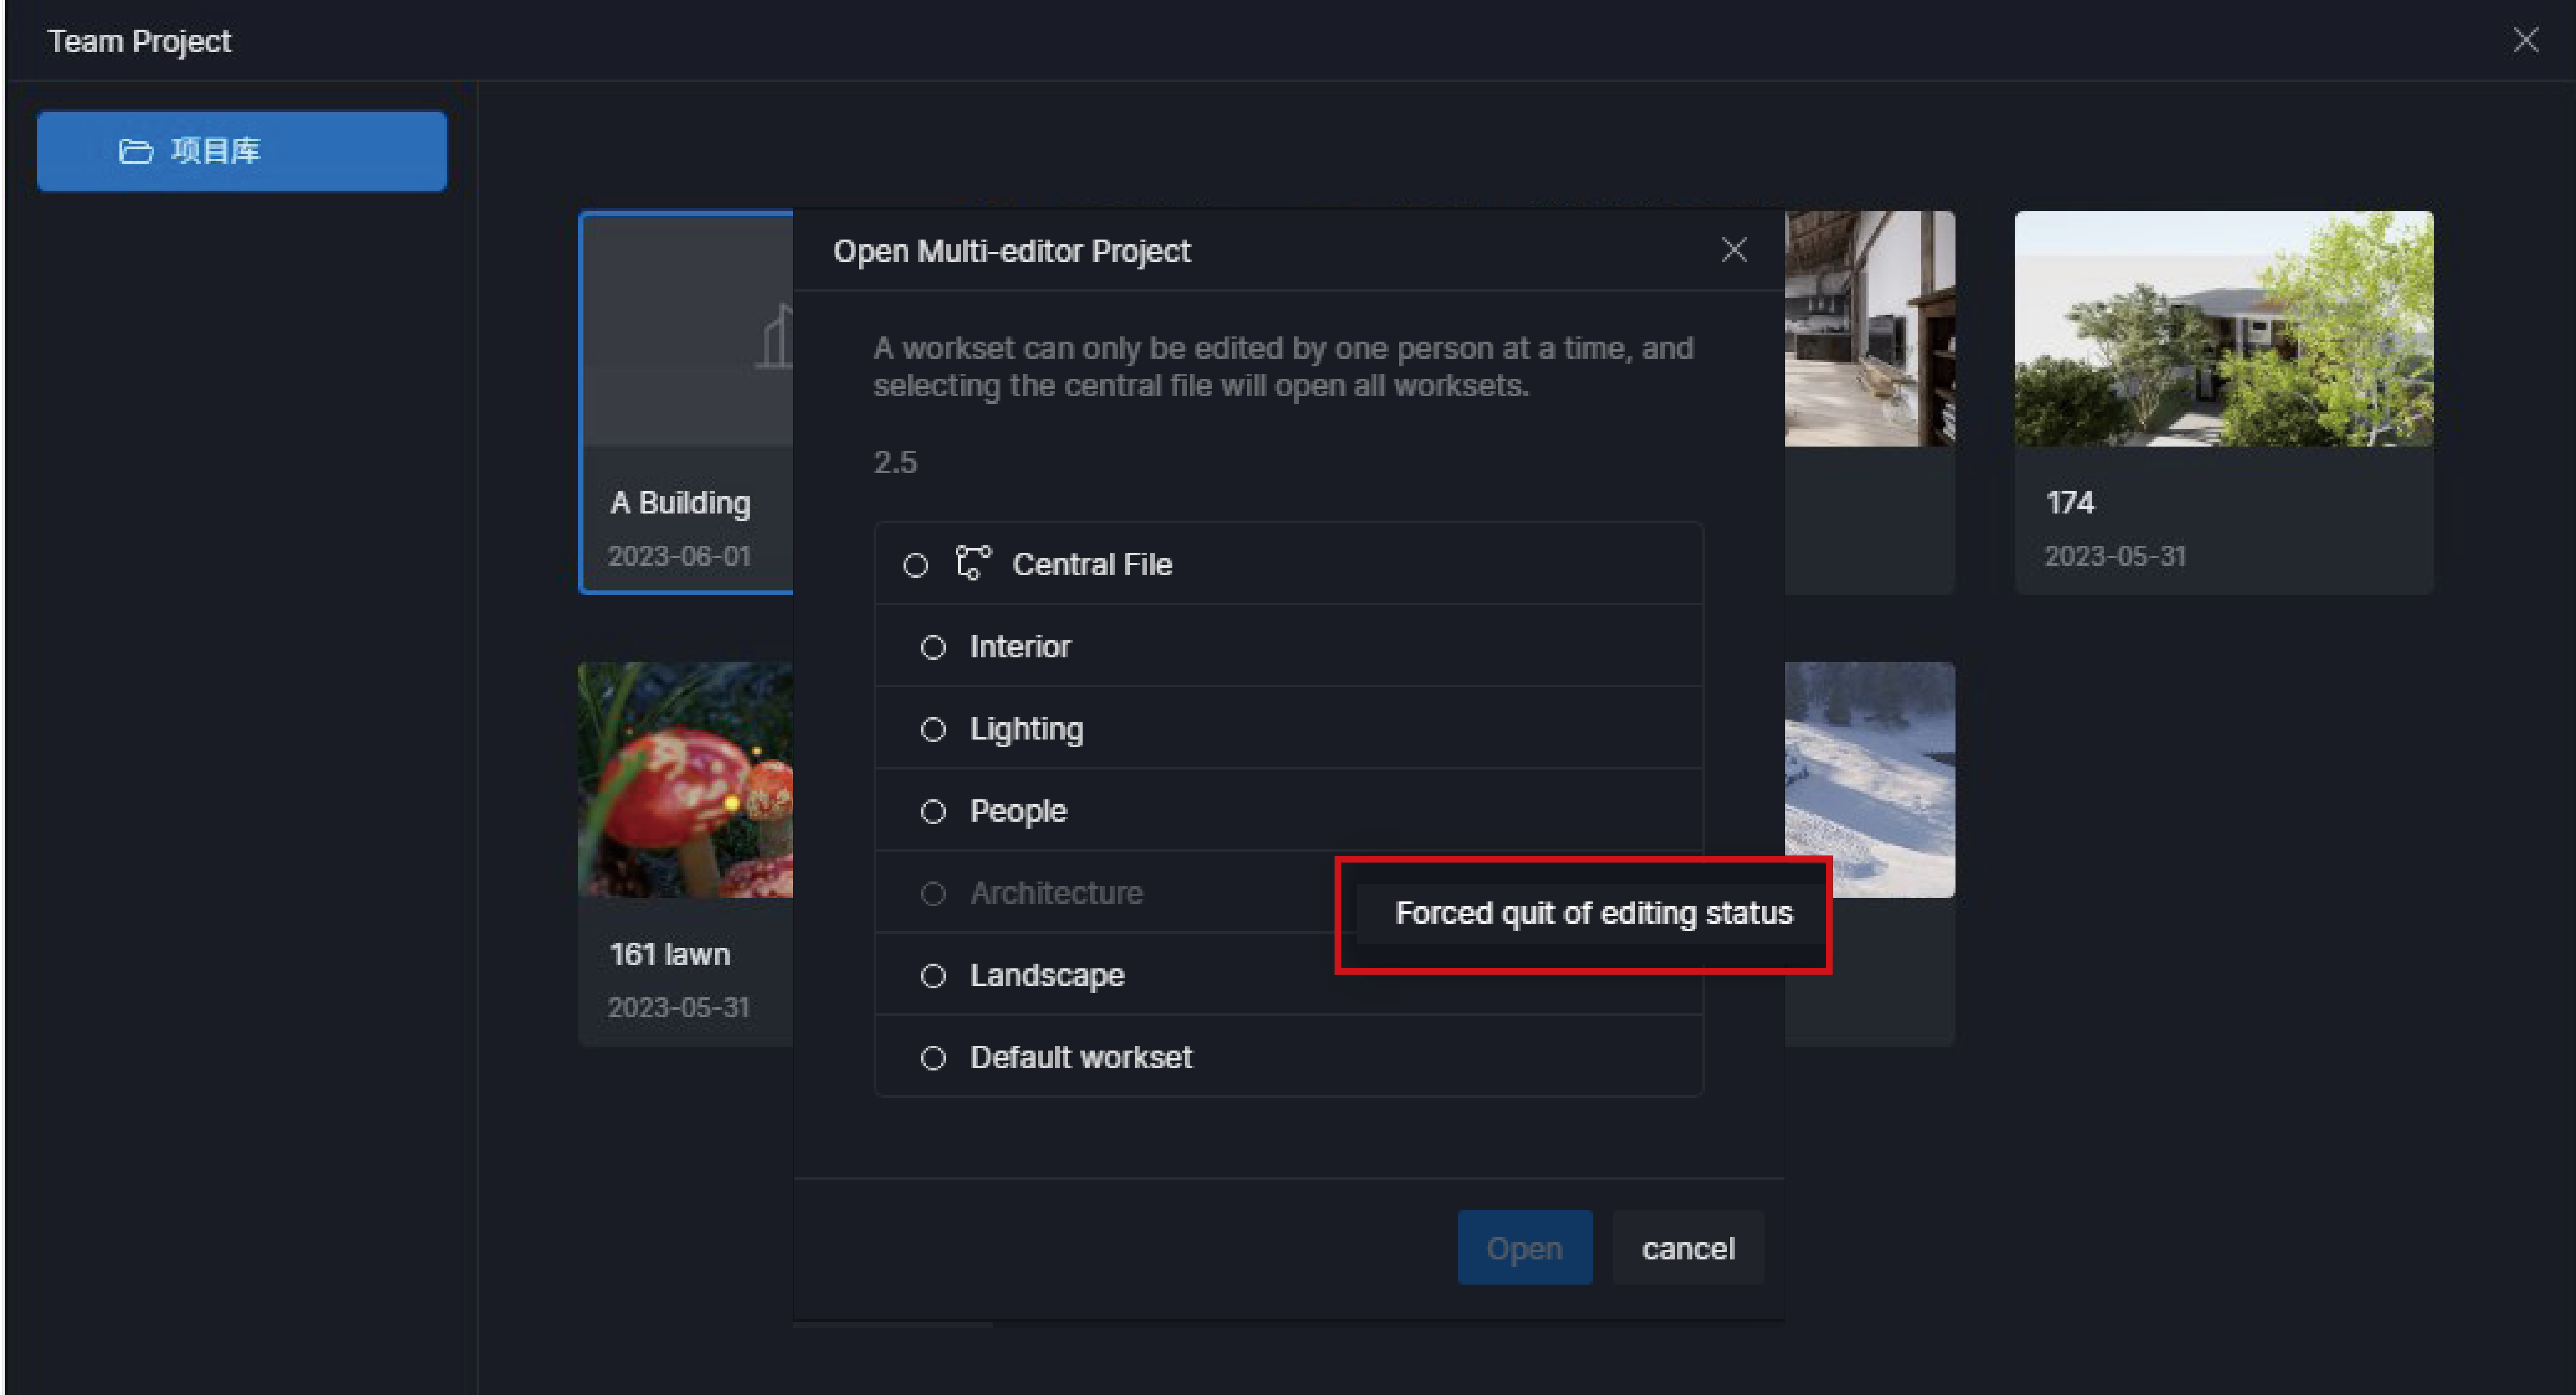
When the central file is open, other members of the team who try to open the multi-editor project will see the prompt - “The central file is in editing.”

Once you exit the central file, other team members can enter different worksets simultaneously.
- Open the central file to check and edit assets in all worksets, or make adjustments in time.

Edit and Manage Worksets
-
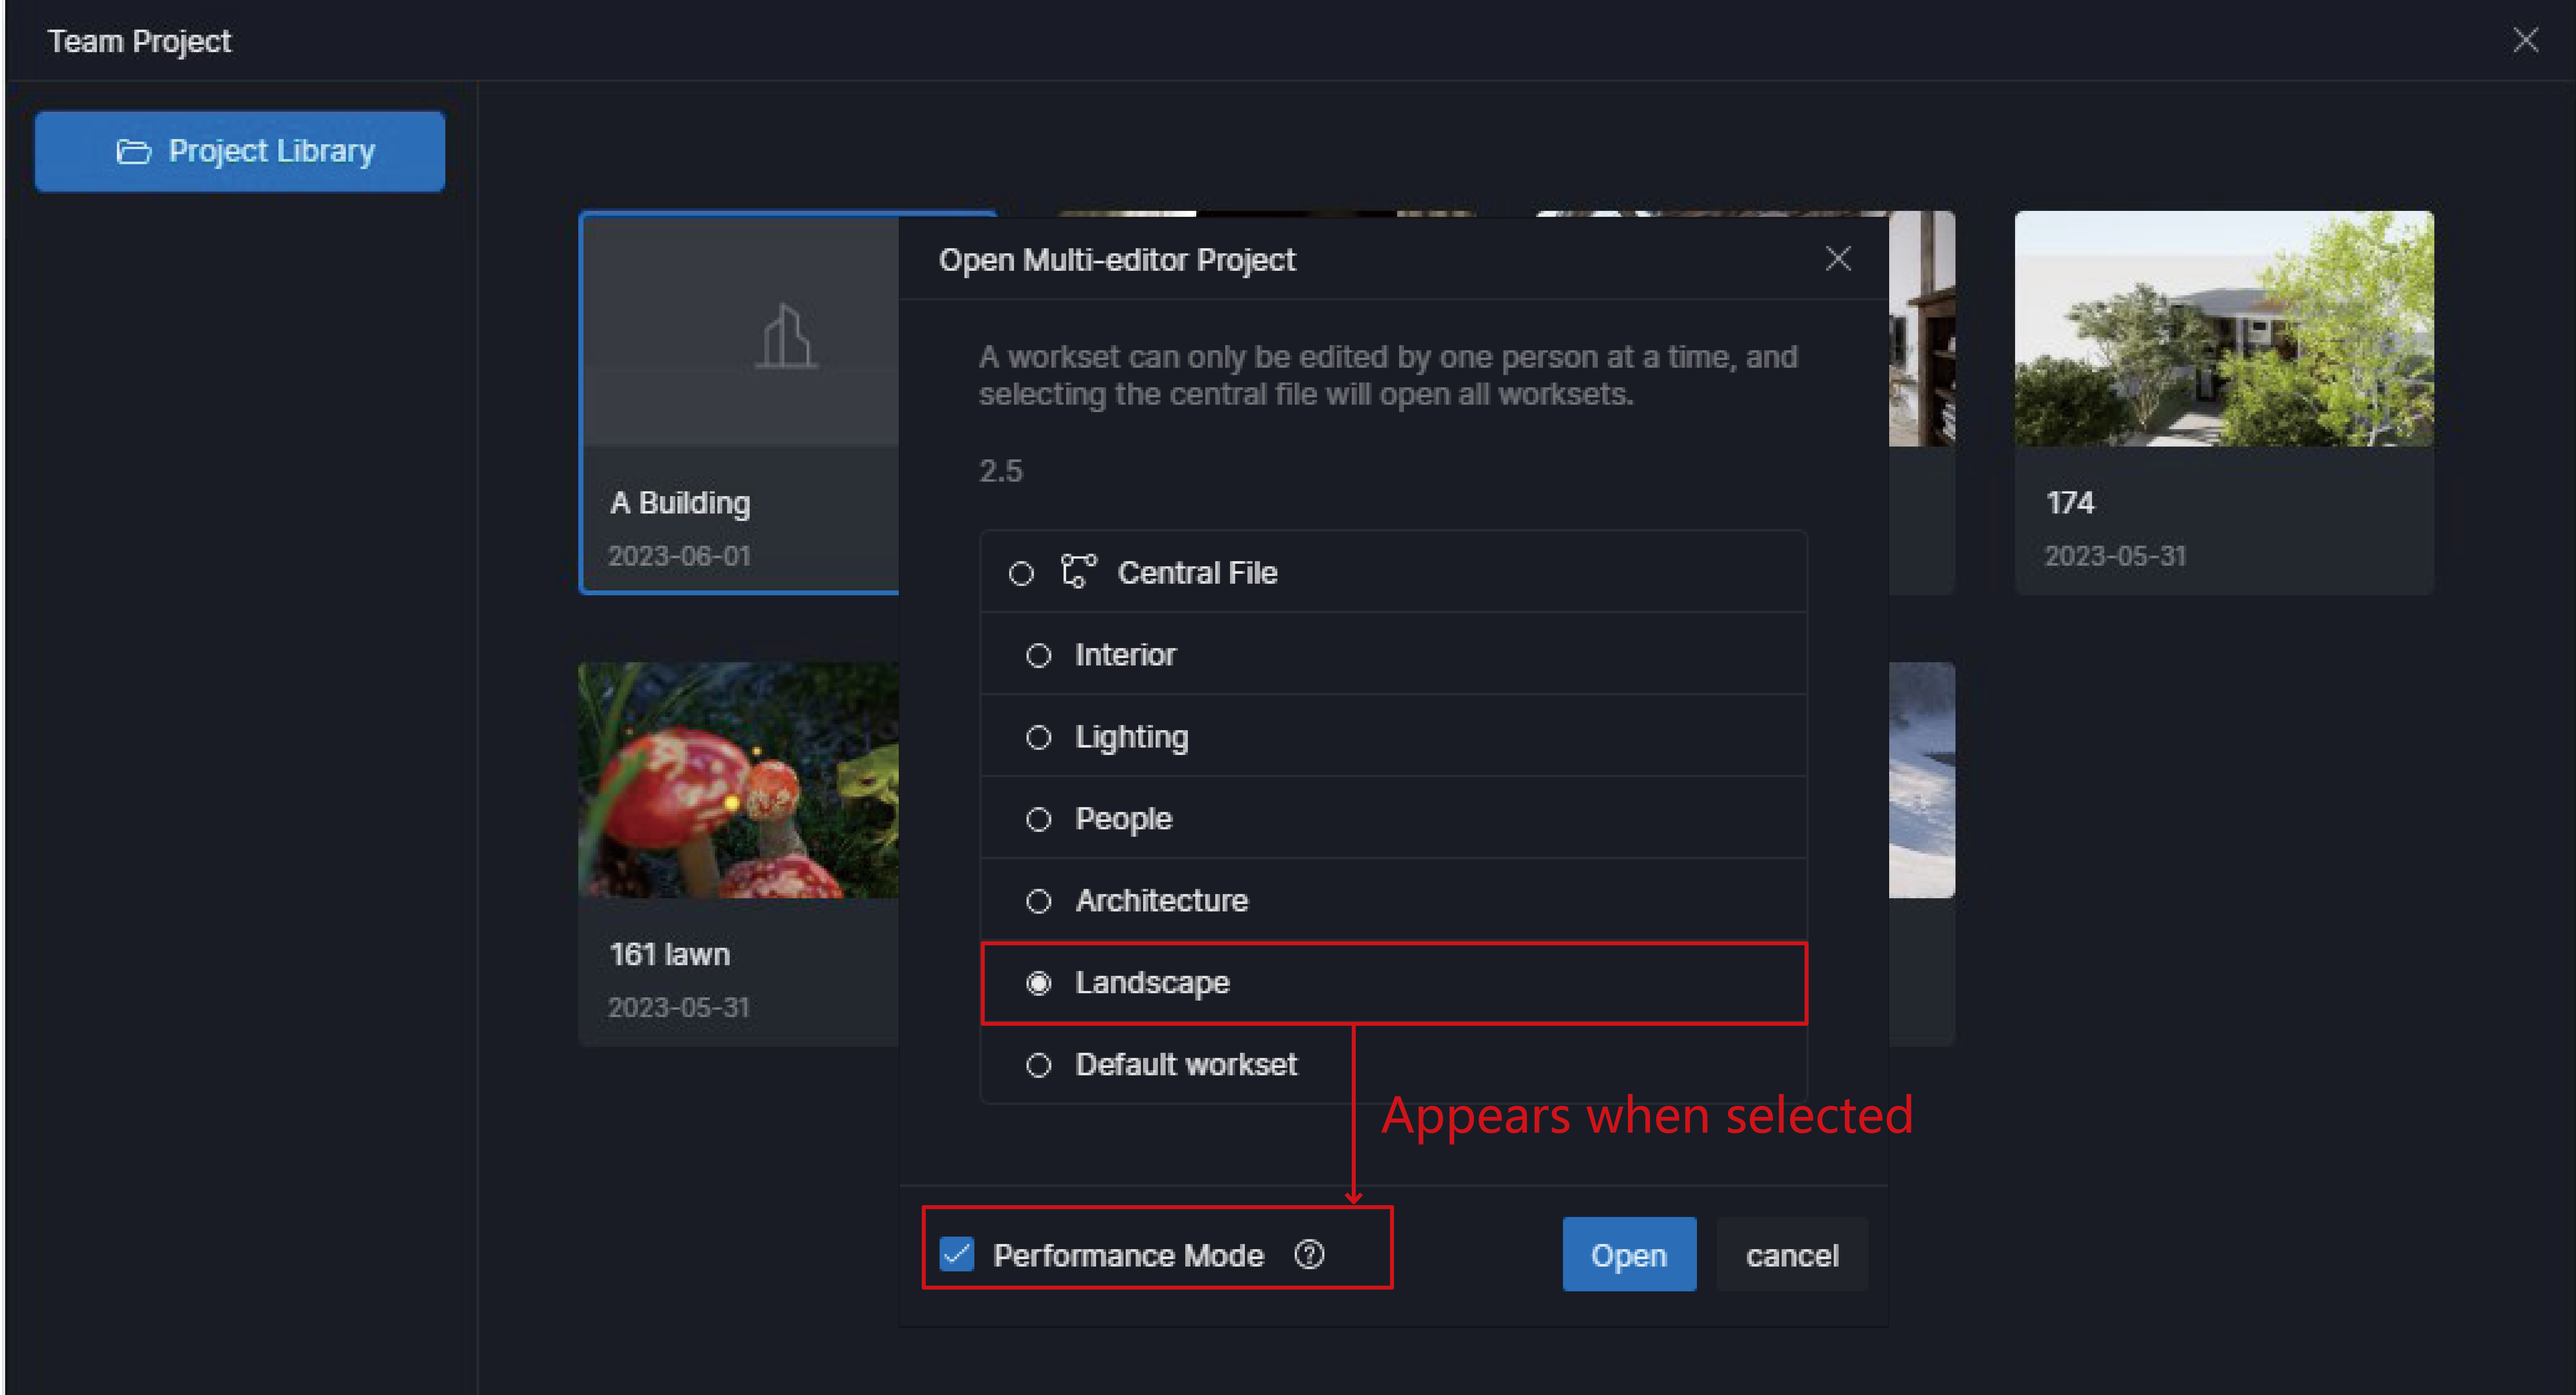
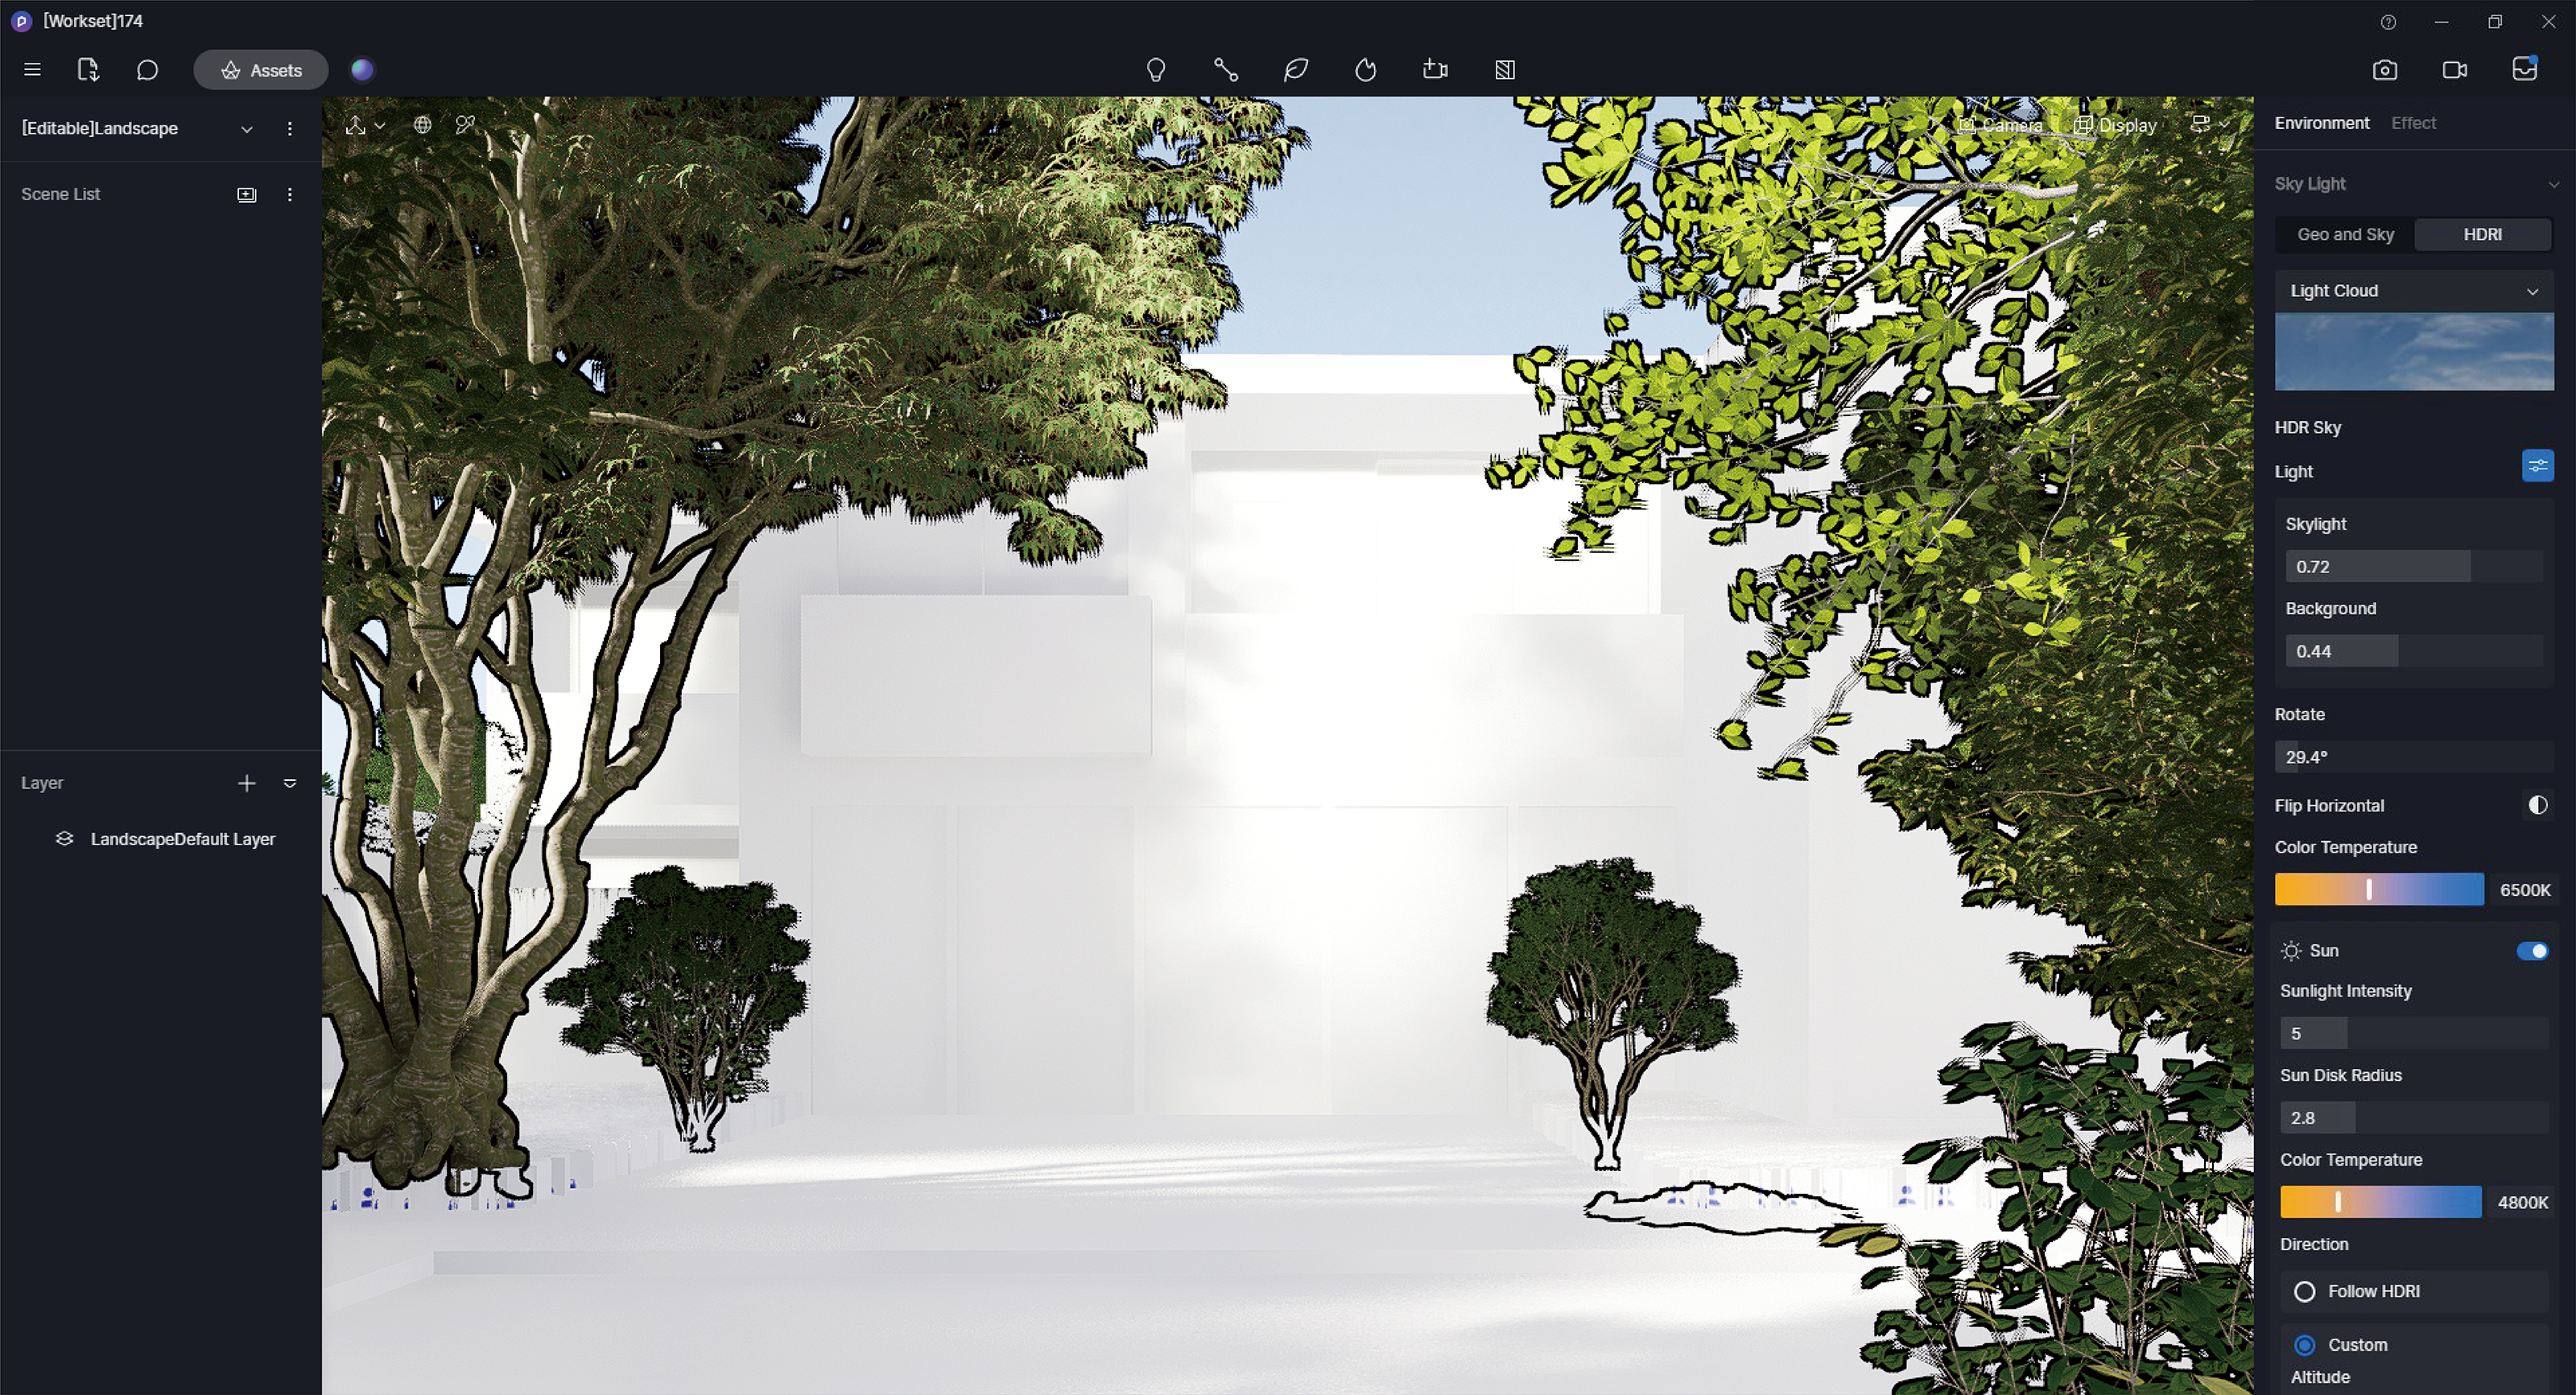
While editing a workset, users can choose to enable performance mode. In performance mode, D5 only loads the materials of the models in the Workset you opened. Models from outside this Workset will be displayed as white models.
-
This can reduce the project’s use of computer resources, making editing smoother, but some display effects may be affected. If you want to switch to the full display mode, please exit and reopen the project, and uncheck the performance mode option.
-
Resources in a read-only workset cannot be edited and can only be viewed. You cannot modify the parameters of models from worksets other than the current workset you opened(including size, position, and material), and you cannot use brushes and scatter tools on models from worksets other than the current workset.
-
The changes you made to the scene in a workset will be automatically merged into the central file upon saving. Members working on other worksets for the same project will receive notifications of updates in the software and can view the changes made by others to the project.

Layer visible to this workset only
-
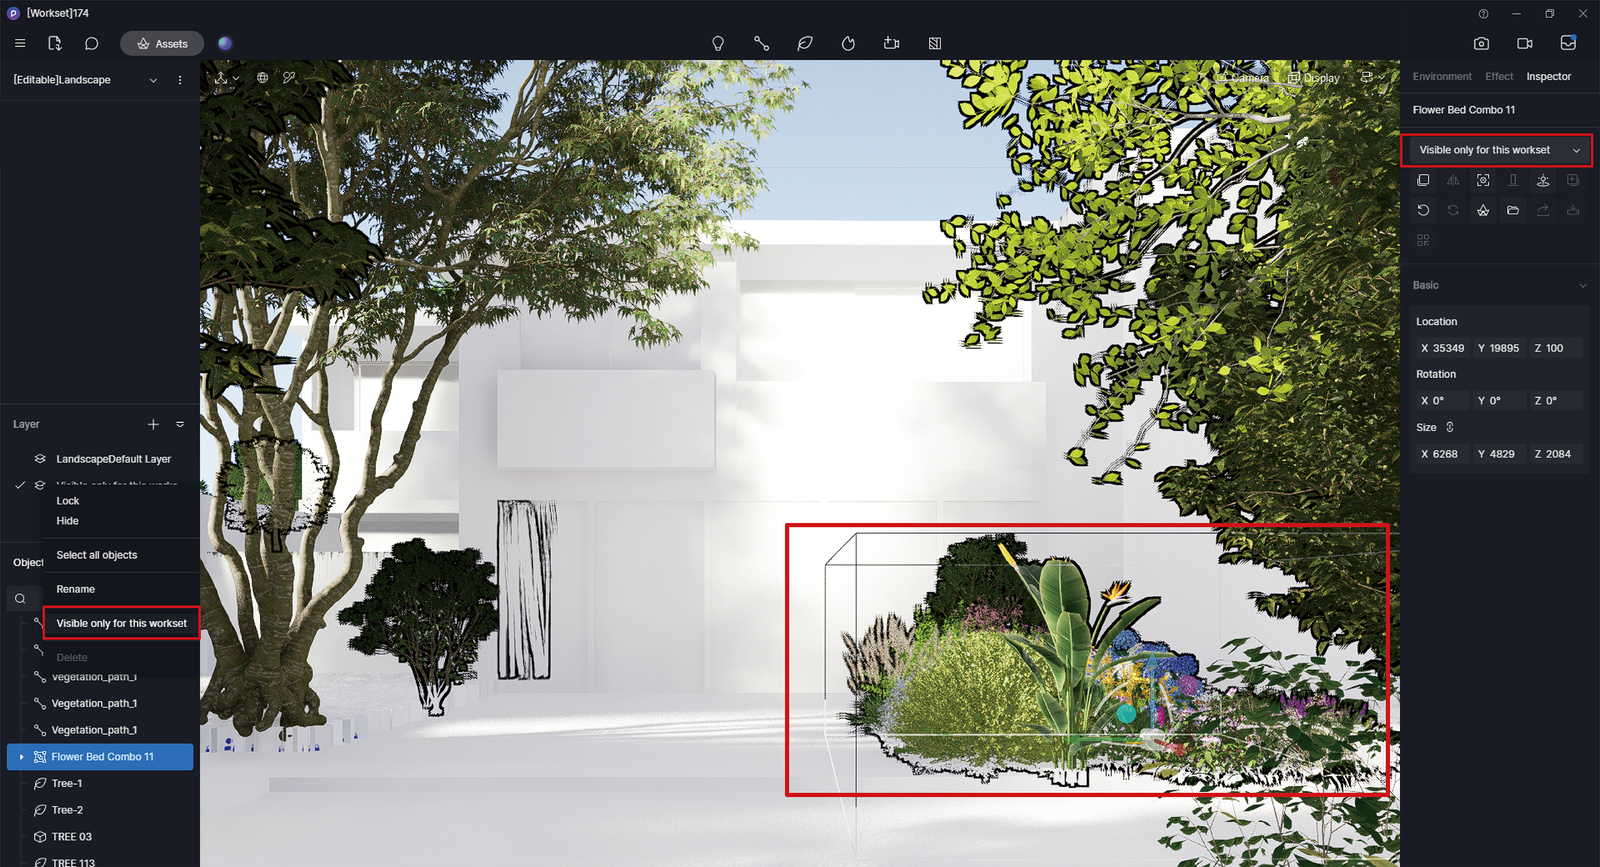
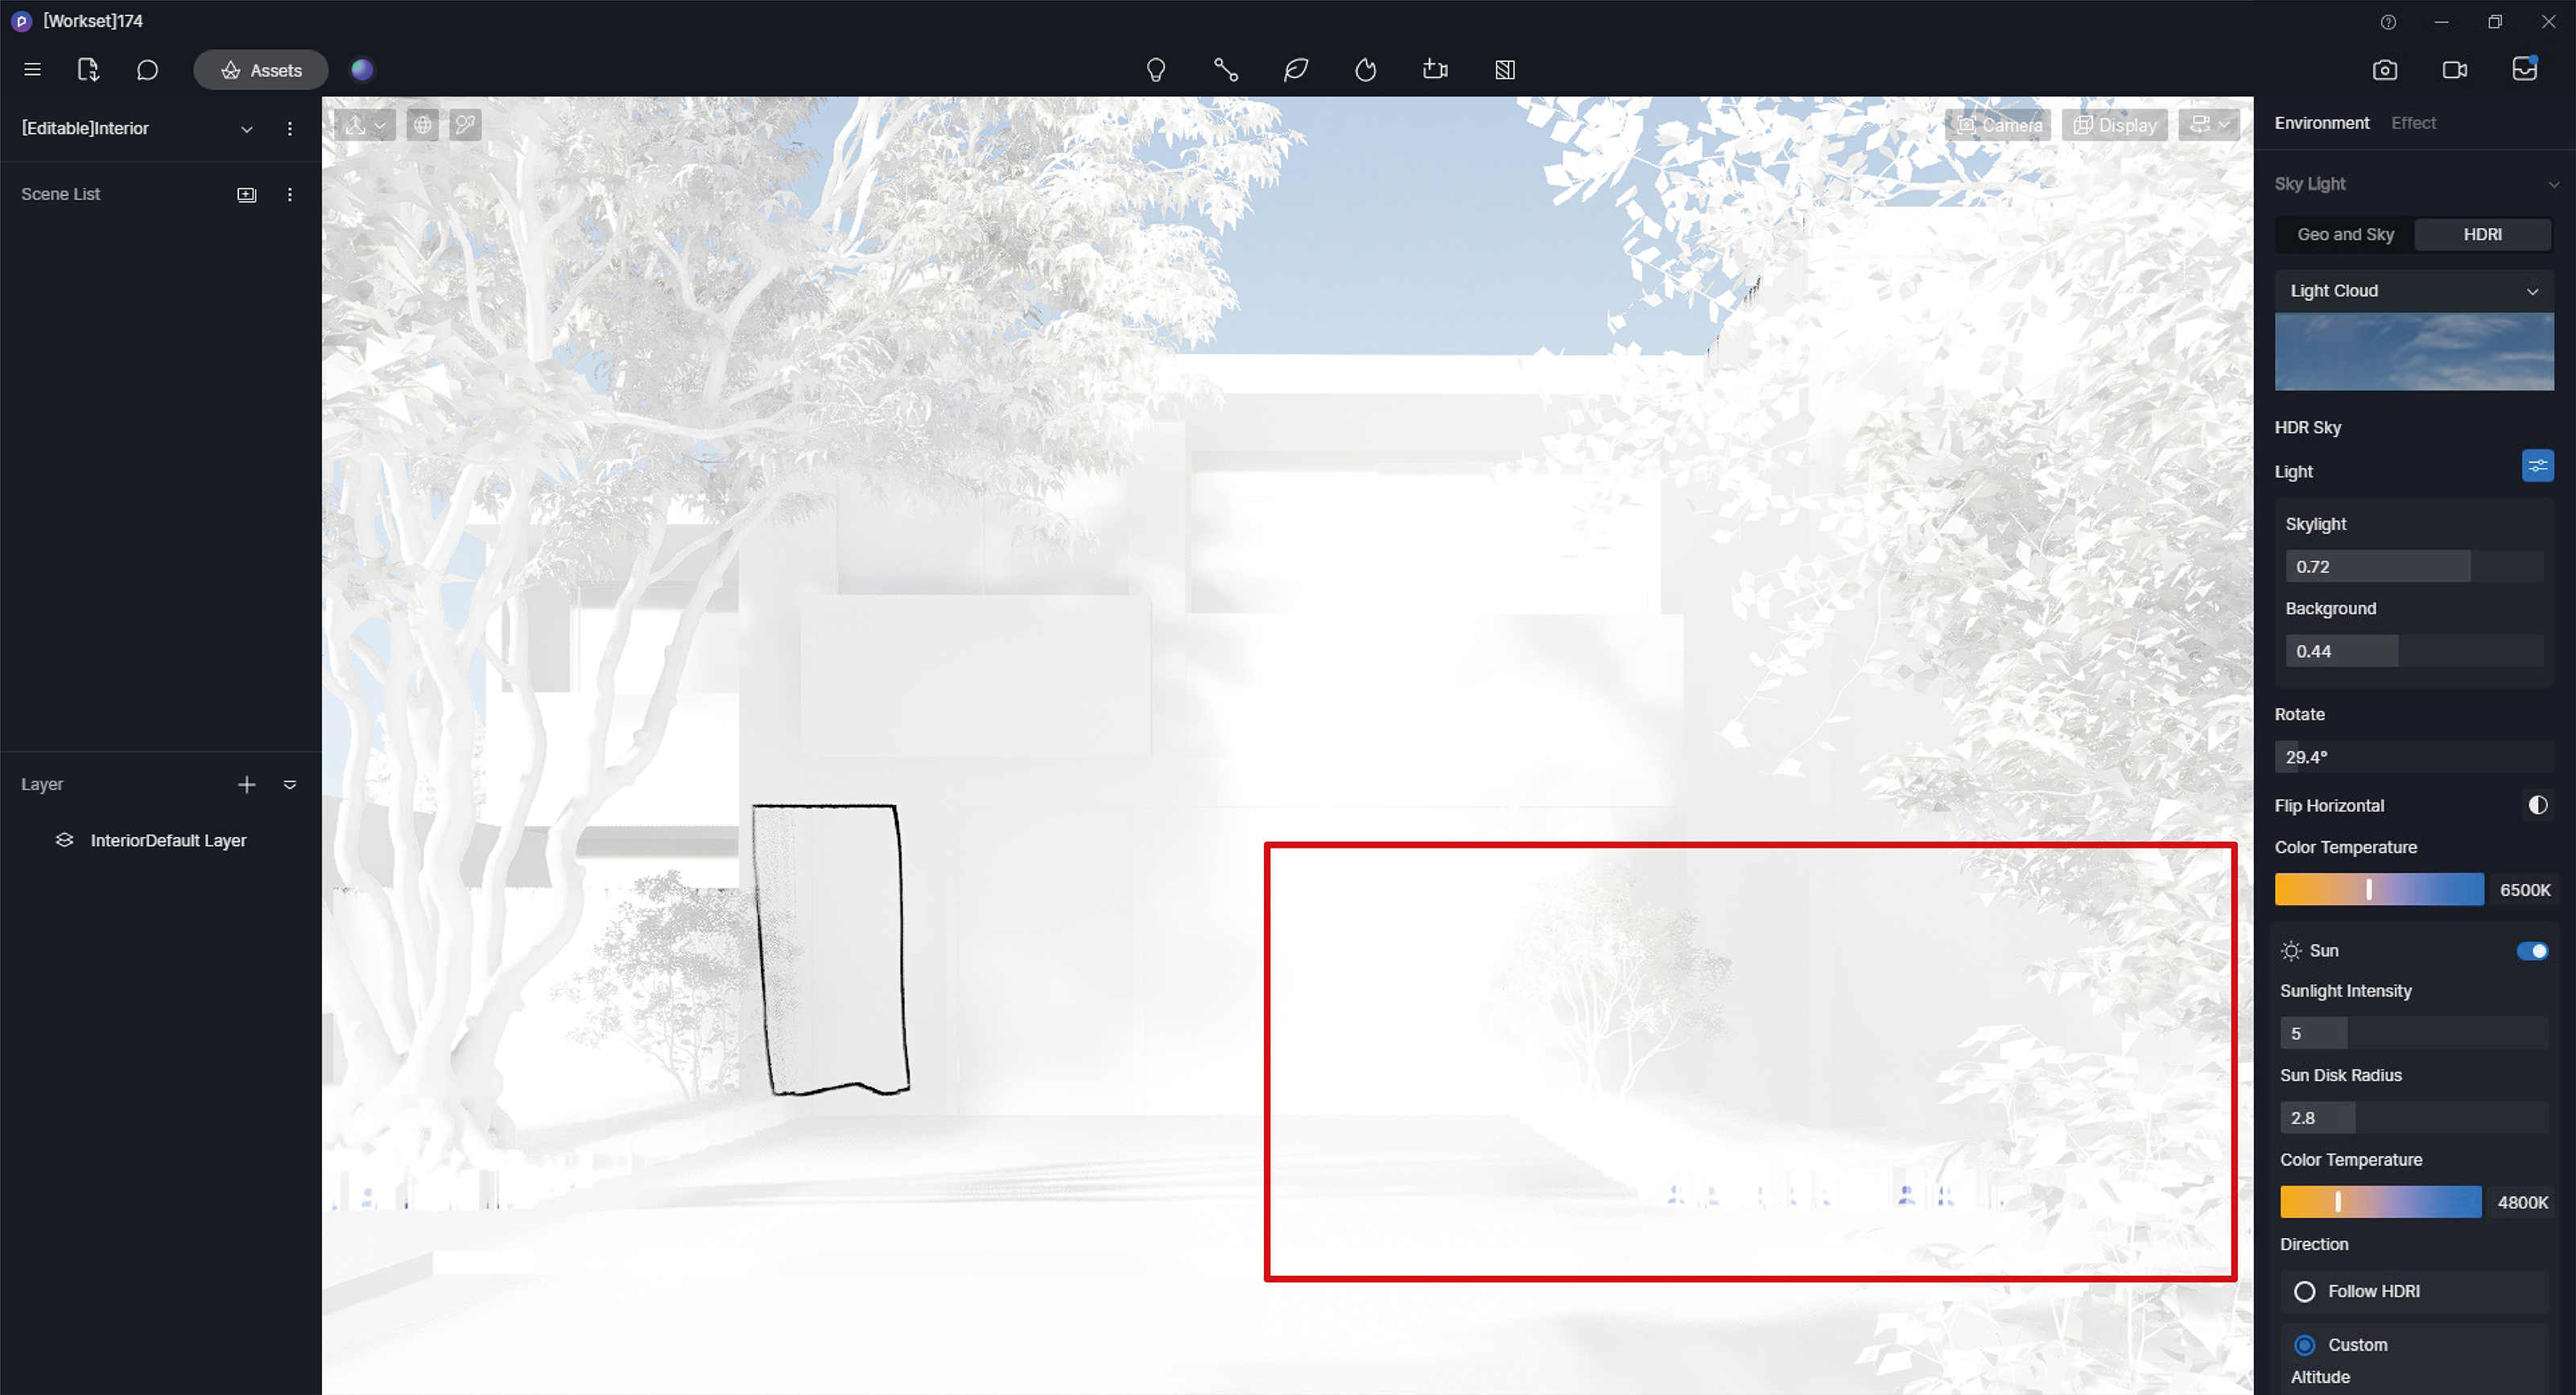
When you import models to a workset and want them displayed only in the current workset to avoid interference with other worksets, you can move models to the same layer and set “Visible to this workset only”. In this way all models in this layer will only be displayed in the current workset and will not appear in other scenes.
-
If you have added a “tree” to the environment workset, but this tree is only relevant to your own scene, you can create a “Visible to this workset only” layer for objects of this kind.
This ensures that models in the “Visible to this workset only” layer are displayed normally only in the current workset and do not affect other worksets.
Convert a multi-editor workset to a normal project
- If your part of editing is complete, click “File” >> “Convert to a Normal Project” in the menu.
Abnormal work status
- If D5 Render is shut down abnormally for some reason after a workset or central file is opened, the project will remain in editing. If this happens, please contact the team administrator to enable “Forced quit of editing status” for the project.
2. Team Library
Team Library Deployment
- After setting the address, username and password for the shared folder in D5 Render, your team members can freely access resources in the folder on the LAN after logging in to their D5 accounts.

Step 1: Create a Shared Drive
- Currently, D5 can connect to shared drives using the Samba protocol. By configuring the corresponding shared drive address, access account, and password in the D5 client, you can use the team library on the LAN.
How to set up Windows shared drive?
Use a portion of your local storage as a network storage location.
Advantages: No additional cost. Easy and convenient setup.
Disadvantages: This tends to cause a shortage of local storage space, and shared host needs to remain powered on. There is a maximum limit on the number of users who can access it.
How to Create a NAS Shared Folder?
NAS - Professional Network Storage Device
Advantages: Large storage space, does not occupy local storage space, secure and stable, suitable for multi-person team sharing.
Disadvantages: Relatively high cost
Step 2: Configuring the Team Library Address in D5 Render
Configuration entrance

- Go to D5 Render: Welcome page - Preference - Team (visible only to administrators). Copy the shared drive information you set up to the corresponding input box and click Save.
Modification and permission management
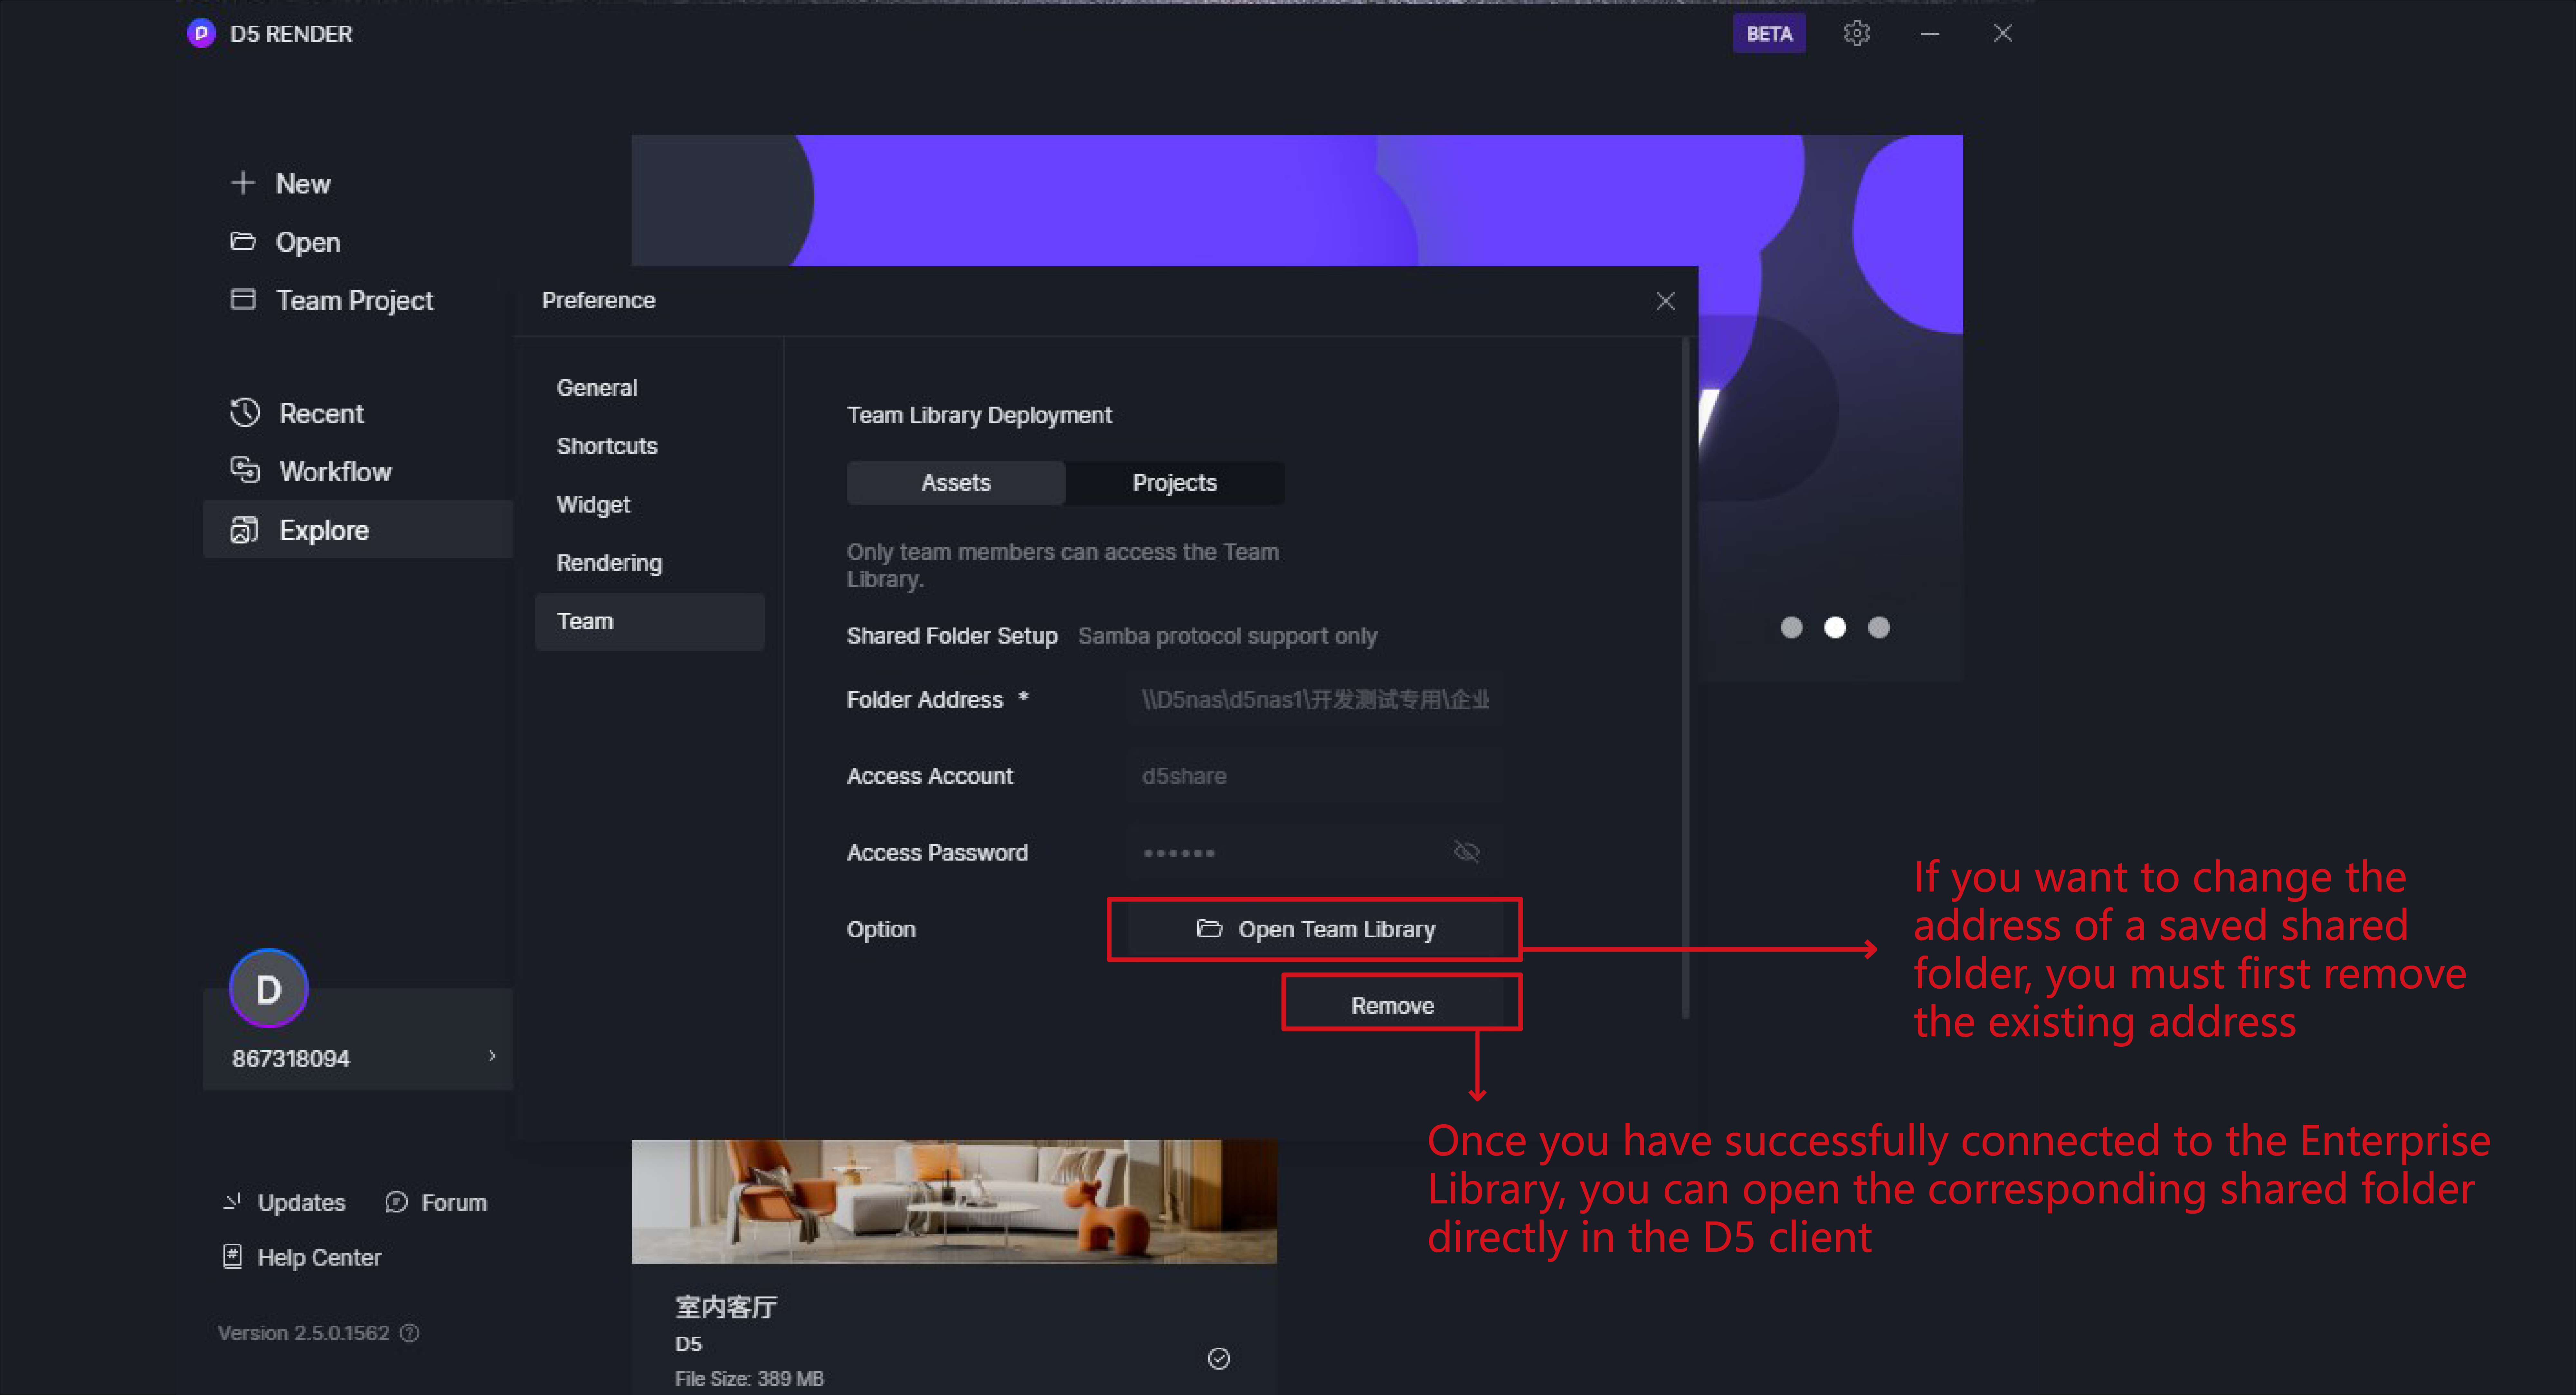
-
If you need to modify a saved shared drive address, you must first remove the original address.
-
It is recommended to set the shared drive to the highest permission level to allow for deletion, modification, upload, and download.
Team Assets Management
Configuration entrance

- Open the D5 Asset Library and go to “Team”, all the d5a(asset) and d5m(material) files under the access address directory of the shared drive will be displayed.
Note: If the folder structure exceeds 4 levels, after opening it, assets will take longer to load.
Migrate Team Assets

-
Team administrators can directly copy the accumulated D5a & D5m file assets to the corresponding folder in the team asset library.
-
Currently, only team administrators can perform this operation.
Generate Asset Thumbnails

- Team administrators can upload assets to the asset library and then click the “Refresh” button in the upper-right corner to automatically generate preview images for the assets in the team asset library. Setting preview images can speed up the loading of the asset library.
Team Project Management
Access and manage project libraries
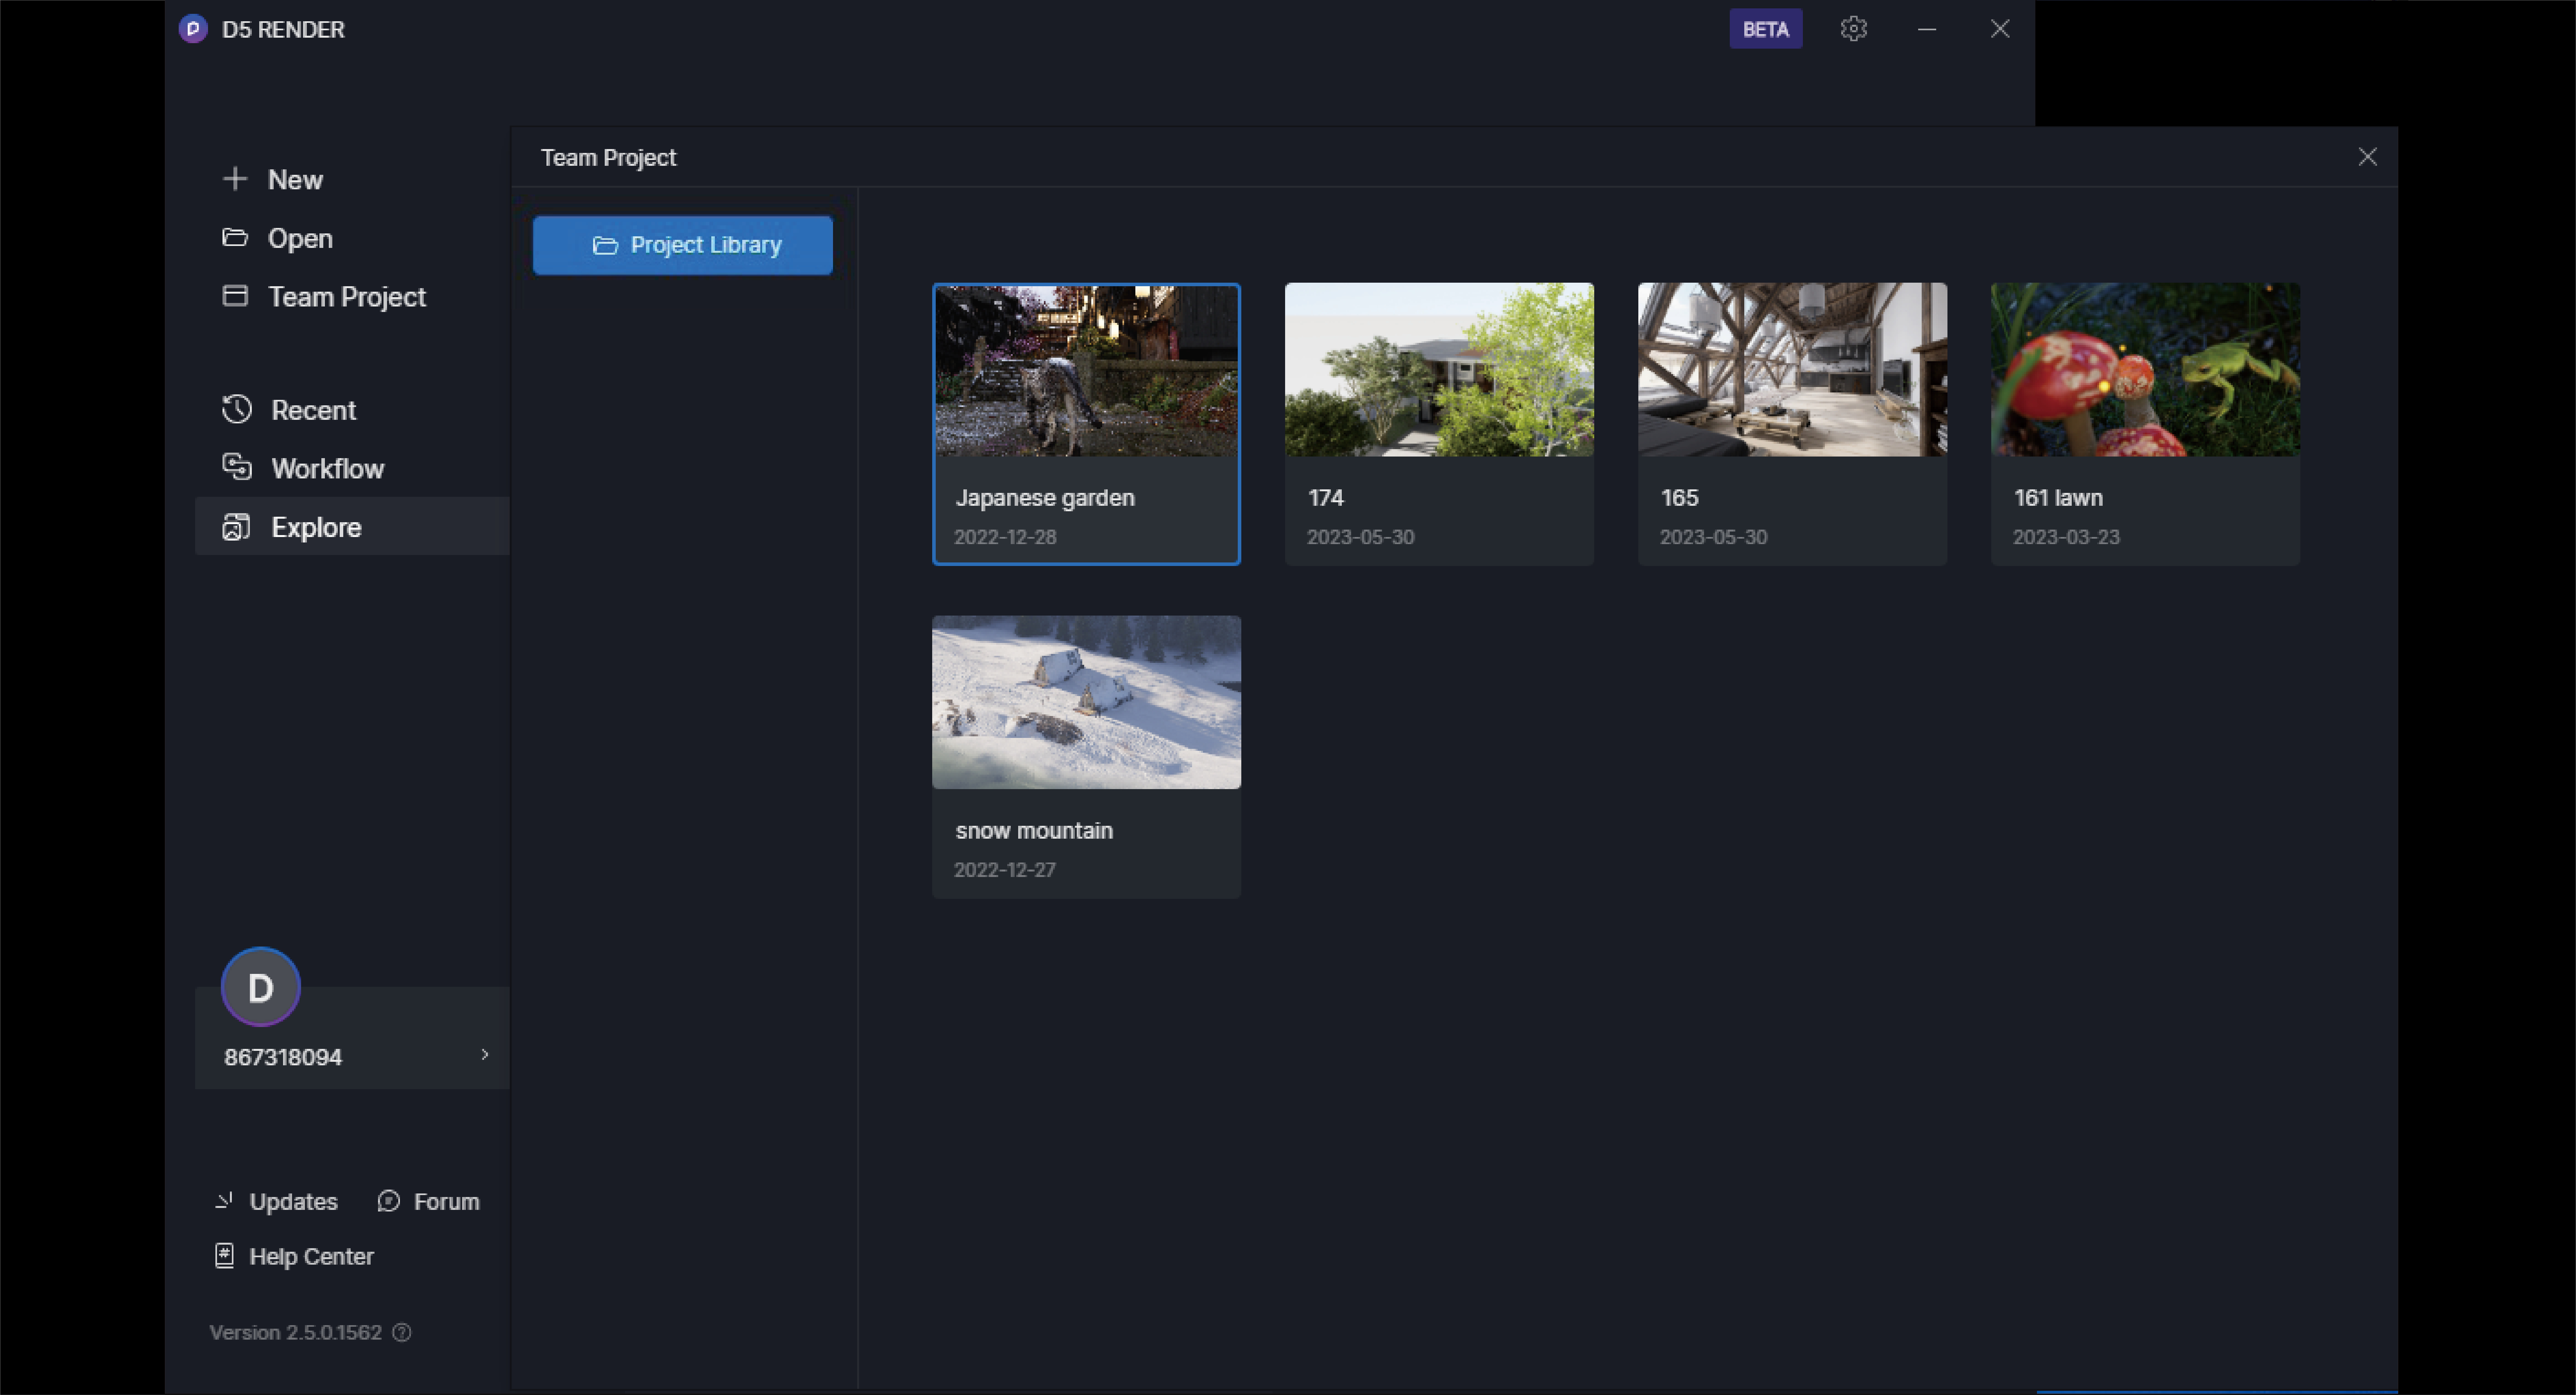
-
After successfully configuring the project library address, the D5 welcome page will display an “Project Library” entry.
-
After opening the project library, you will see all the D5 projects under the root directory. If your DRS file is stored in a folder that is two or more levels deep, the project may not be displayed in the project library.
-
In the project library, the same project can only be edited by one user. If multiple users edit the same project in a shared NAS, it may cause local archives to overwrite each other, resulting in the risk of data corruption.
Forced quit of editing status

- If a project is not closed properly, such as due to software crashes or computer shutdowns, the project will remain in an editing state. You can remove the editing state in two ways:
-
If you are the editor of the project, please reopen the project and close it properly.
-
Team administrators can use the “Forced quit of editing status” feature to remove the editing state of the project. Please make sure that the project is not being edited at the moment, otherwise, archive errors may occur.
Notes

-
After the administrator updates the assets in the shared folder, they need to click the “Refresh” button in D5 Render team library to load the cache. If the asset library has been updated without refreshing in time, the preview images could get slow to load. Please do not add or delete folders after opening D5 Render, as the folder acquisition is not real-time. If the folder directory is not updated in time, please close D5 Render and reopen it.
-
The D5 Render team library is based on the LAN protocol. If team members cannot access the team asset library, please check if the network of their computer is consistent with the network used by the shared drive address. If you find that the download speed of assets (or projects) in the team library is slow, you can check if the NAS that stores the team library has set traffic restrictions.
-
If you need to use the team asset library in a WAN environment, there are three ways to achieve it:
a. Use the VPN provided by the company’s IT department to access the internal network.
b. Apply for a public IP address from the ISP.
c. Use a network proxy provider, such as Synology NAS Quick Connect.
Usage recommendations:
-
Manage asset library and project library separately using different addresses.
-
Name and classify folders according to asset category or by project.
-
Do not place too many projects in the project library. Completed projects can be moved out of the project library and backed up.
Common Issues and Troubleshooting
- When deploying D5 Team Library, if the connection fails, the Windows system will return several corresponding error codes, and the corresponding feedback in the D5 Render is as follows: ↓
| Error codes returned by Windows | Prompt in D5 | Note |
|---|---|---|
| ERROR_ACCESS_DENIED | The current account does not have permission to access the address | Possible causes: 1. Improper permissions set for the shared drive; 2. The host where the shared drive is located has been shut down. |
| ERROR_BAD_NET_NAME | The target folder location is invalid | |
| ERROR_BAD_USERNAME | The user name is invalid | |
| ERROR_INVALID_PASSWORD | The password is invalid | Possible cause: 1. The computer where the shared folder is located has the same account name (i.e. login name) as the other members’ computers, making it impossible to share. |
| ERROR_NO_NETWORK | The network is not available, please check if you are on the same LAN | |
| ERROR_LOGON_FAILURE | The account or password is invalid |
3. D5 Studio
What is D5 Studio
-
D5 Studio is a cloud workspace built by D5 Render. In Studio, you can store and share resources with your team. D5 Studio aims to provide higher work efficiency and creativity for all kinds of projects.
-
Data in Studio is stored in the cloud space and associated with your D5 account. Even if you switch devices or work remotely, you can use all your own and team’s Studio resources.


How to open D5 Studio
Open D5, click on the Studio icon in the upper left corner.

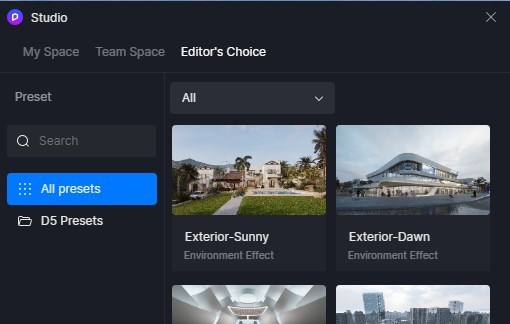
-
Here you’ll find presets that include environment effects, brush parameters, and path parameters.
-
For Teams users, there are two workspaces: My Space and Team Space. Owner/Administrators can create folder directories under the team workspace, and other members can share their personal data to a specific folder in the team.
What’s in D5 Studio
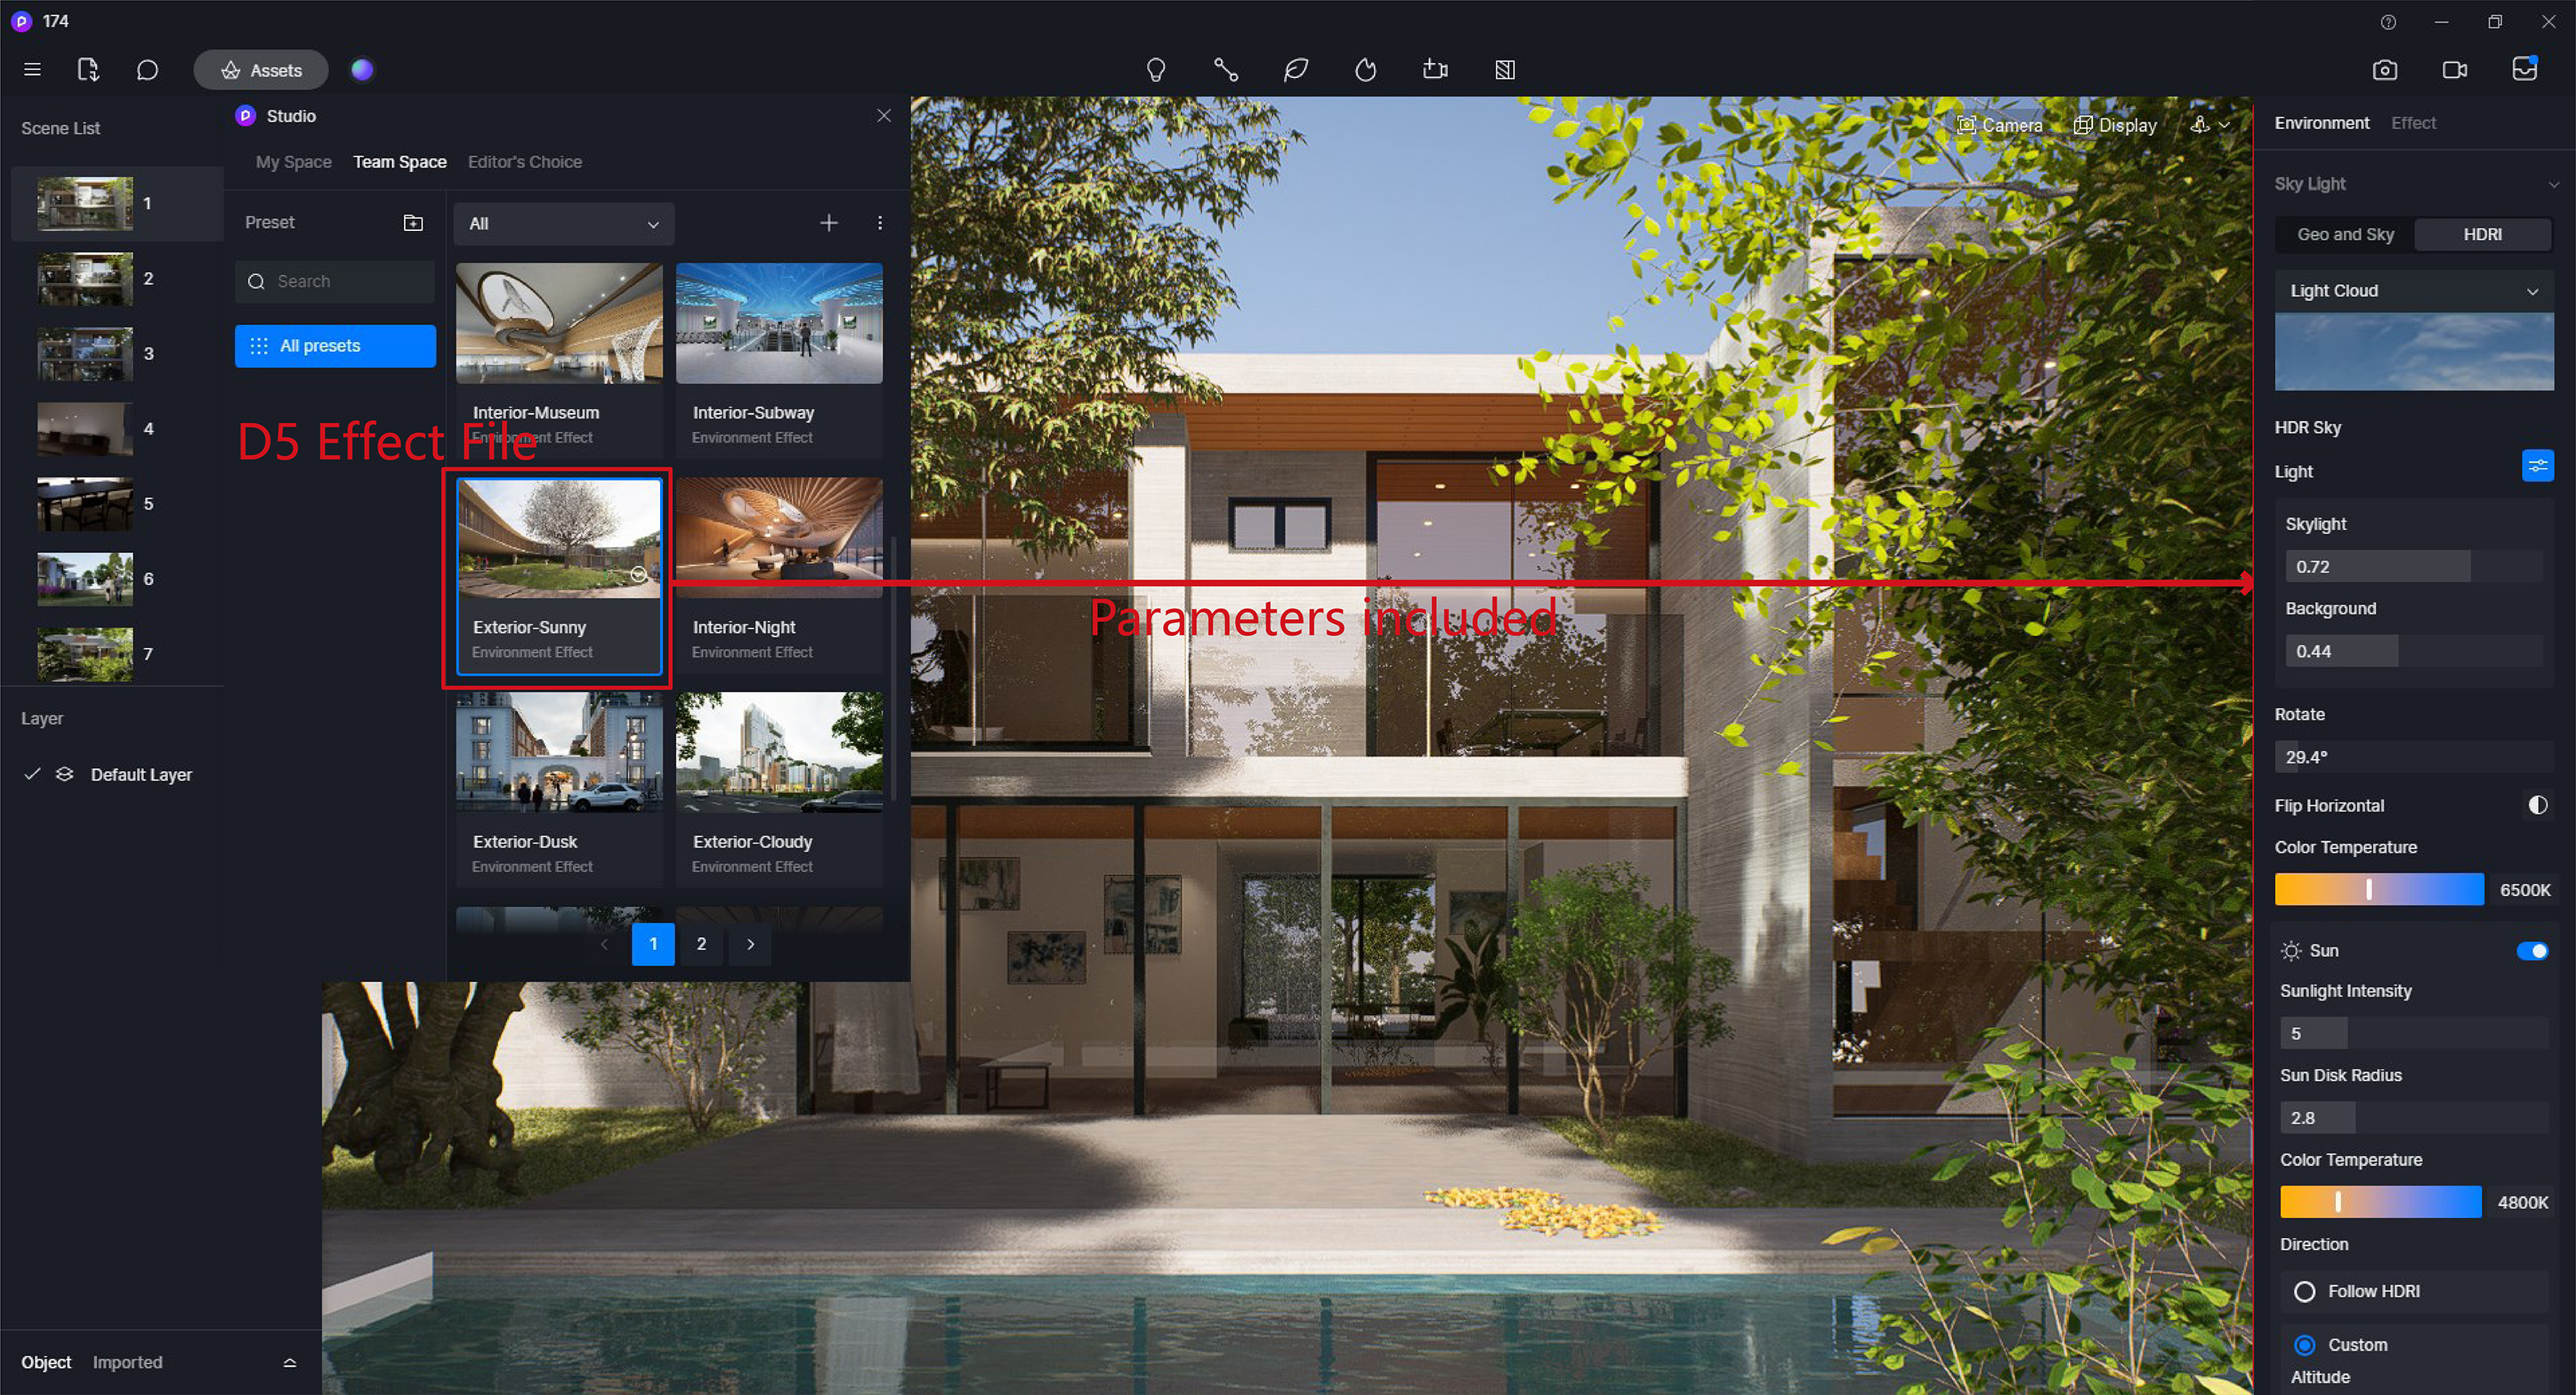
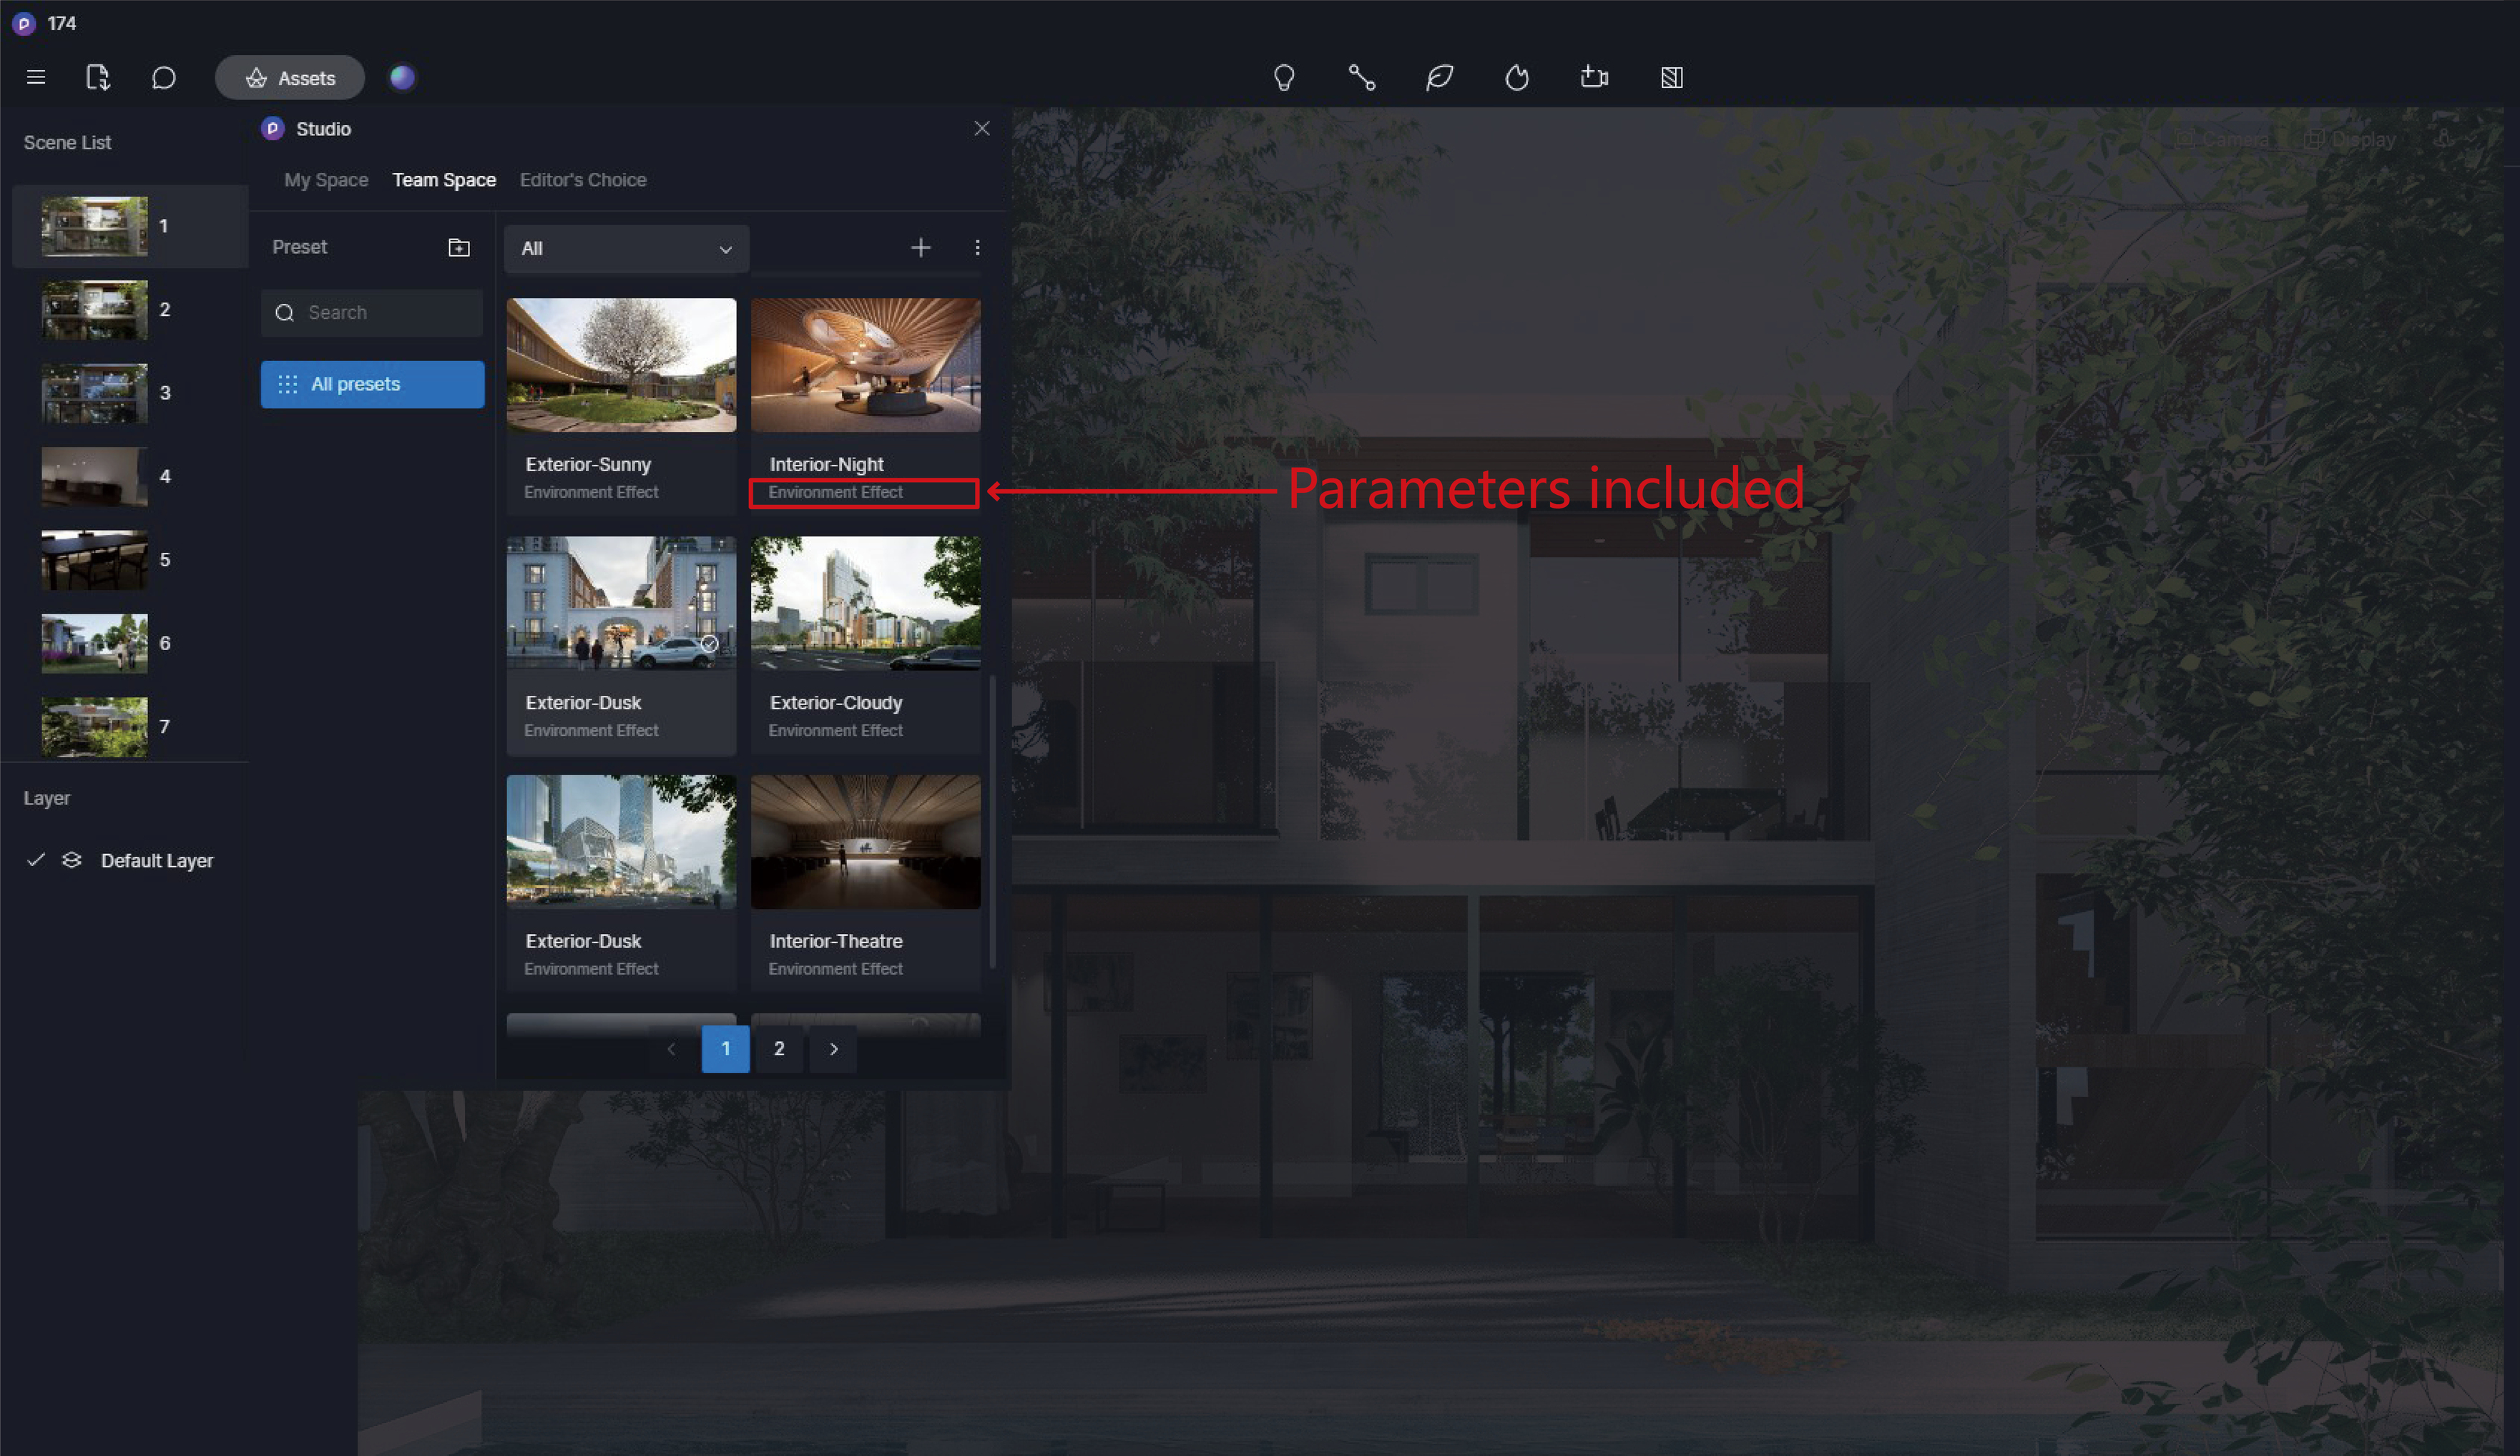
Effect Preset
-
D5 effect preset contains all parameters in the D5 scene, environment and effect panel
-
How to Create Effect Presets
-
Switch to the ready scene in the scene list.
-
Right-click on the scene or click “Create Preset” in the Studio panel.

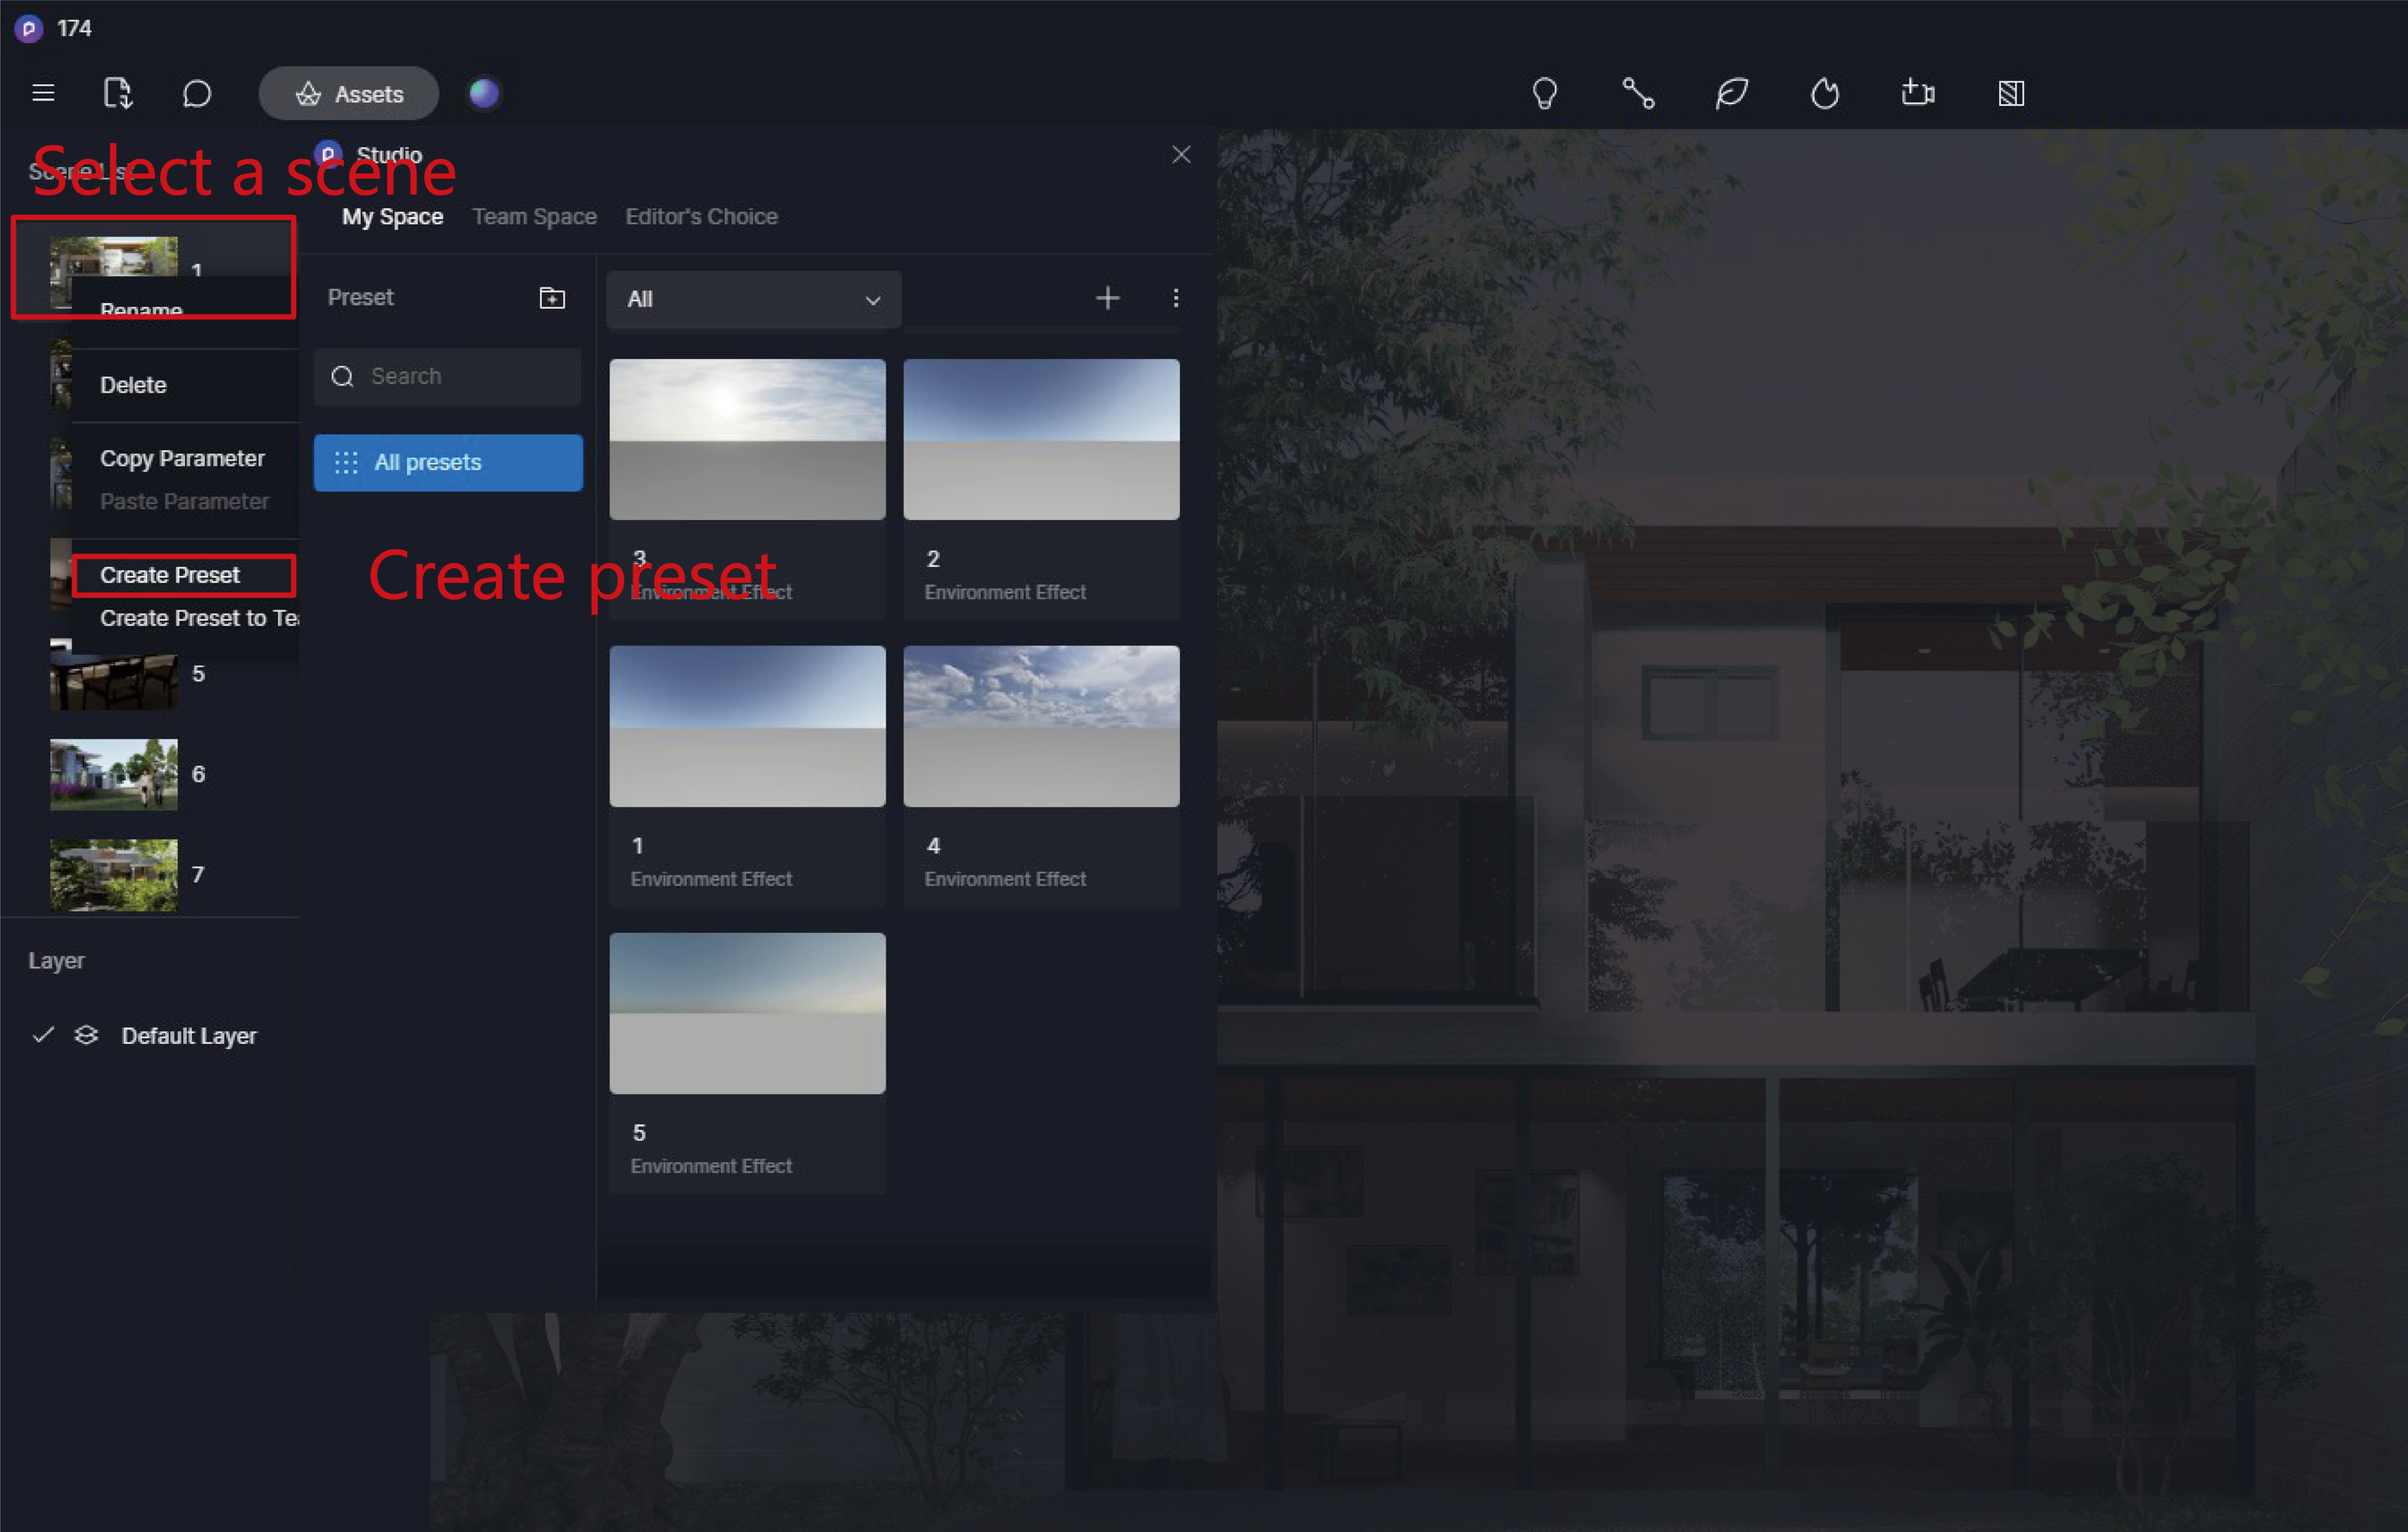
- After clicking “Create Preset”, a pop-up window for saving the settings will appear. Complete the settings and save.
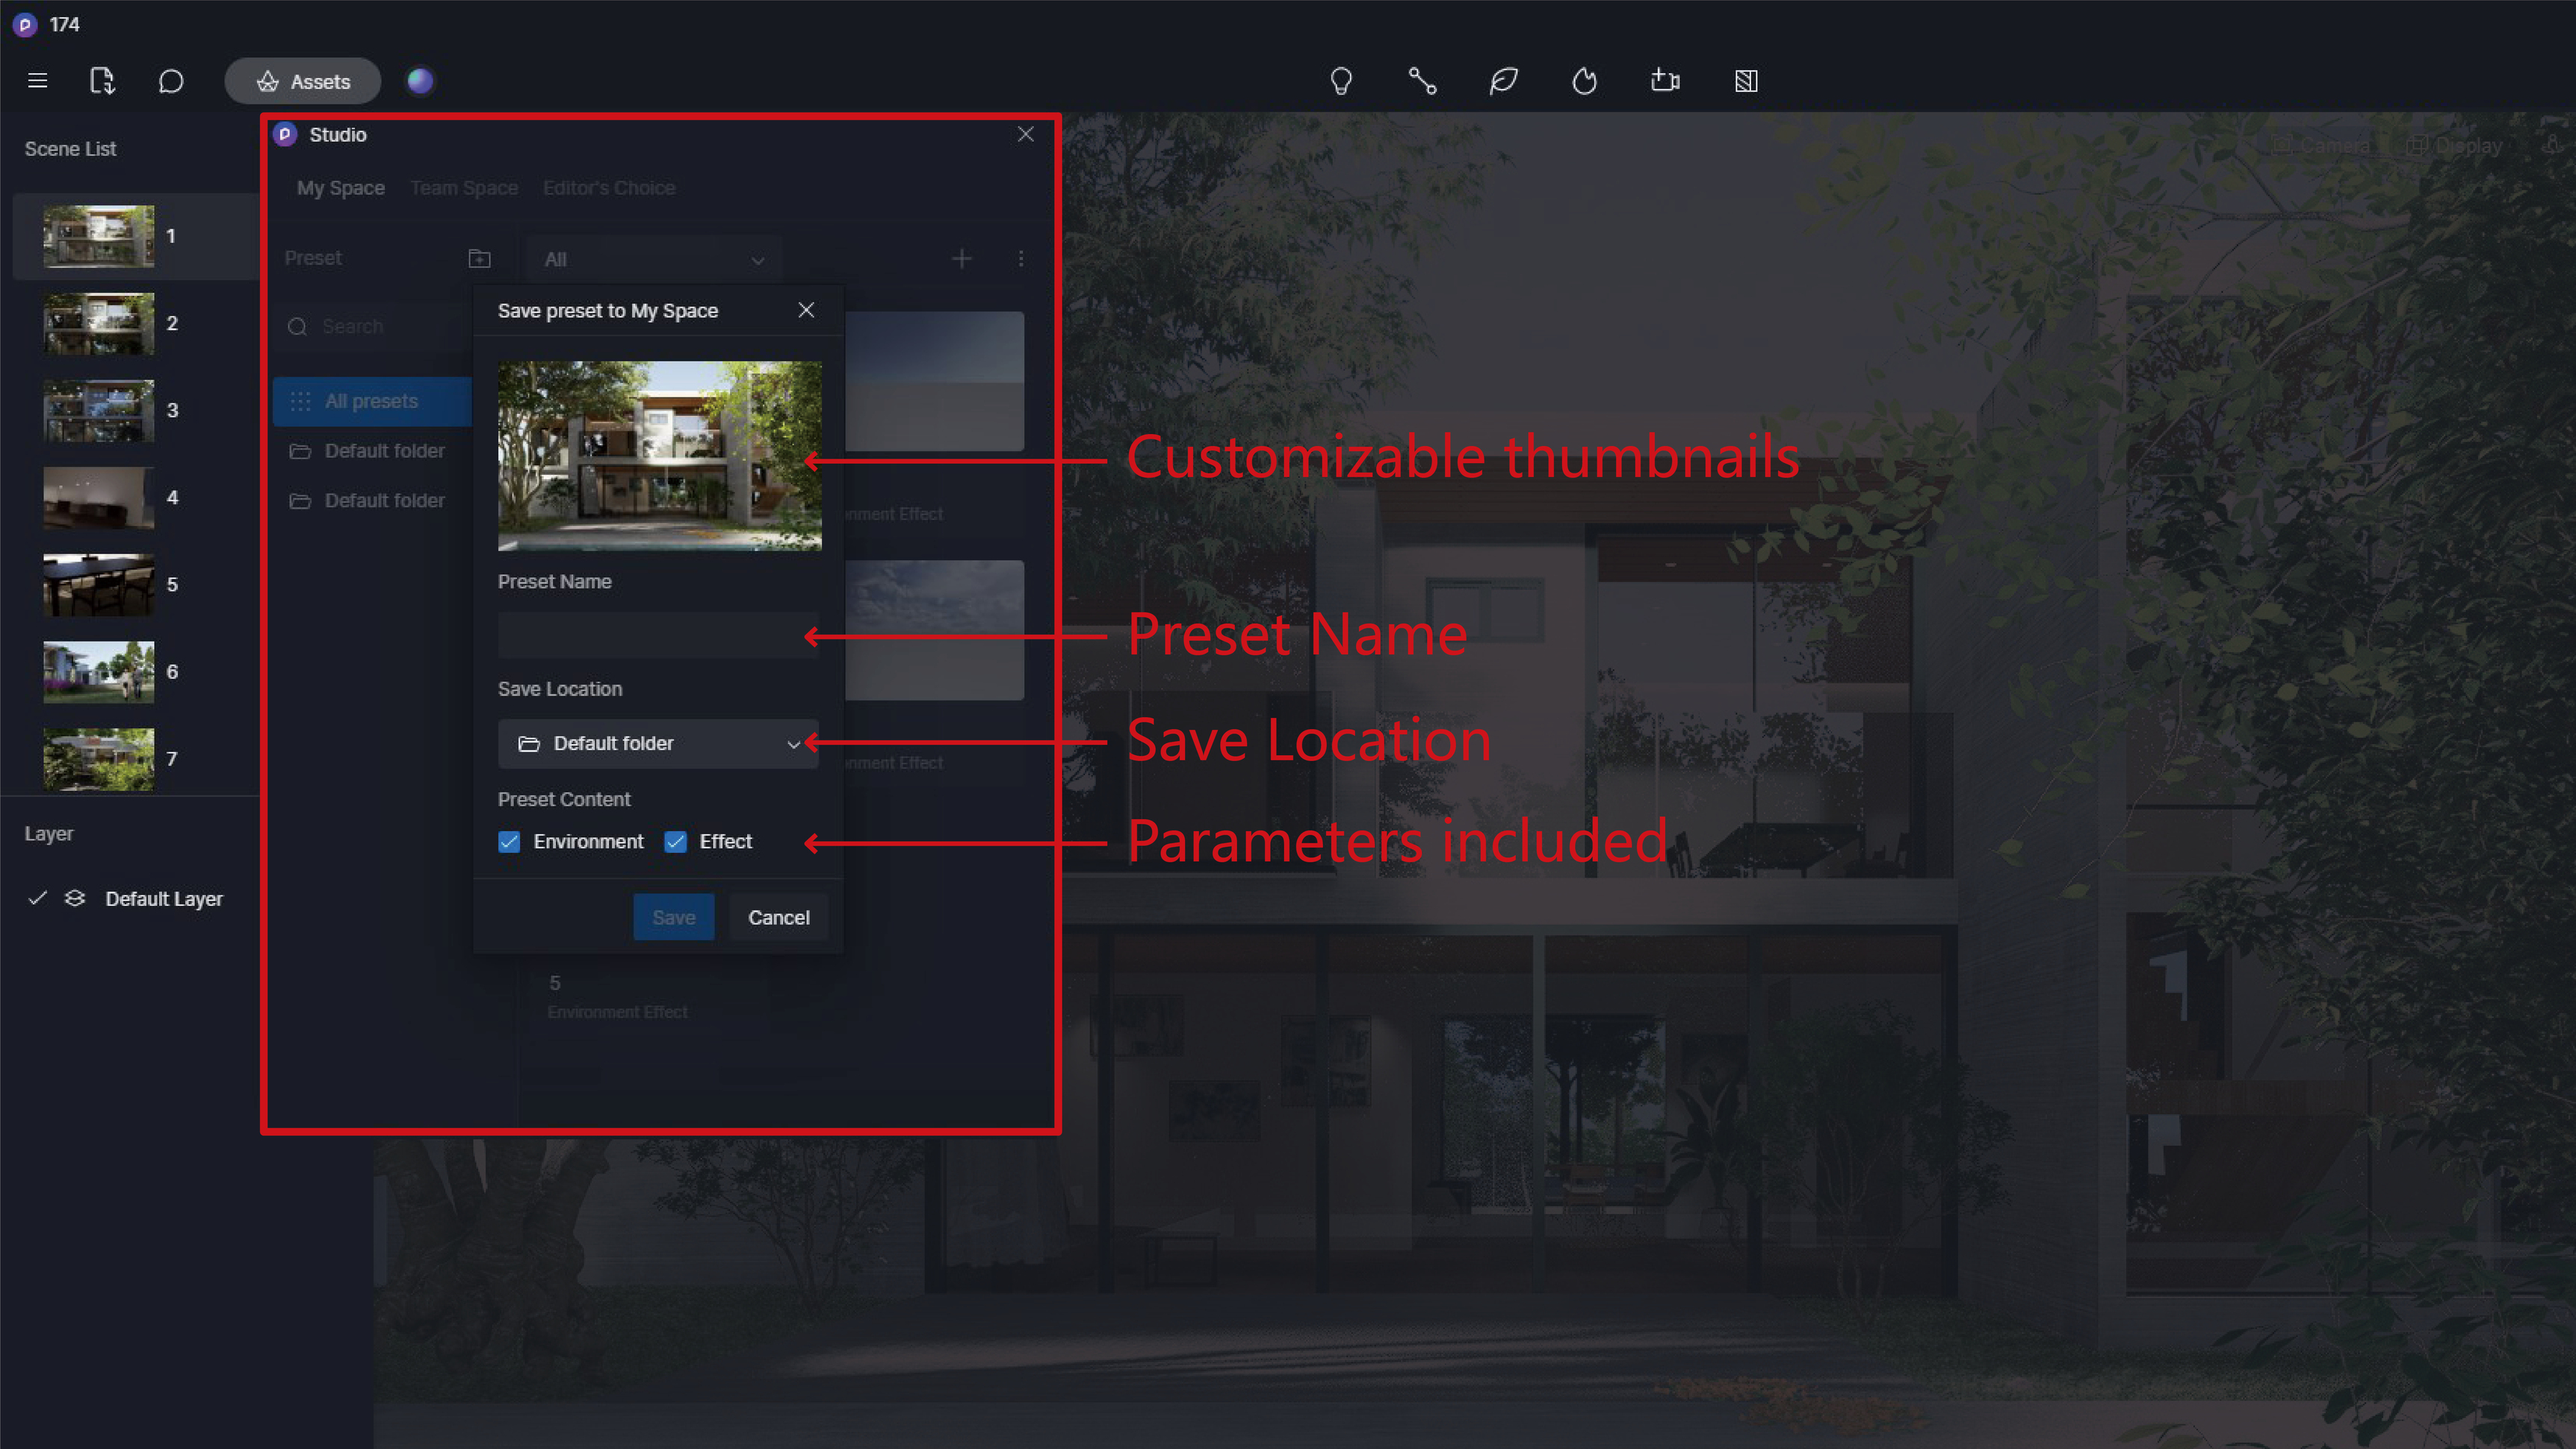
Note:
When saving the preset, the custom HDR and LUT files used will also be uploaded.
The save time is affected by the size of the HDR file used. The preset is stored based on the data in the current preview viewport.

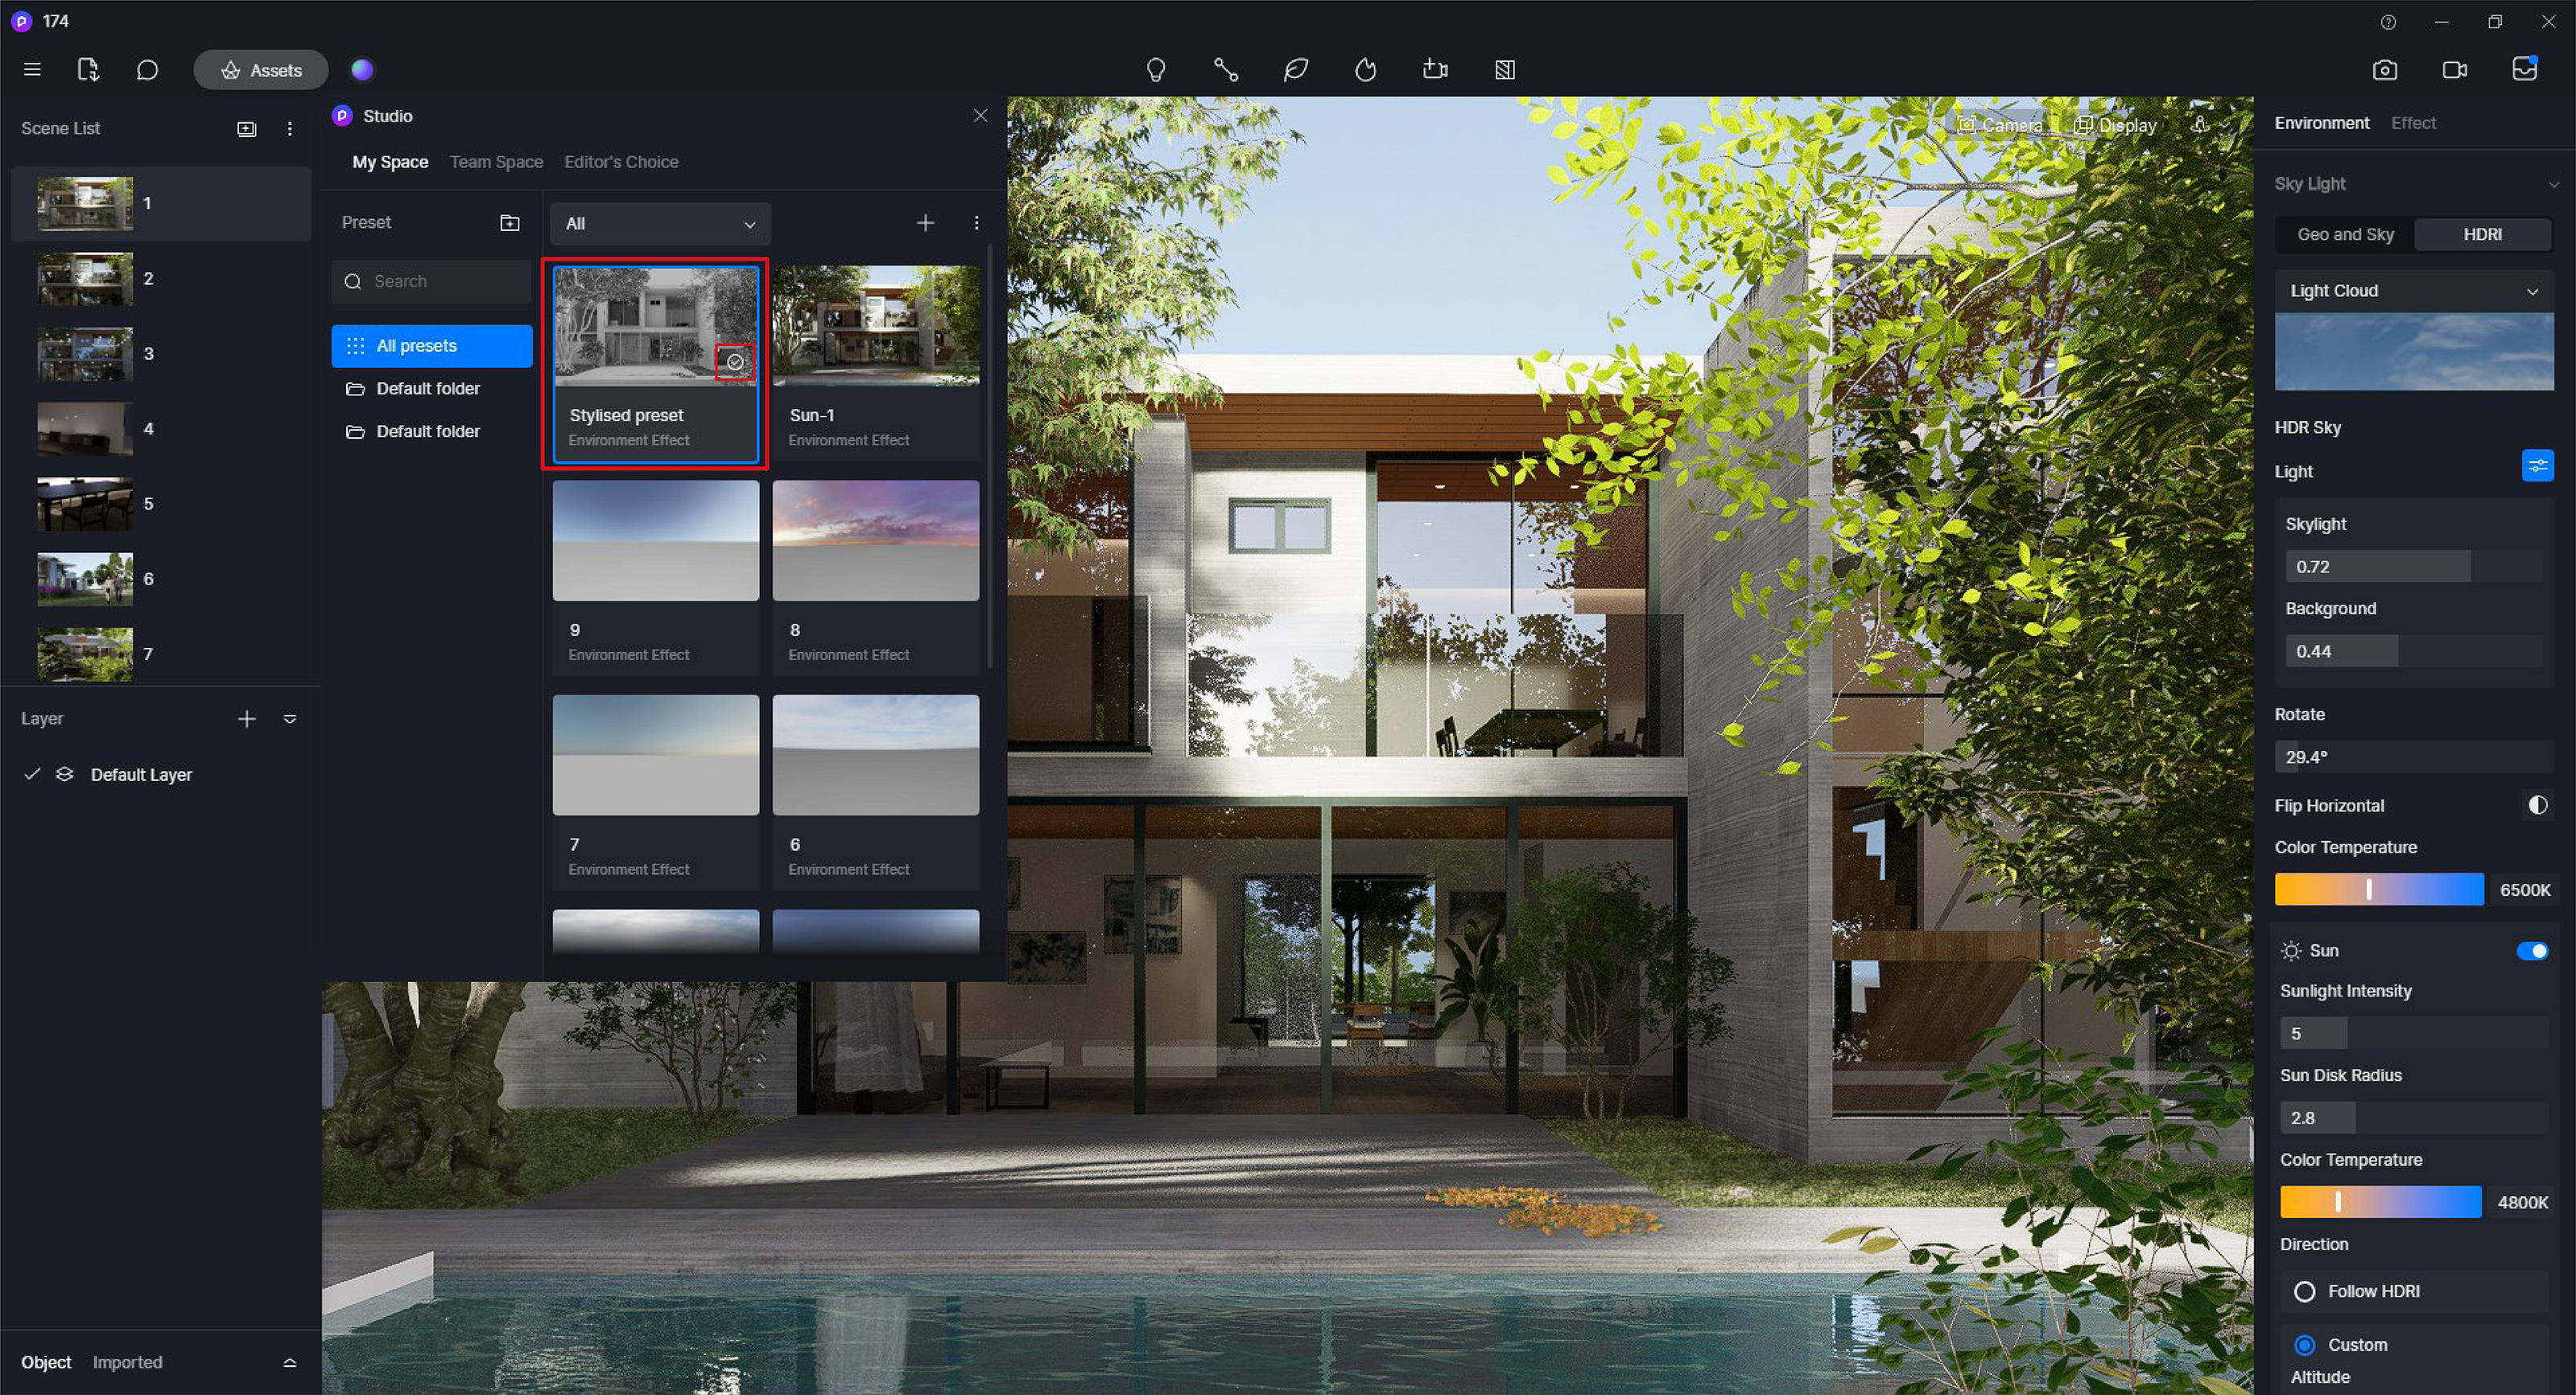
- How to Apply Effect Presets
In the Studio panel, double-click on the preset file that you want to apply (the first click will download the data, and the second click will apply it). The download and loading time depends on the size of the custom HDR file in the preset.
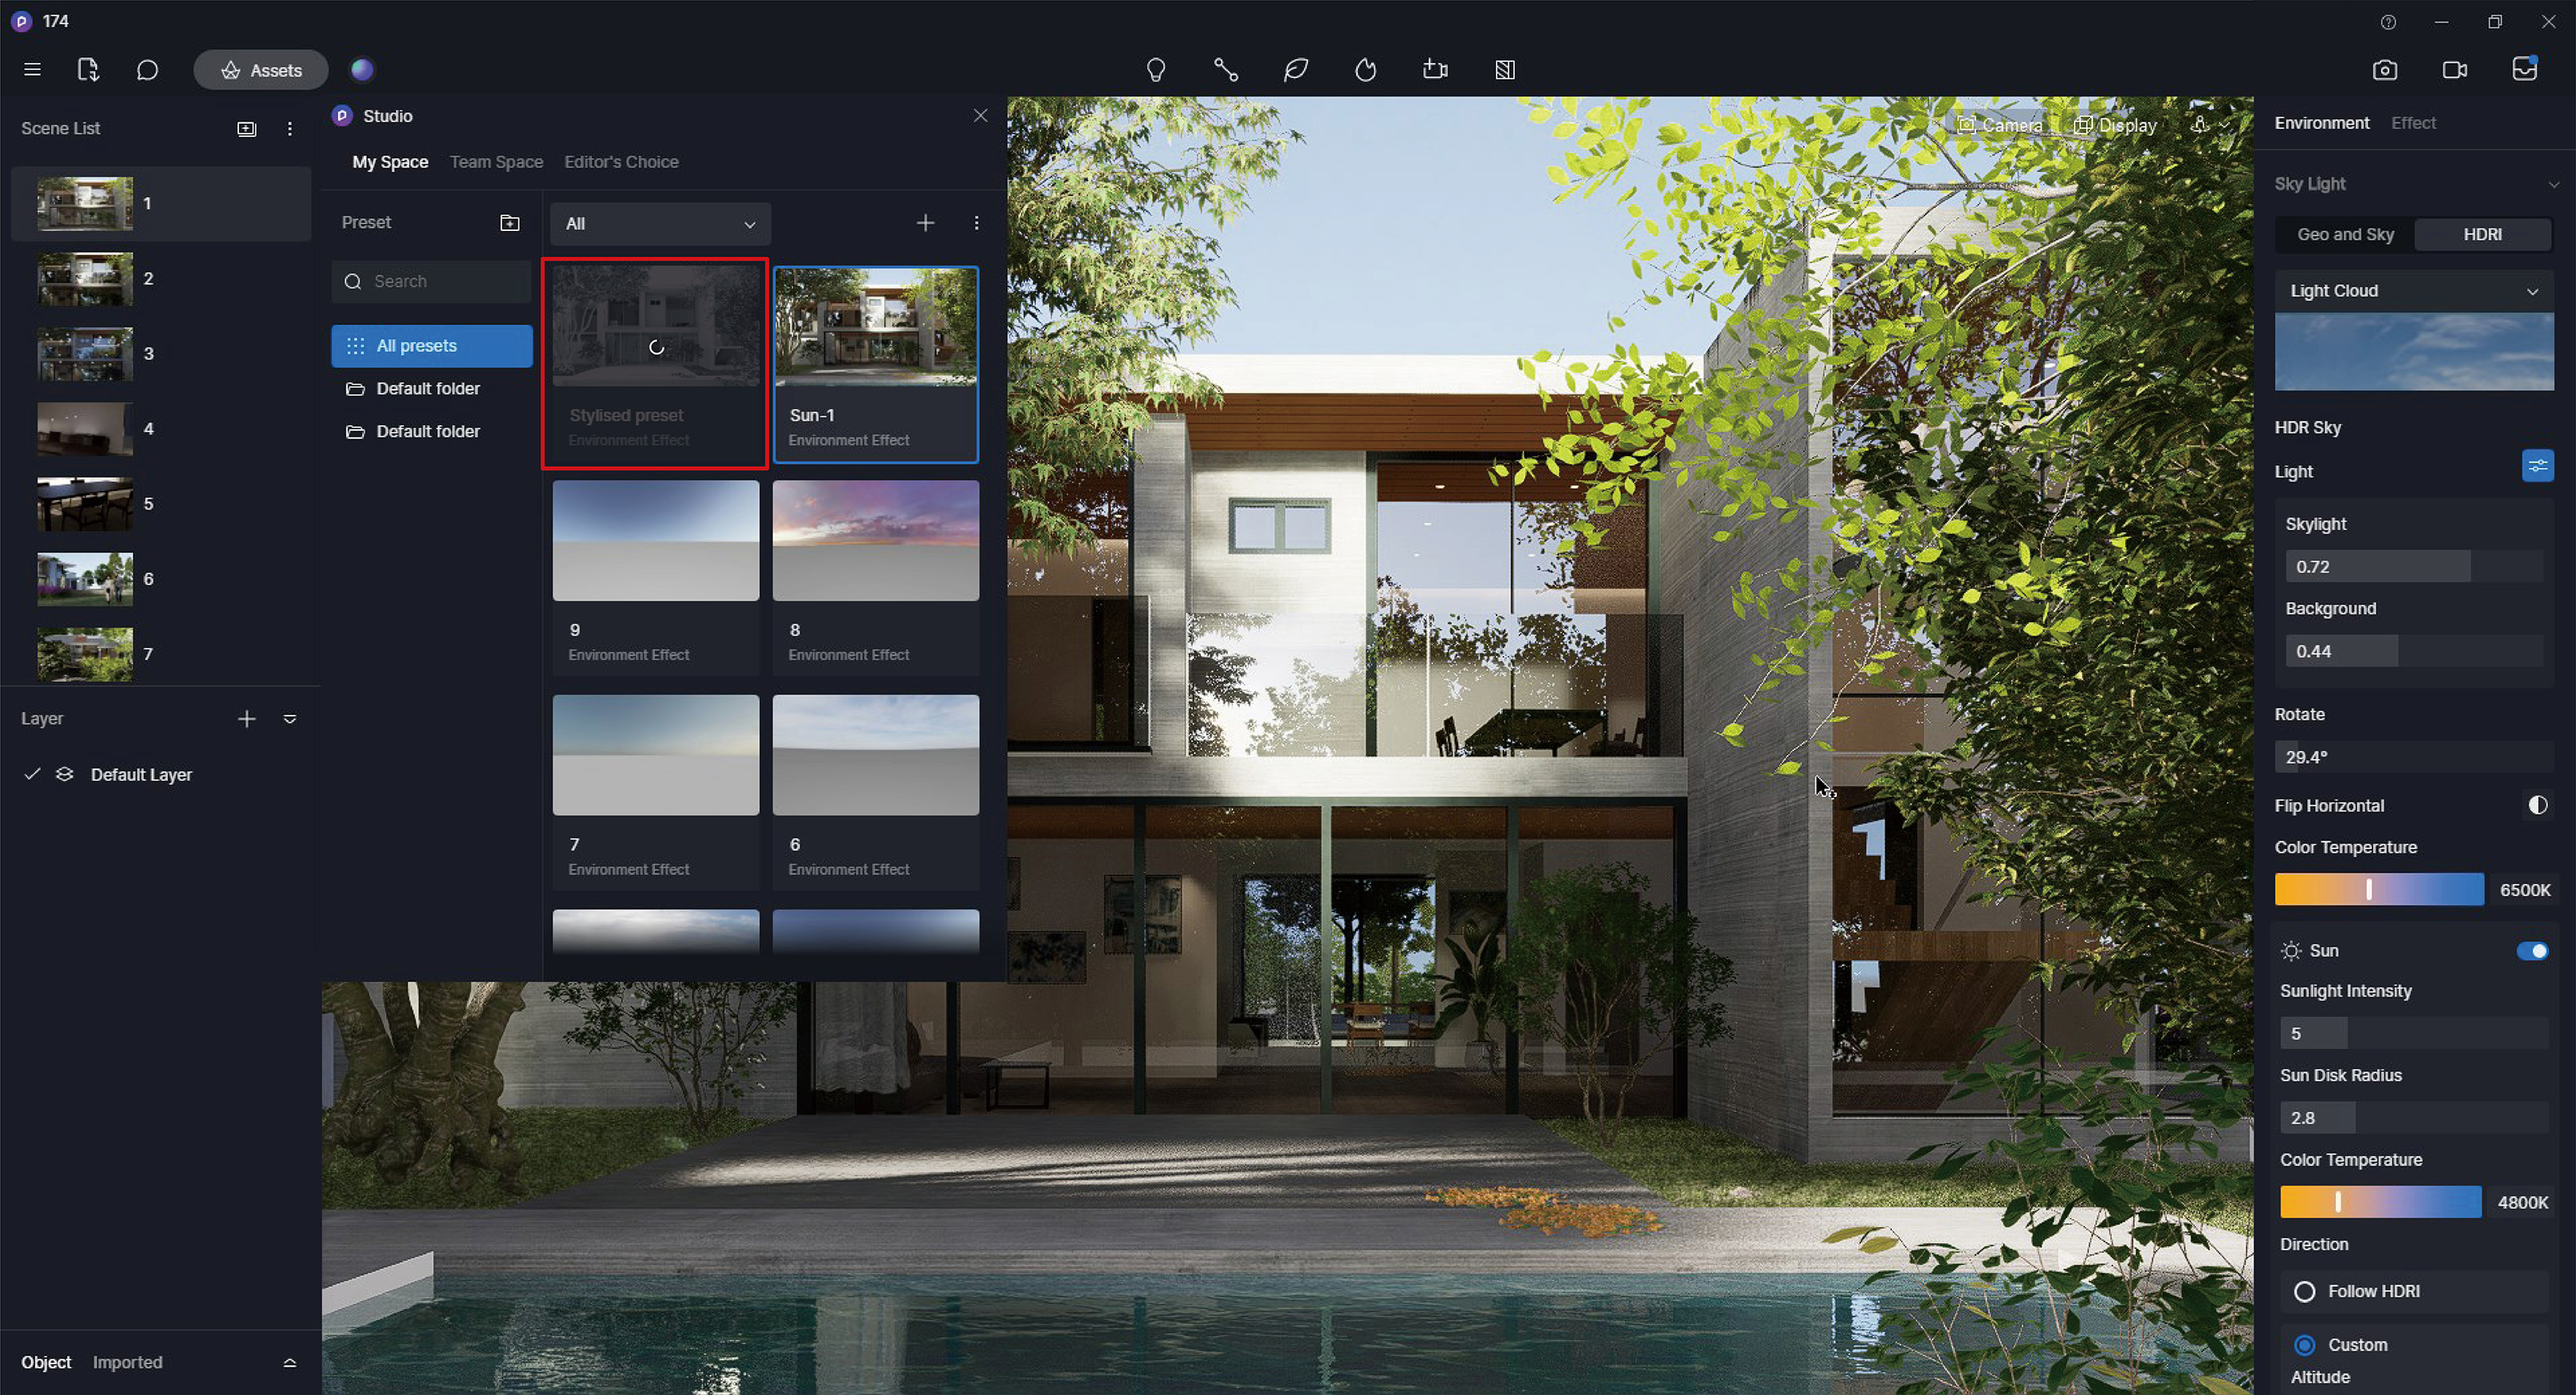

Data ia automatically cached, so there is no need to download it repeatedly. The check mark icon in the lower right corner of the thumbnail indicates whether the preset has been downloaded.
In the image or video rendering mode, applying presets is also supported.
Note: Please update the scene after applying a preset
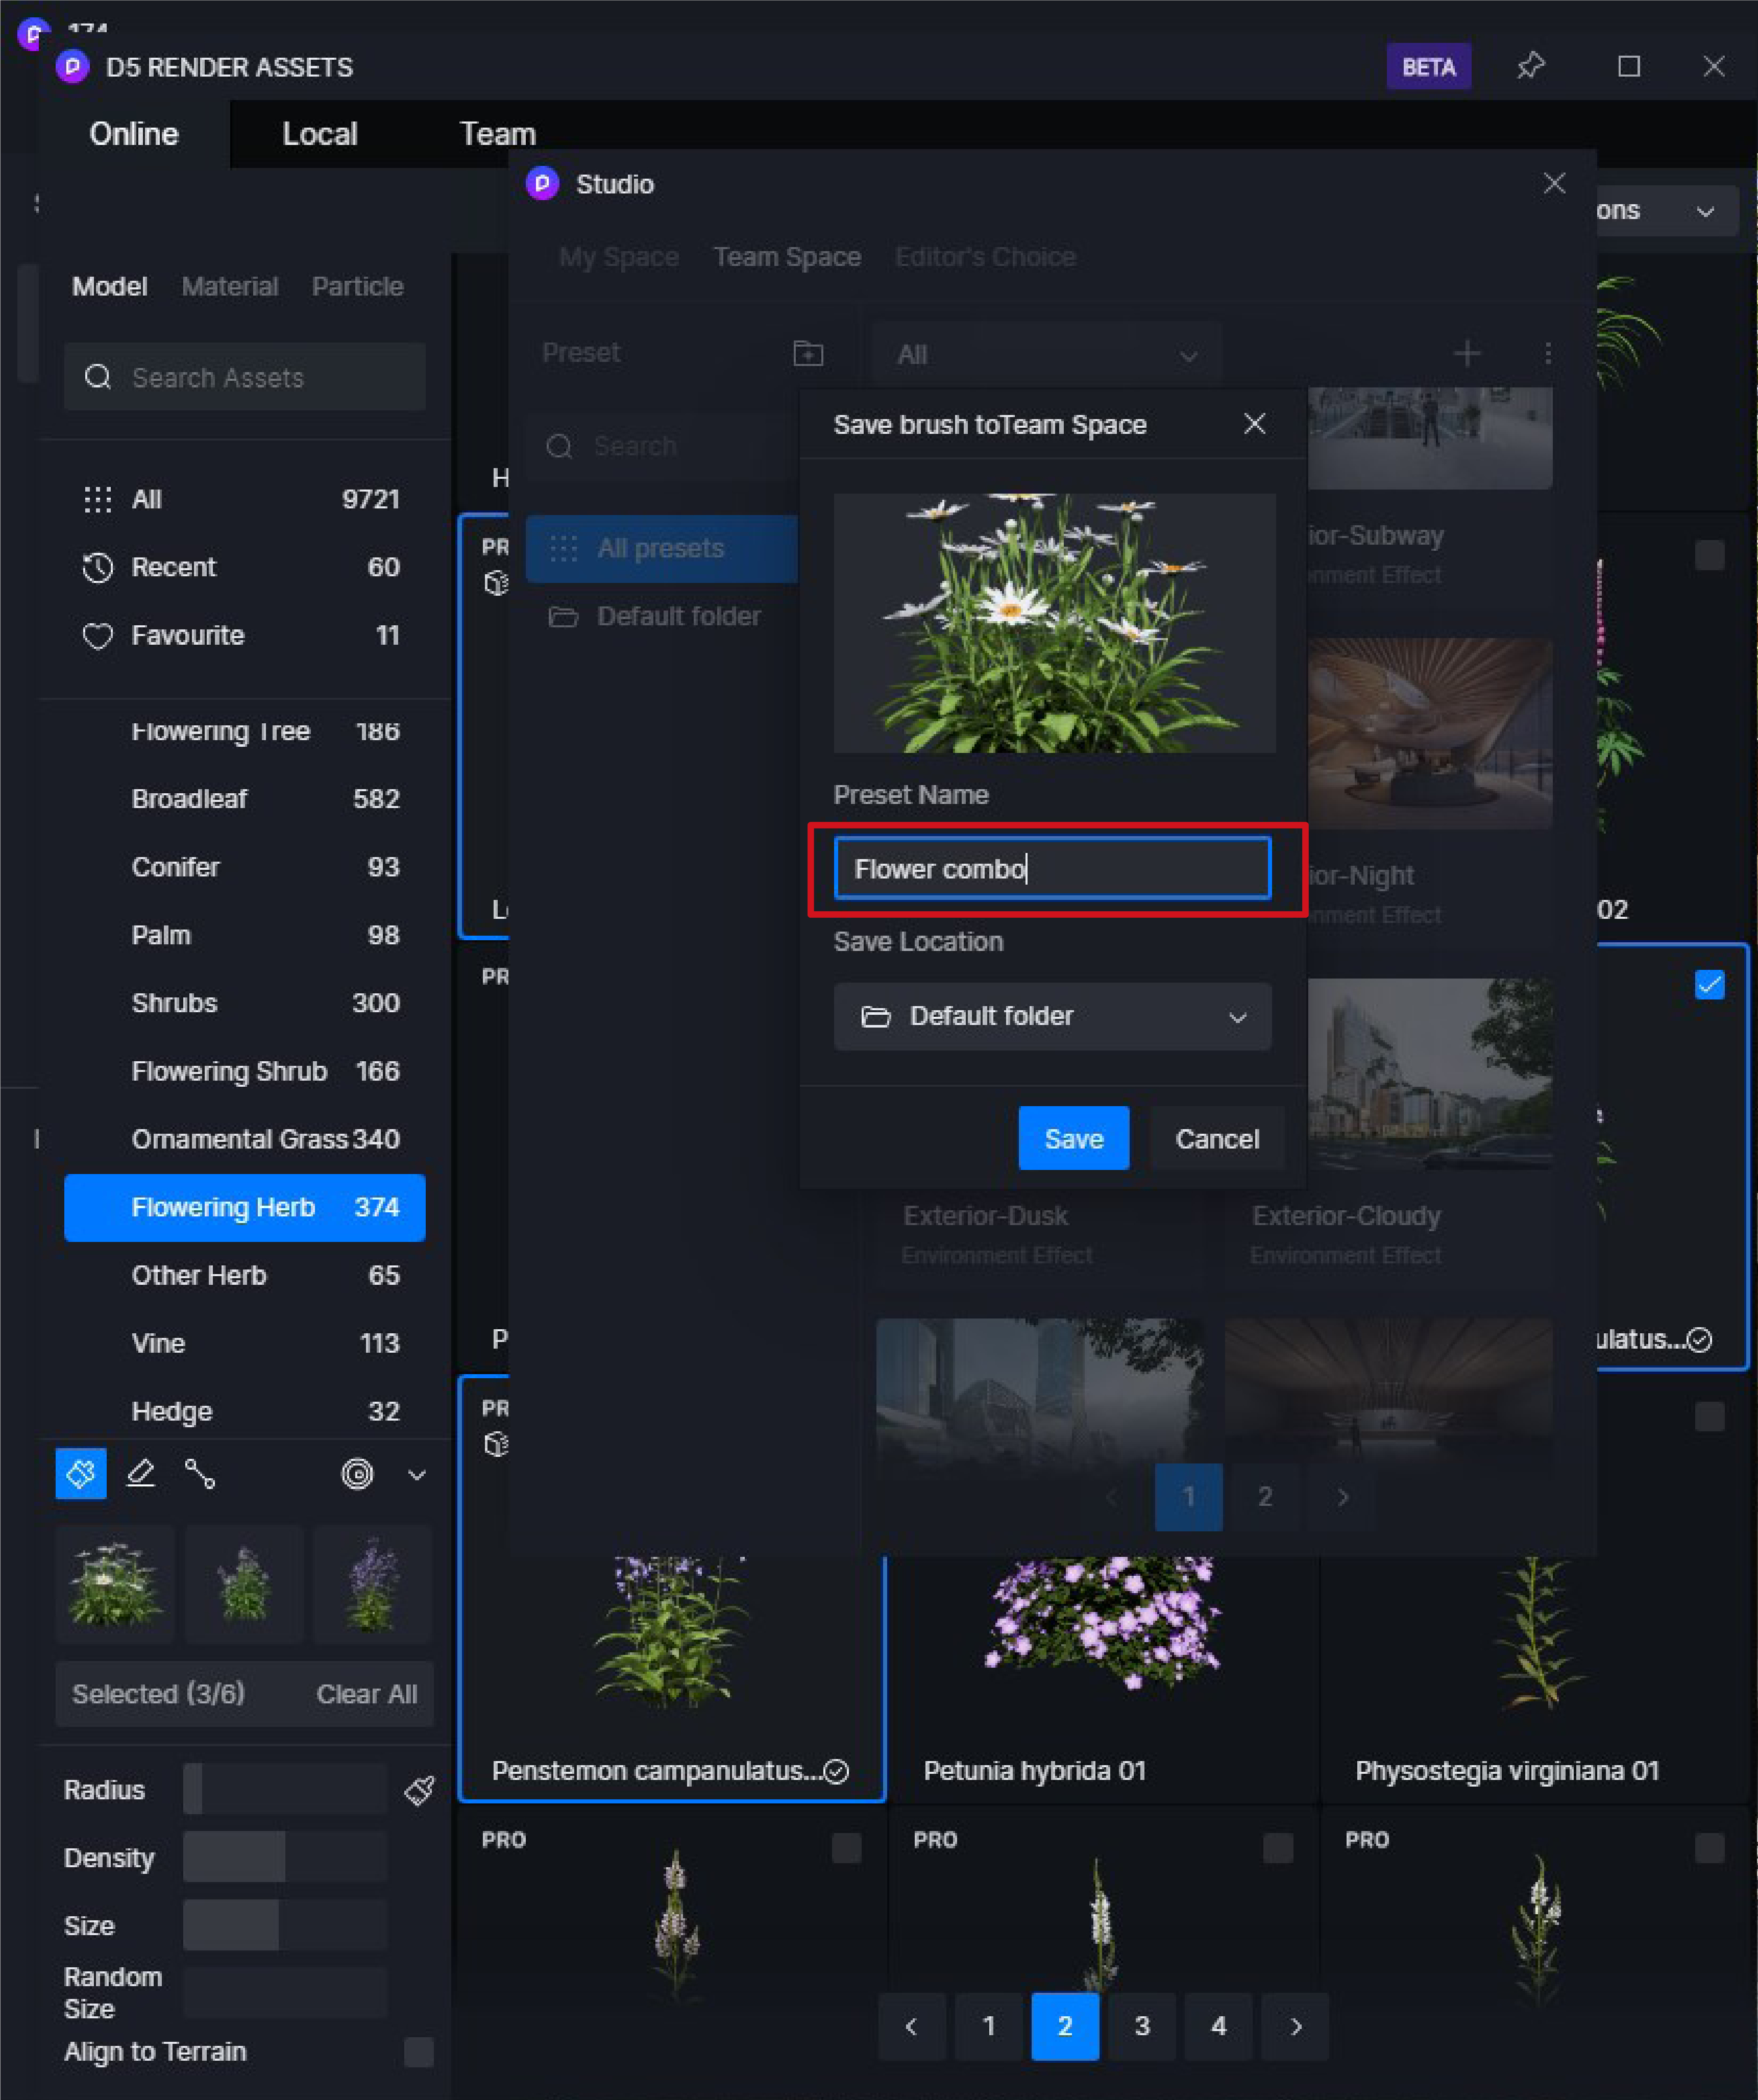
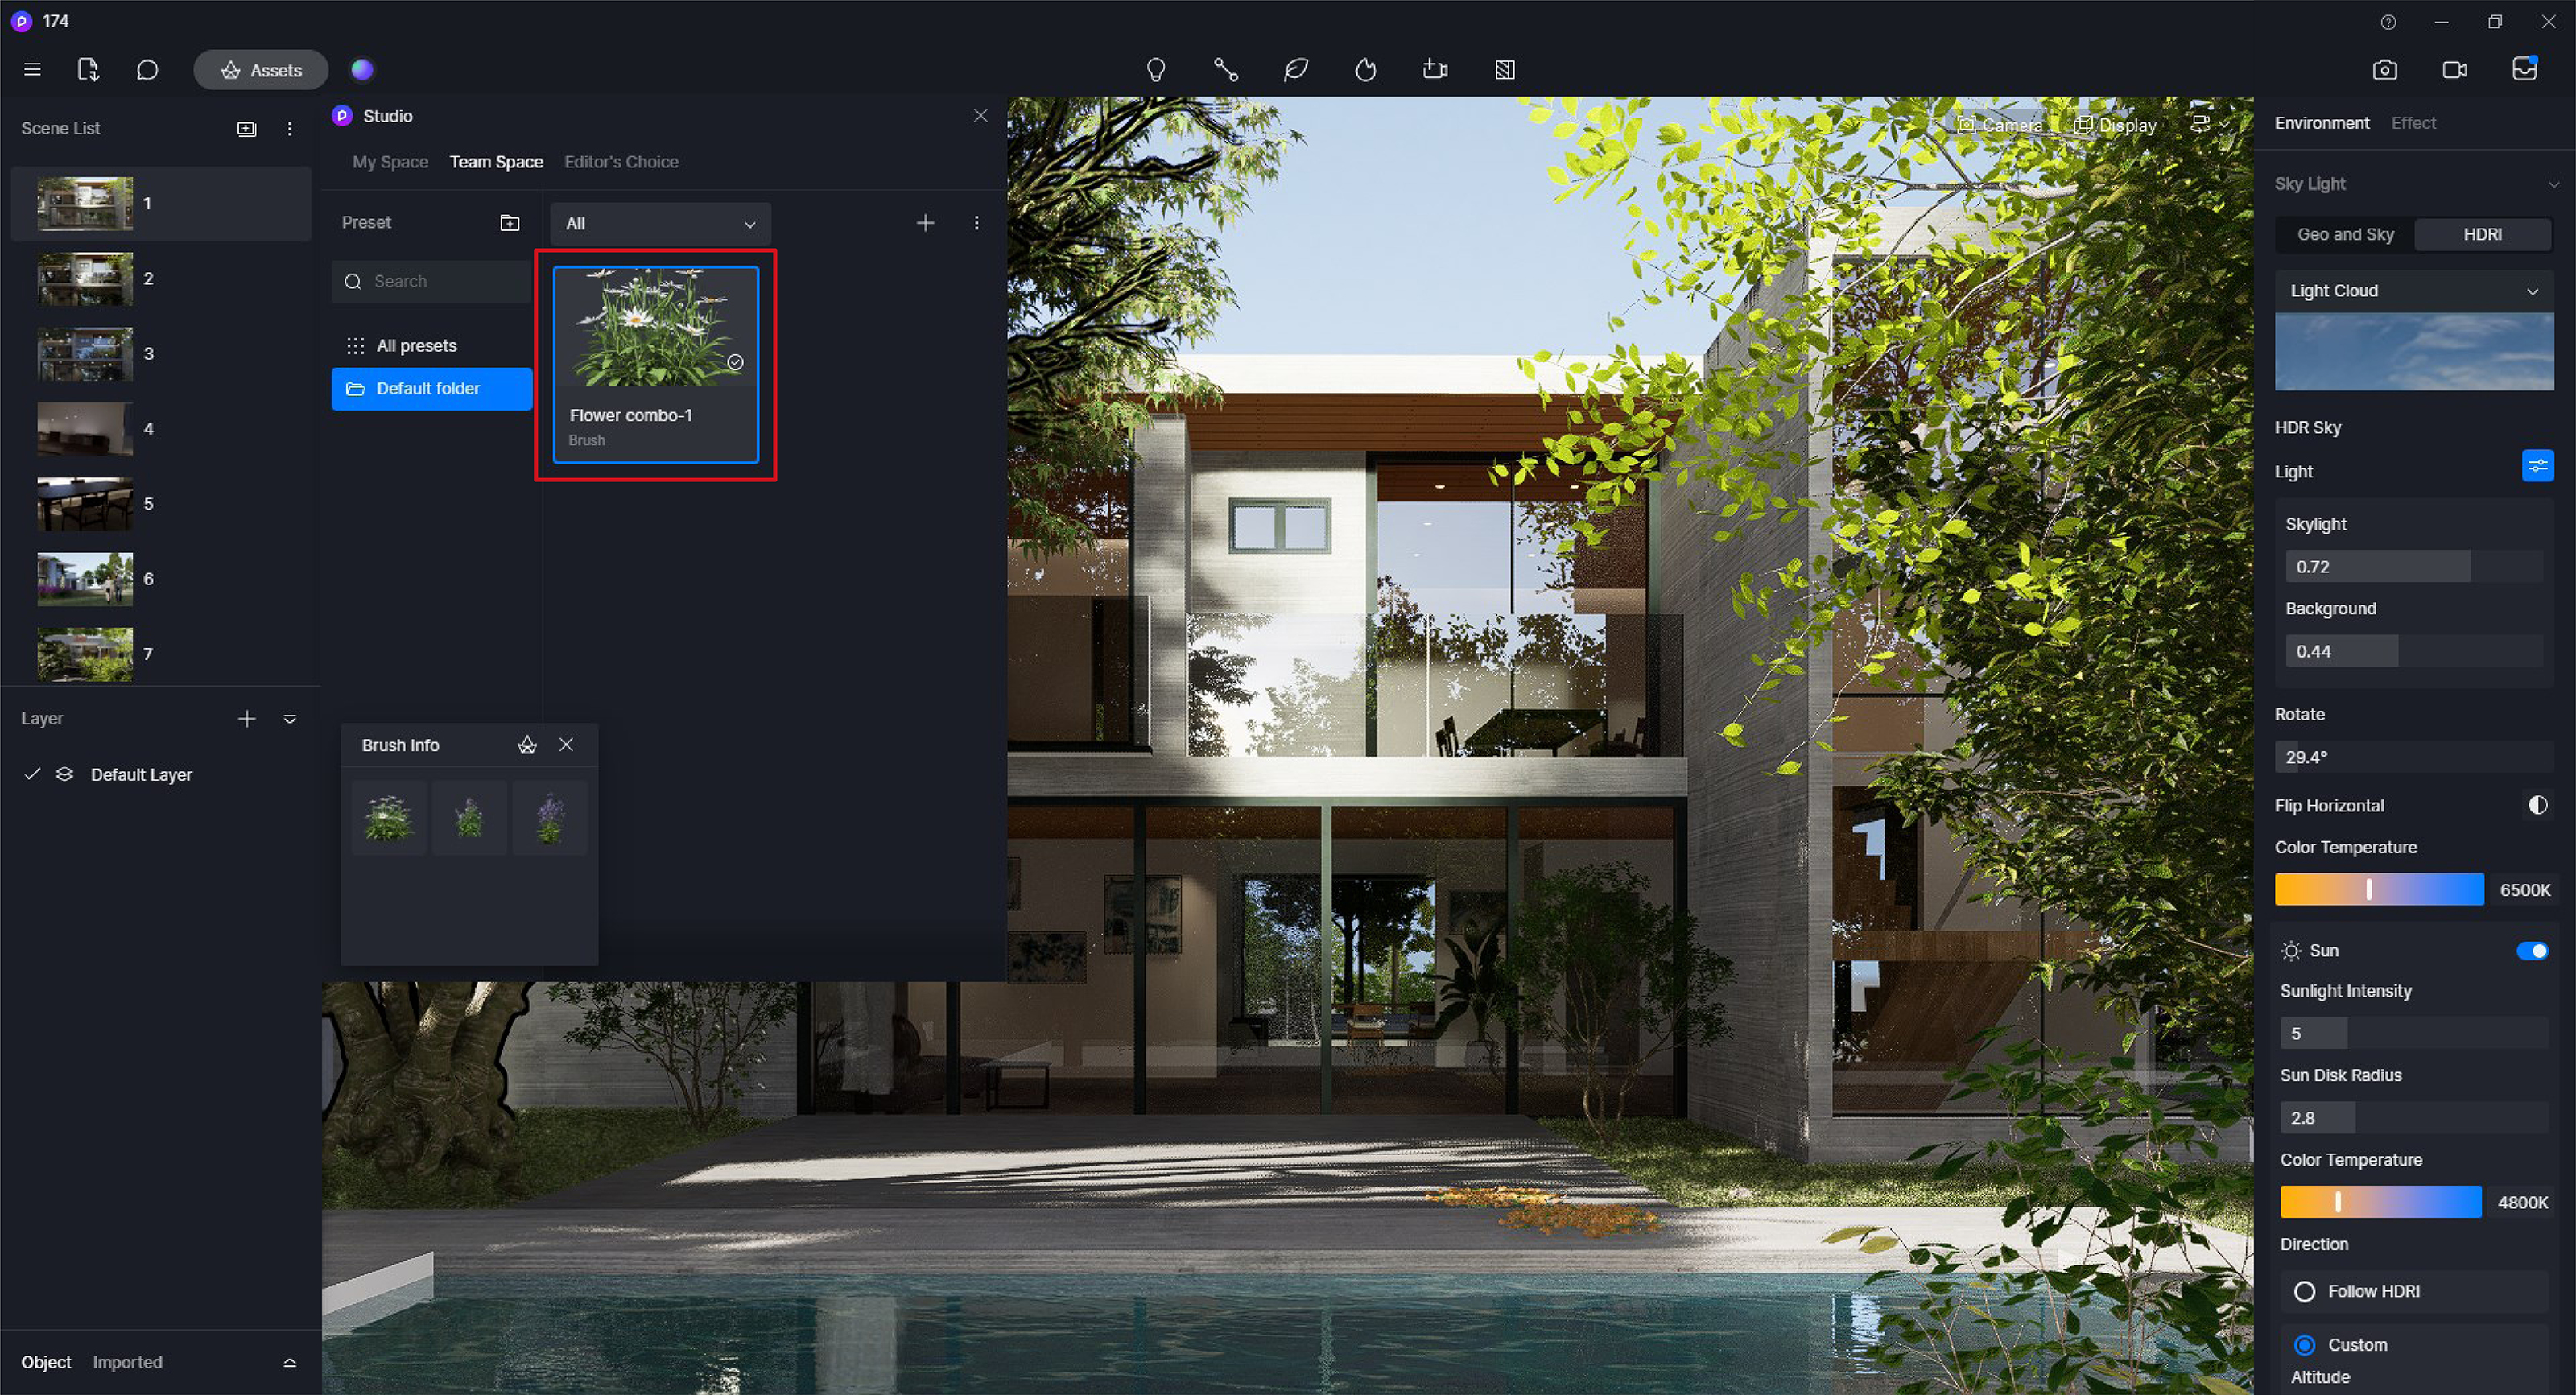
Brush Preset
D5 brush presets contain the asset IDs and brush parameters
How to create D5 brush presets
After logging into your Teams account, select brush tool and you can then save the preset to My Space or Team Space in the Assets tab.

How to apply D5 brush presets
Double-click on the preset thumbnail in the Studio panel to use the brush preset, and the models in the preset will be automatically downloaded and the brush tool will be activated, allowing you to directly brush in the scene. If you need to adjust the brush parameters, simply click on the preset for adjustments.
Path Preset
D5 path presets contain the asset IDs and path parameters
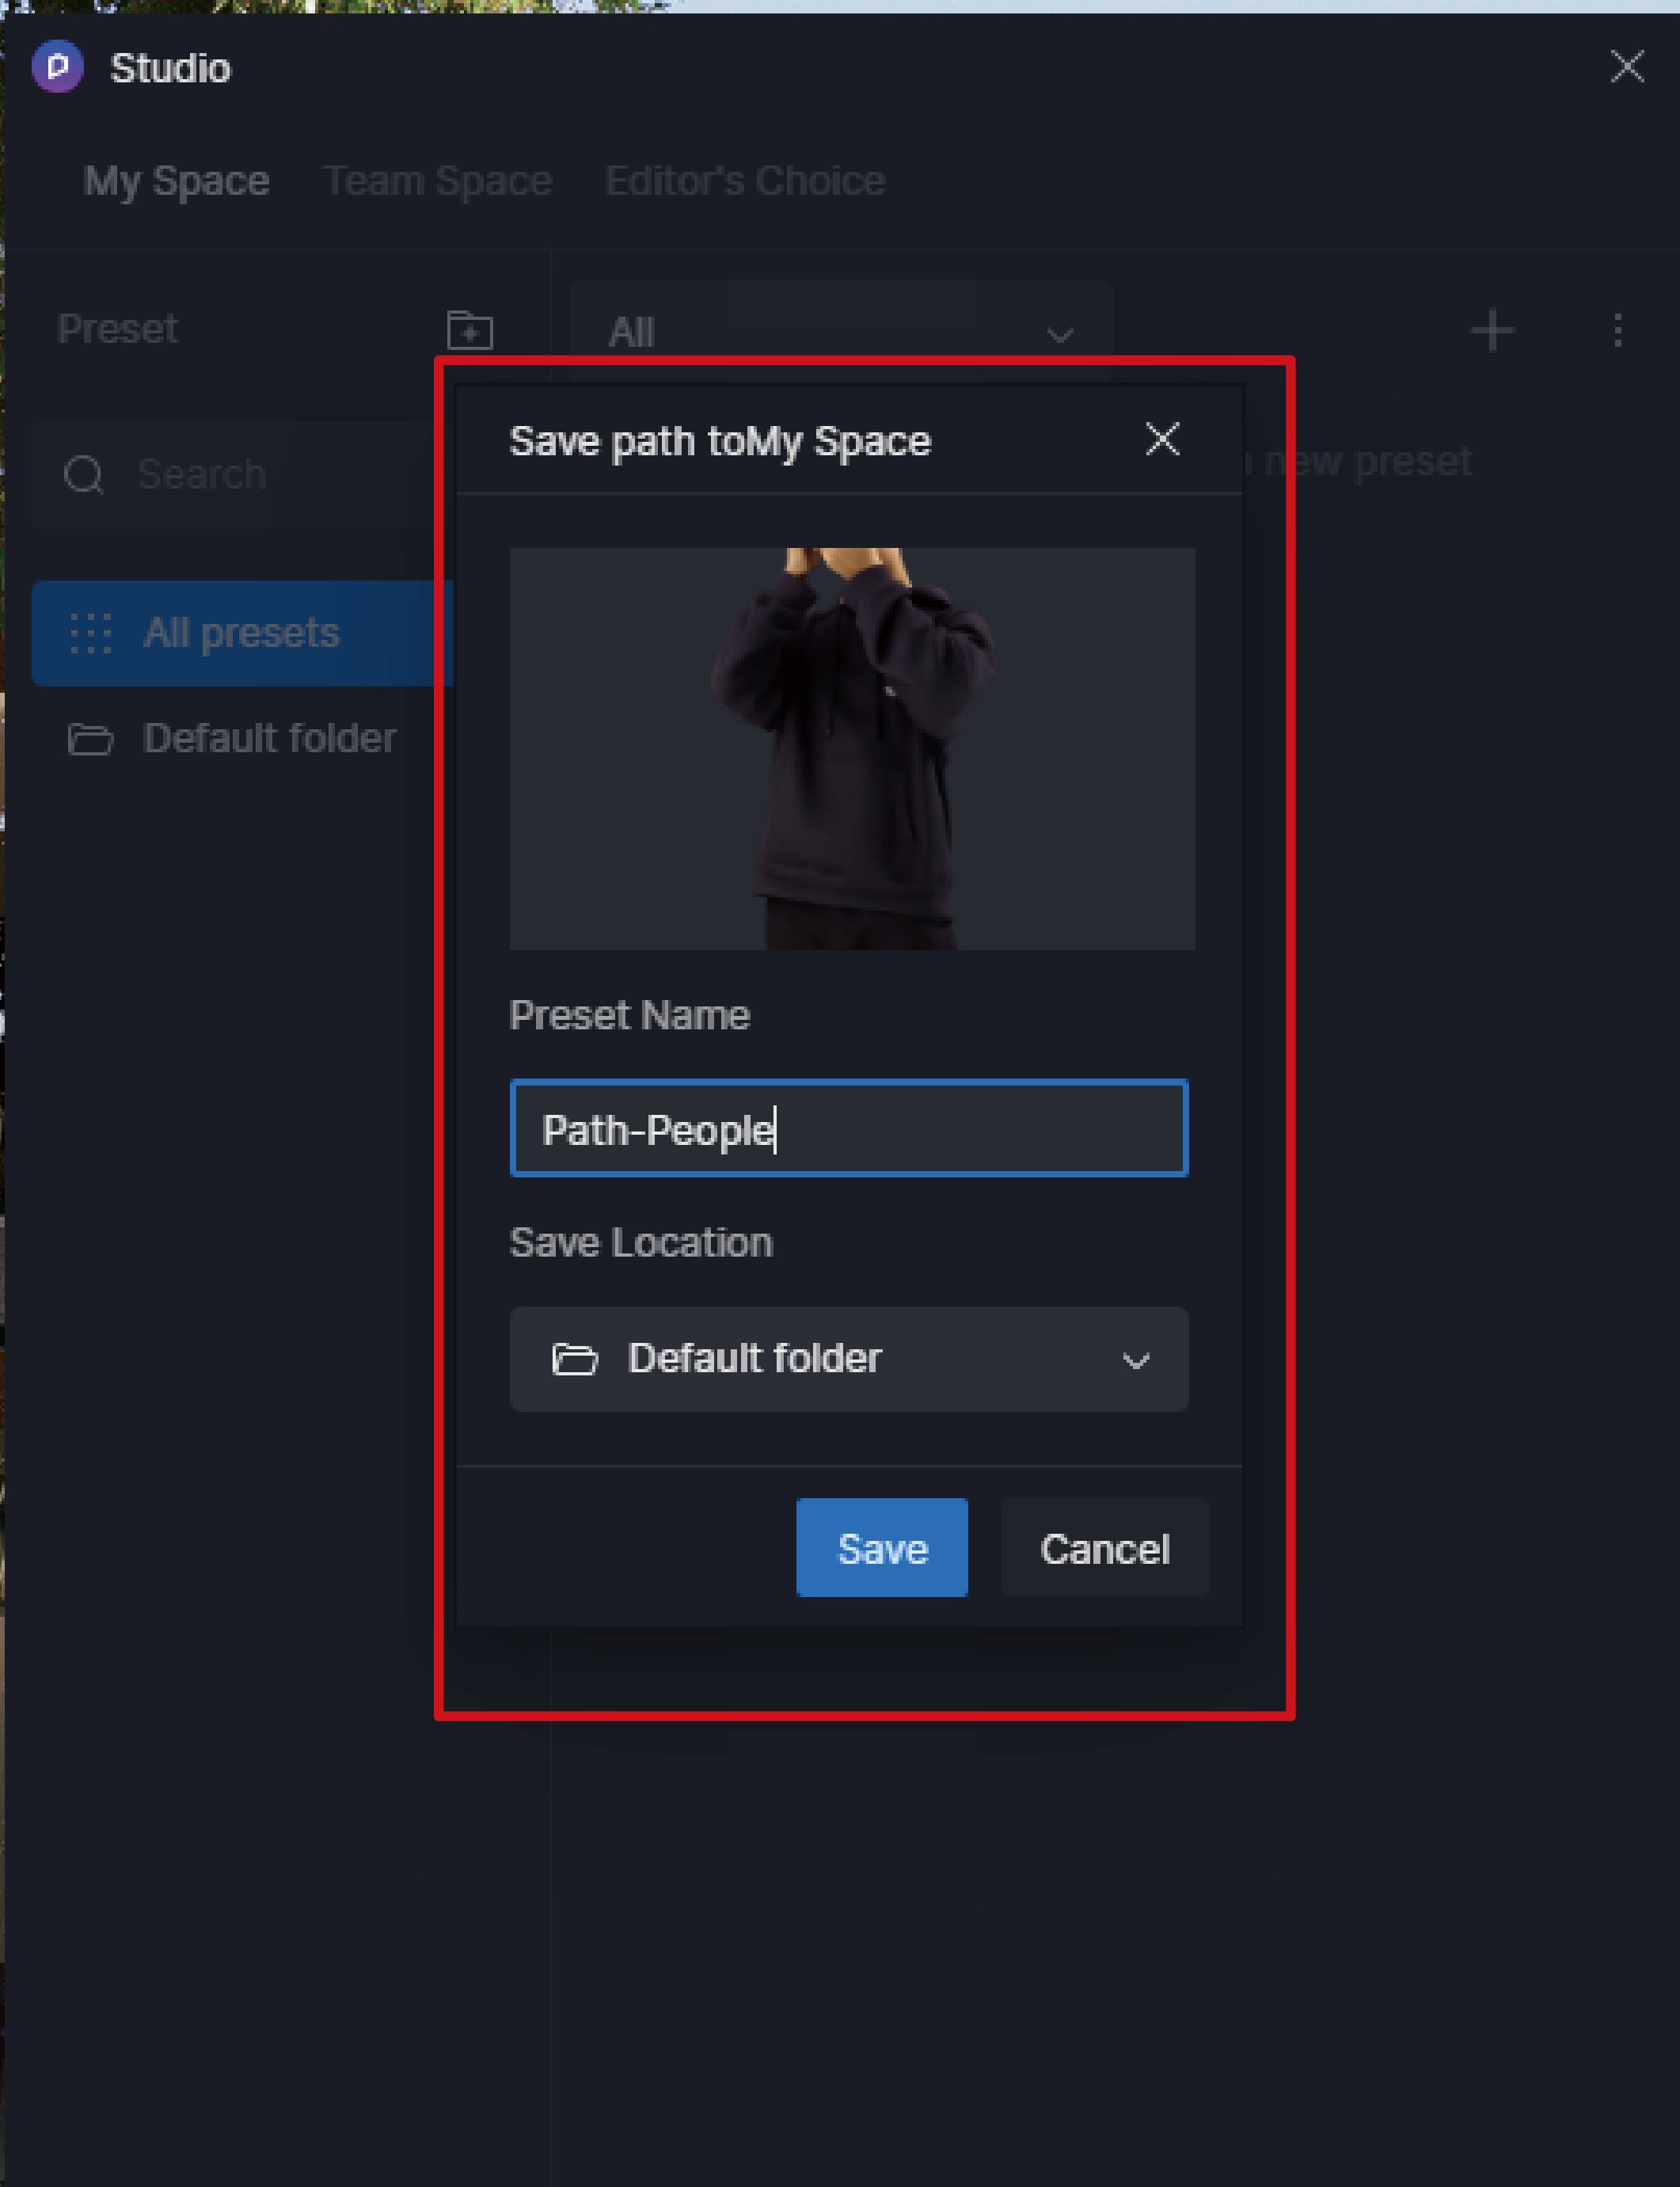
How to create D5 path presets
Select a drawn path model, on the right side you can save the preset to My Space or Team Space

How to apply D5 path presets
Double-click on the path preset to activate path tool, and the assets in the preset will be automatically downloaded and available for path drawing directly in the scene.
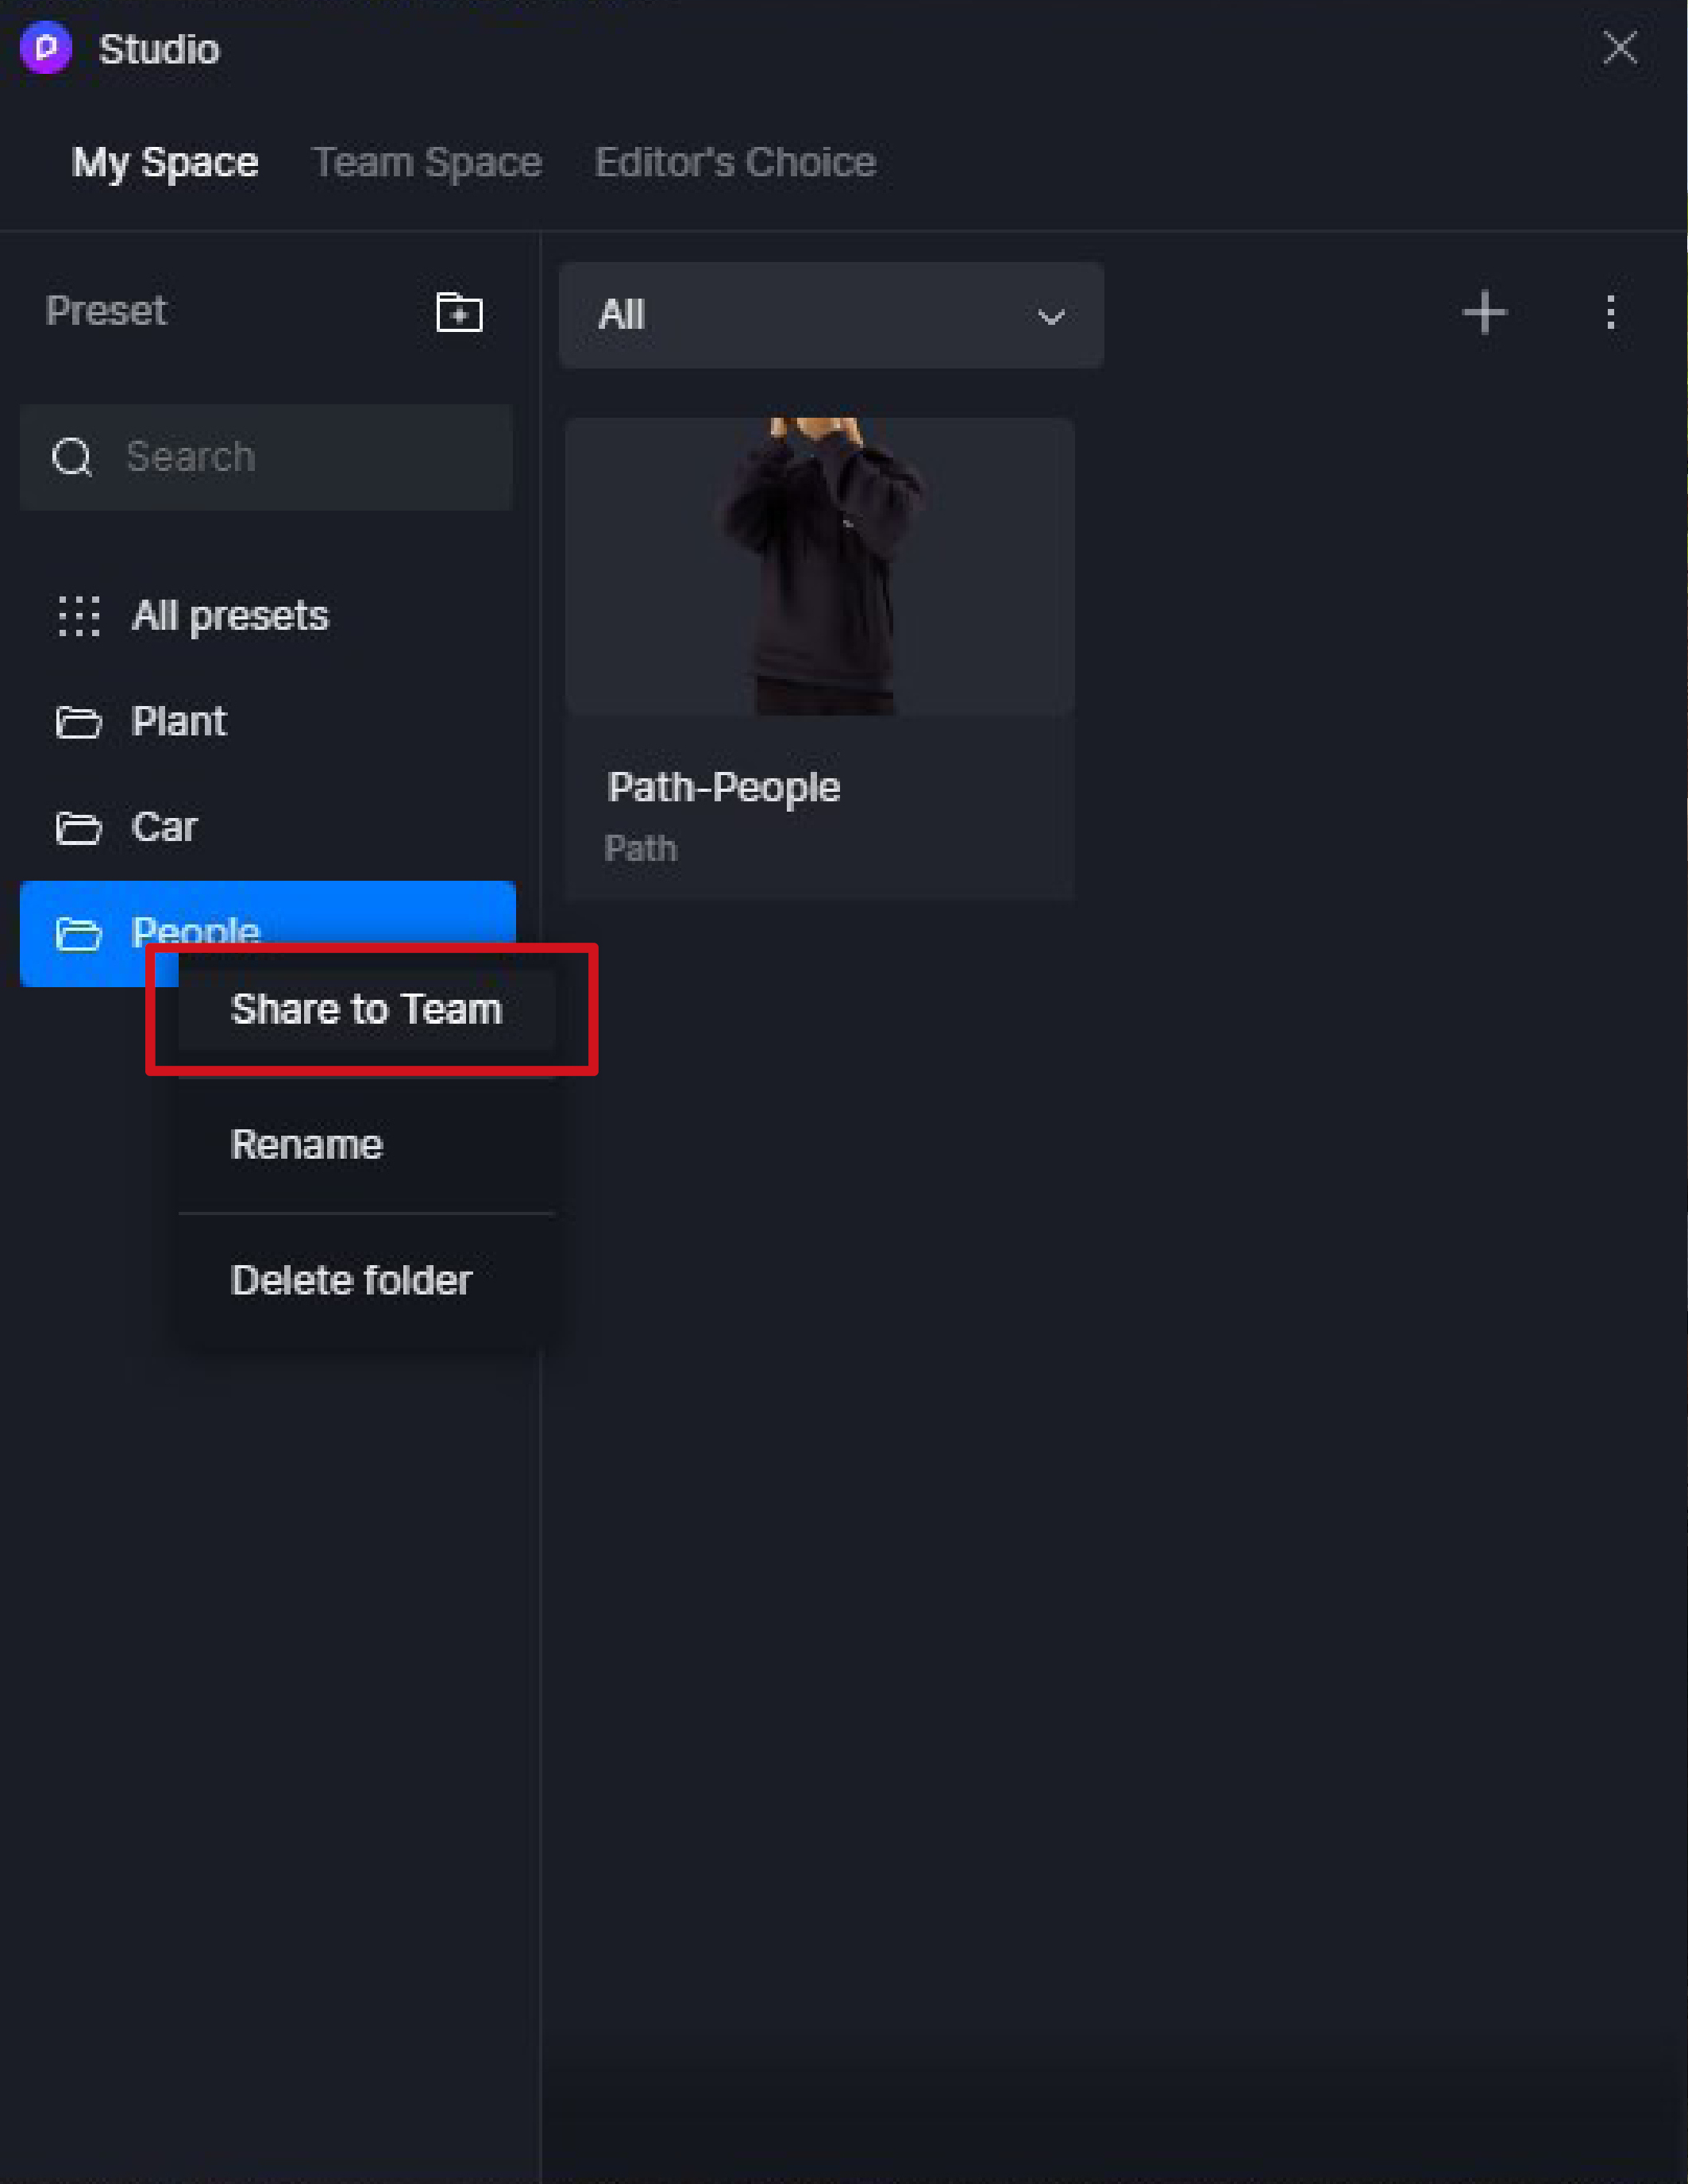
Share Presets with Team
You can share data of either a single preset or an entire folder with team members. In either case, the shared data will be copied to the designated team folder.


Permissions for team roles
-
Save preset to My Space: everyone
-
Save preset to Team Space: administrators and owner
-
Share preset to Team Space: everyone
-
Delete/rename preset in My Space: everyone
-
Delete/rename preset in Team Space: administrators and owner
D5 Curated
D5 Curated is a resource section in Studio, where D5 collects some amazing presets created by outstanding designers and design teams we invite. The resources in D5 Curated are continuously updated.

Cloud storage management
D5’s cloud services (such as D5 Studio) will occupy your storage space, with a shared team cloud storage space of 100GB. You can view detailed usage information for both personal and team space usage in Team Settings and Dashboards. If you need more cloud storage space, try deleting historical data that is no longer in use or contacting us here.

4. Comments
How to add comments
Before creating comments, it is necessary to bind “D5 Cloud Project”. One cloud project can be bound to multiple local projects, and users can choose to bind existing cloud projects or create new ones.

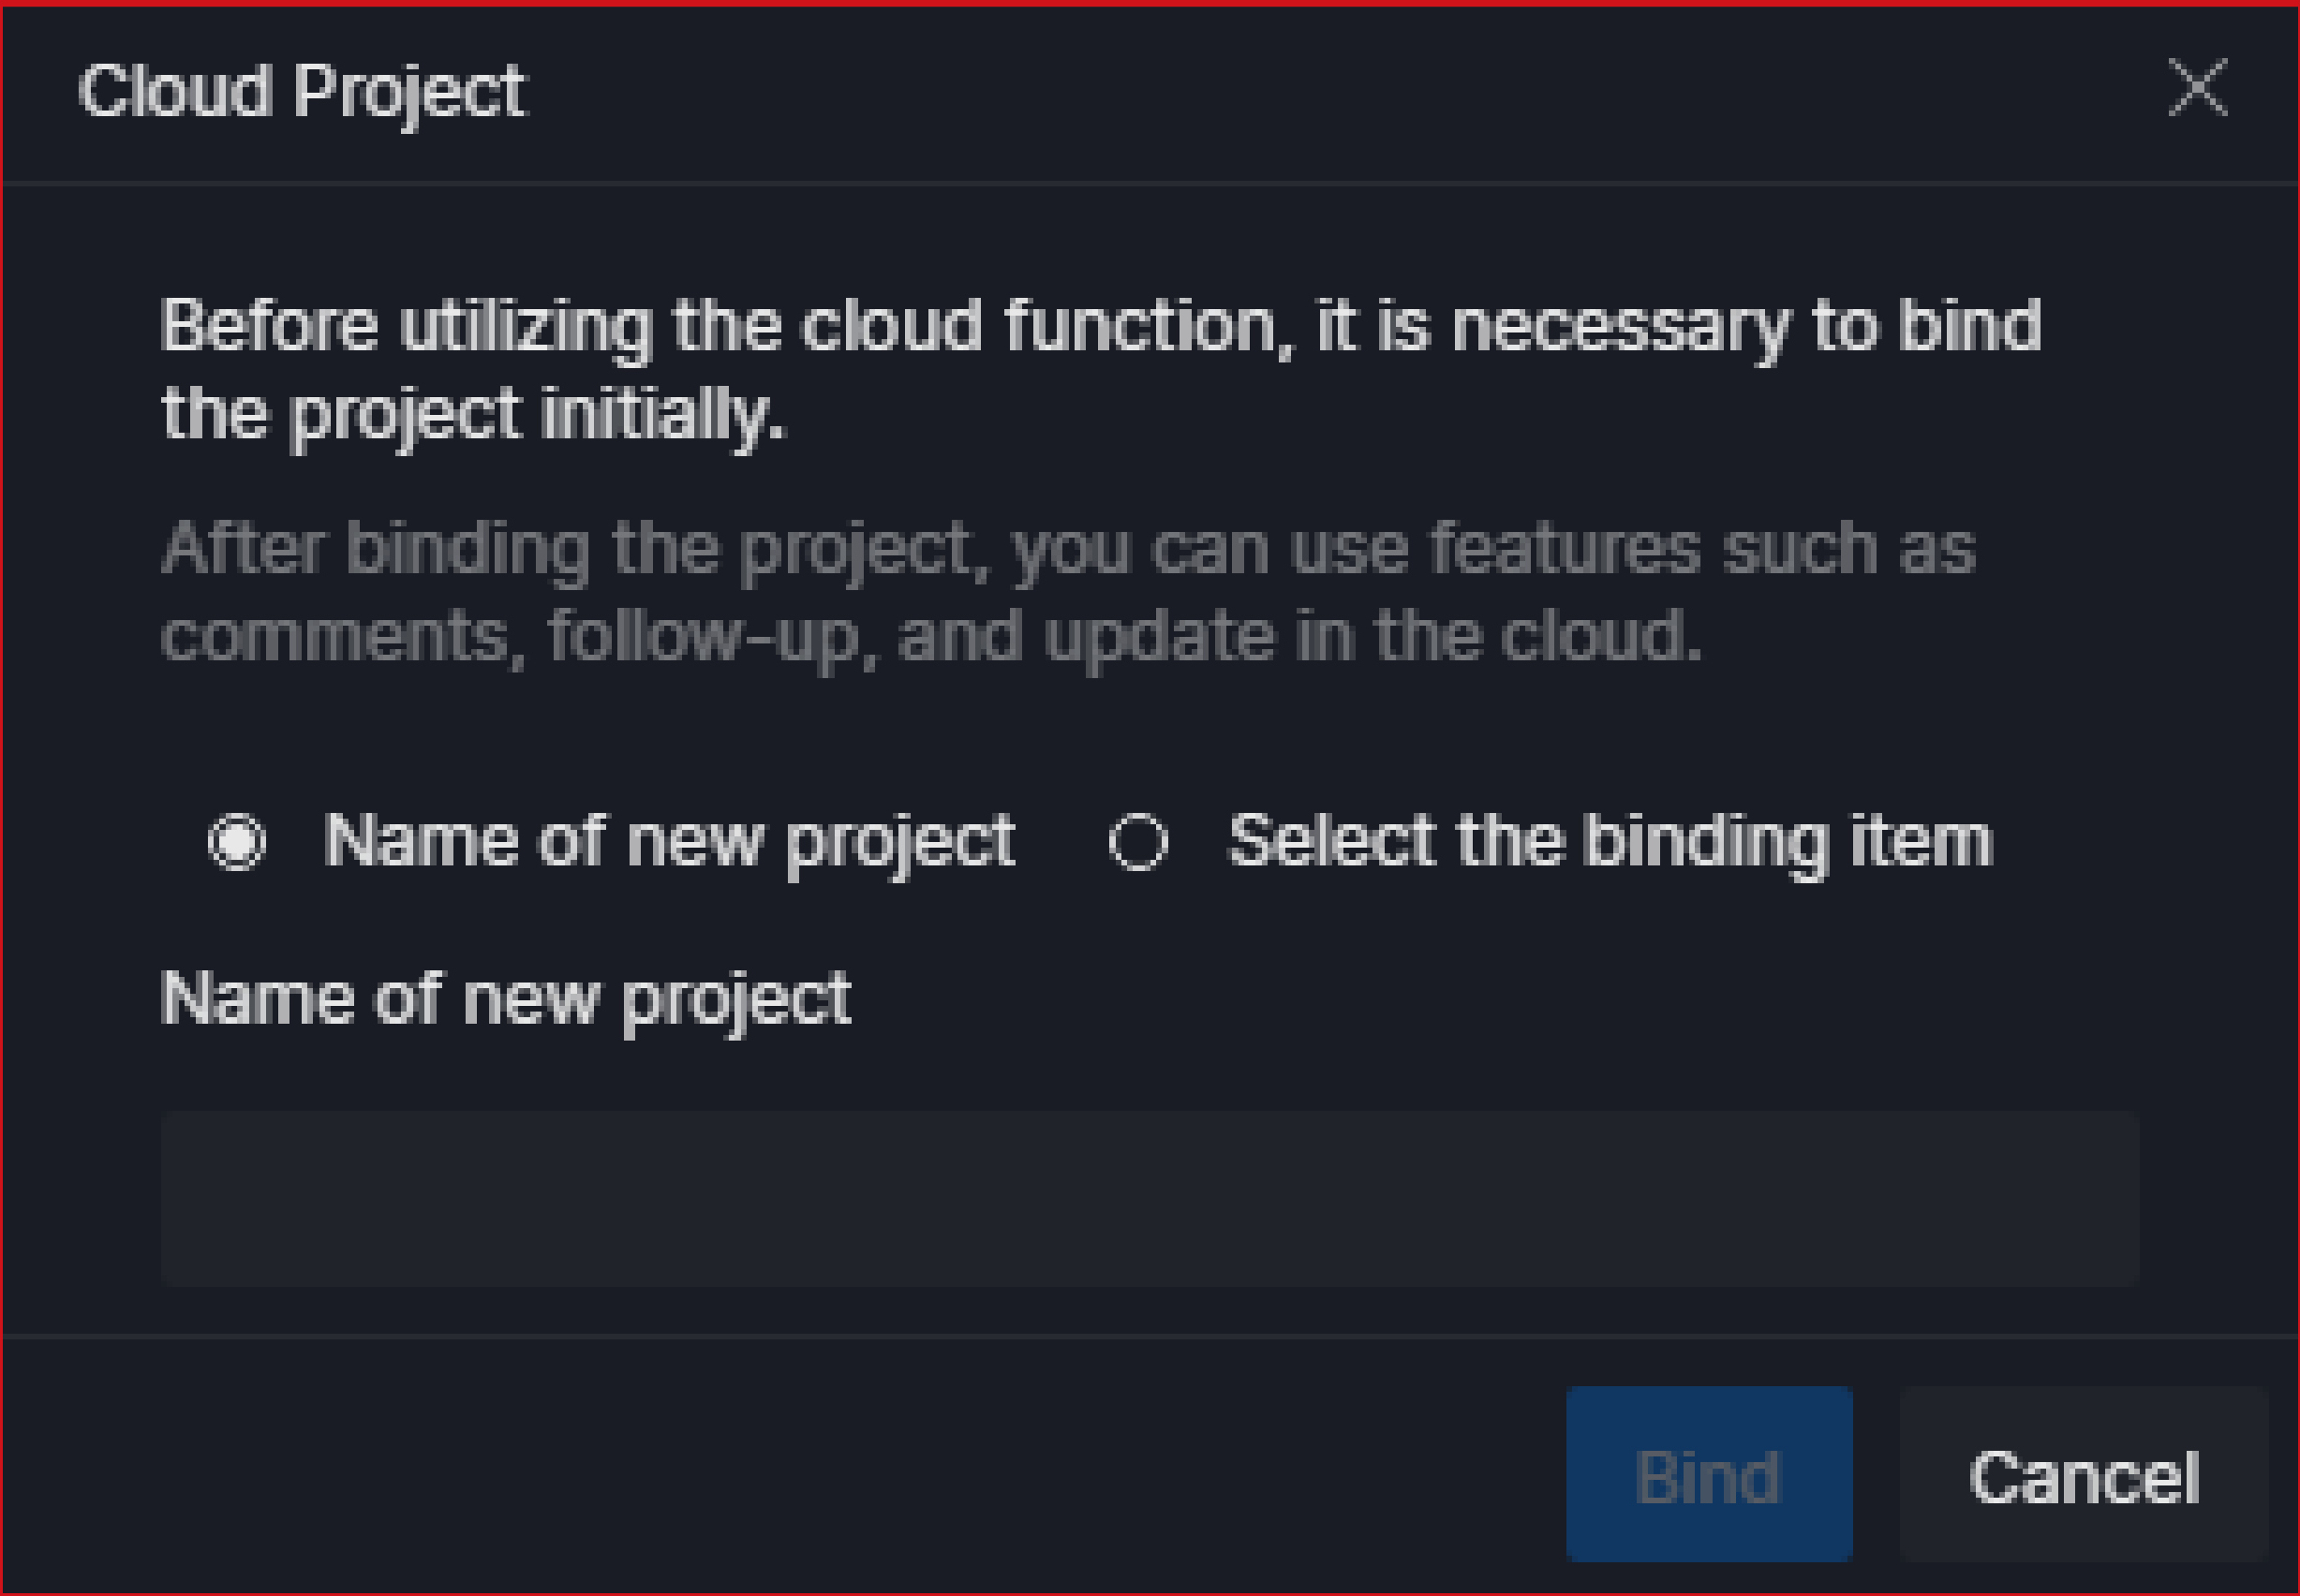
- After binding the cloud project, you can add comments to the project.
You can only create and view comments for a saved project.

You can directly add images and anchors in the project comments.

You can see comments from other team members on this project in the comment tab and reply to them.
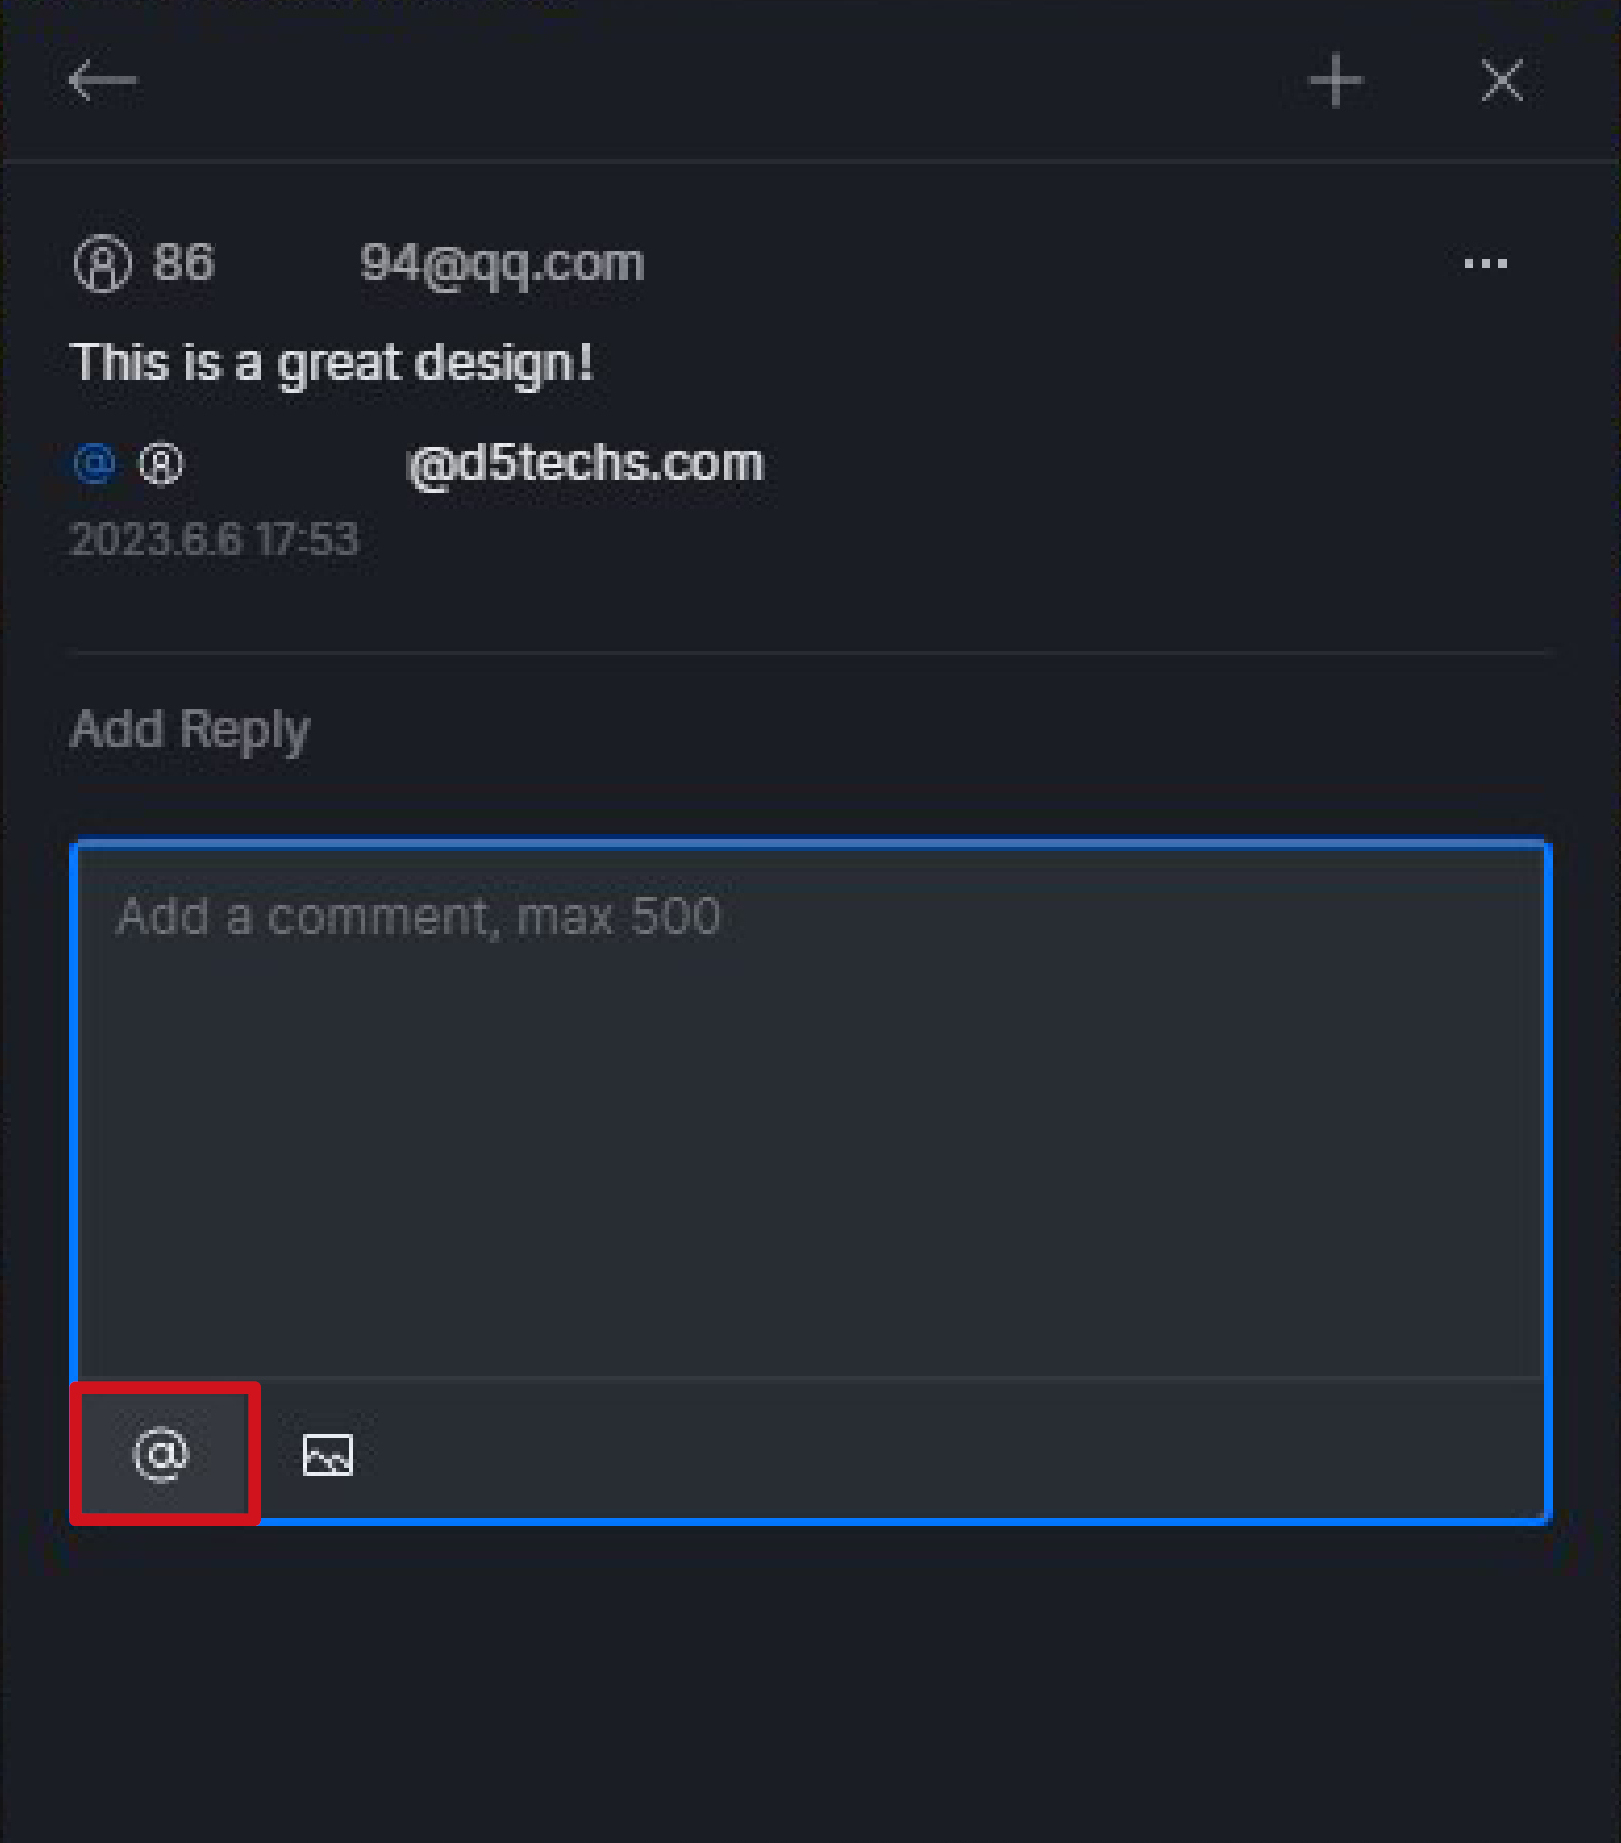
When creating a comment, @ other team members to automatically send an email notification to them, keeping you all updated.
How to add comments to a project that is currently in use?
If a project in the team project library is being edited by another team member and it is not a multi-editor project, you can choose to open the project in view-only mode to use comments
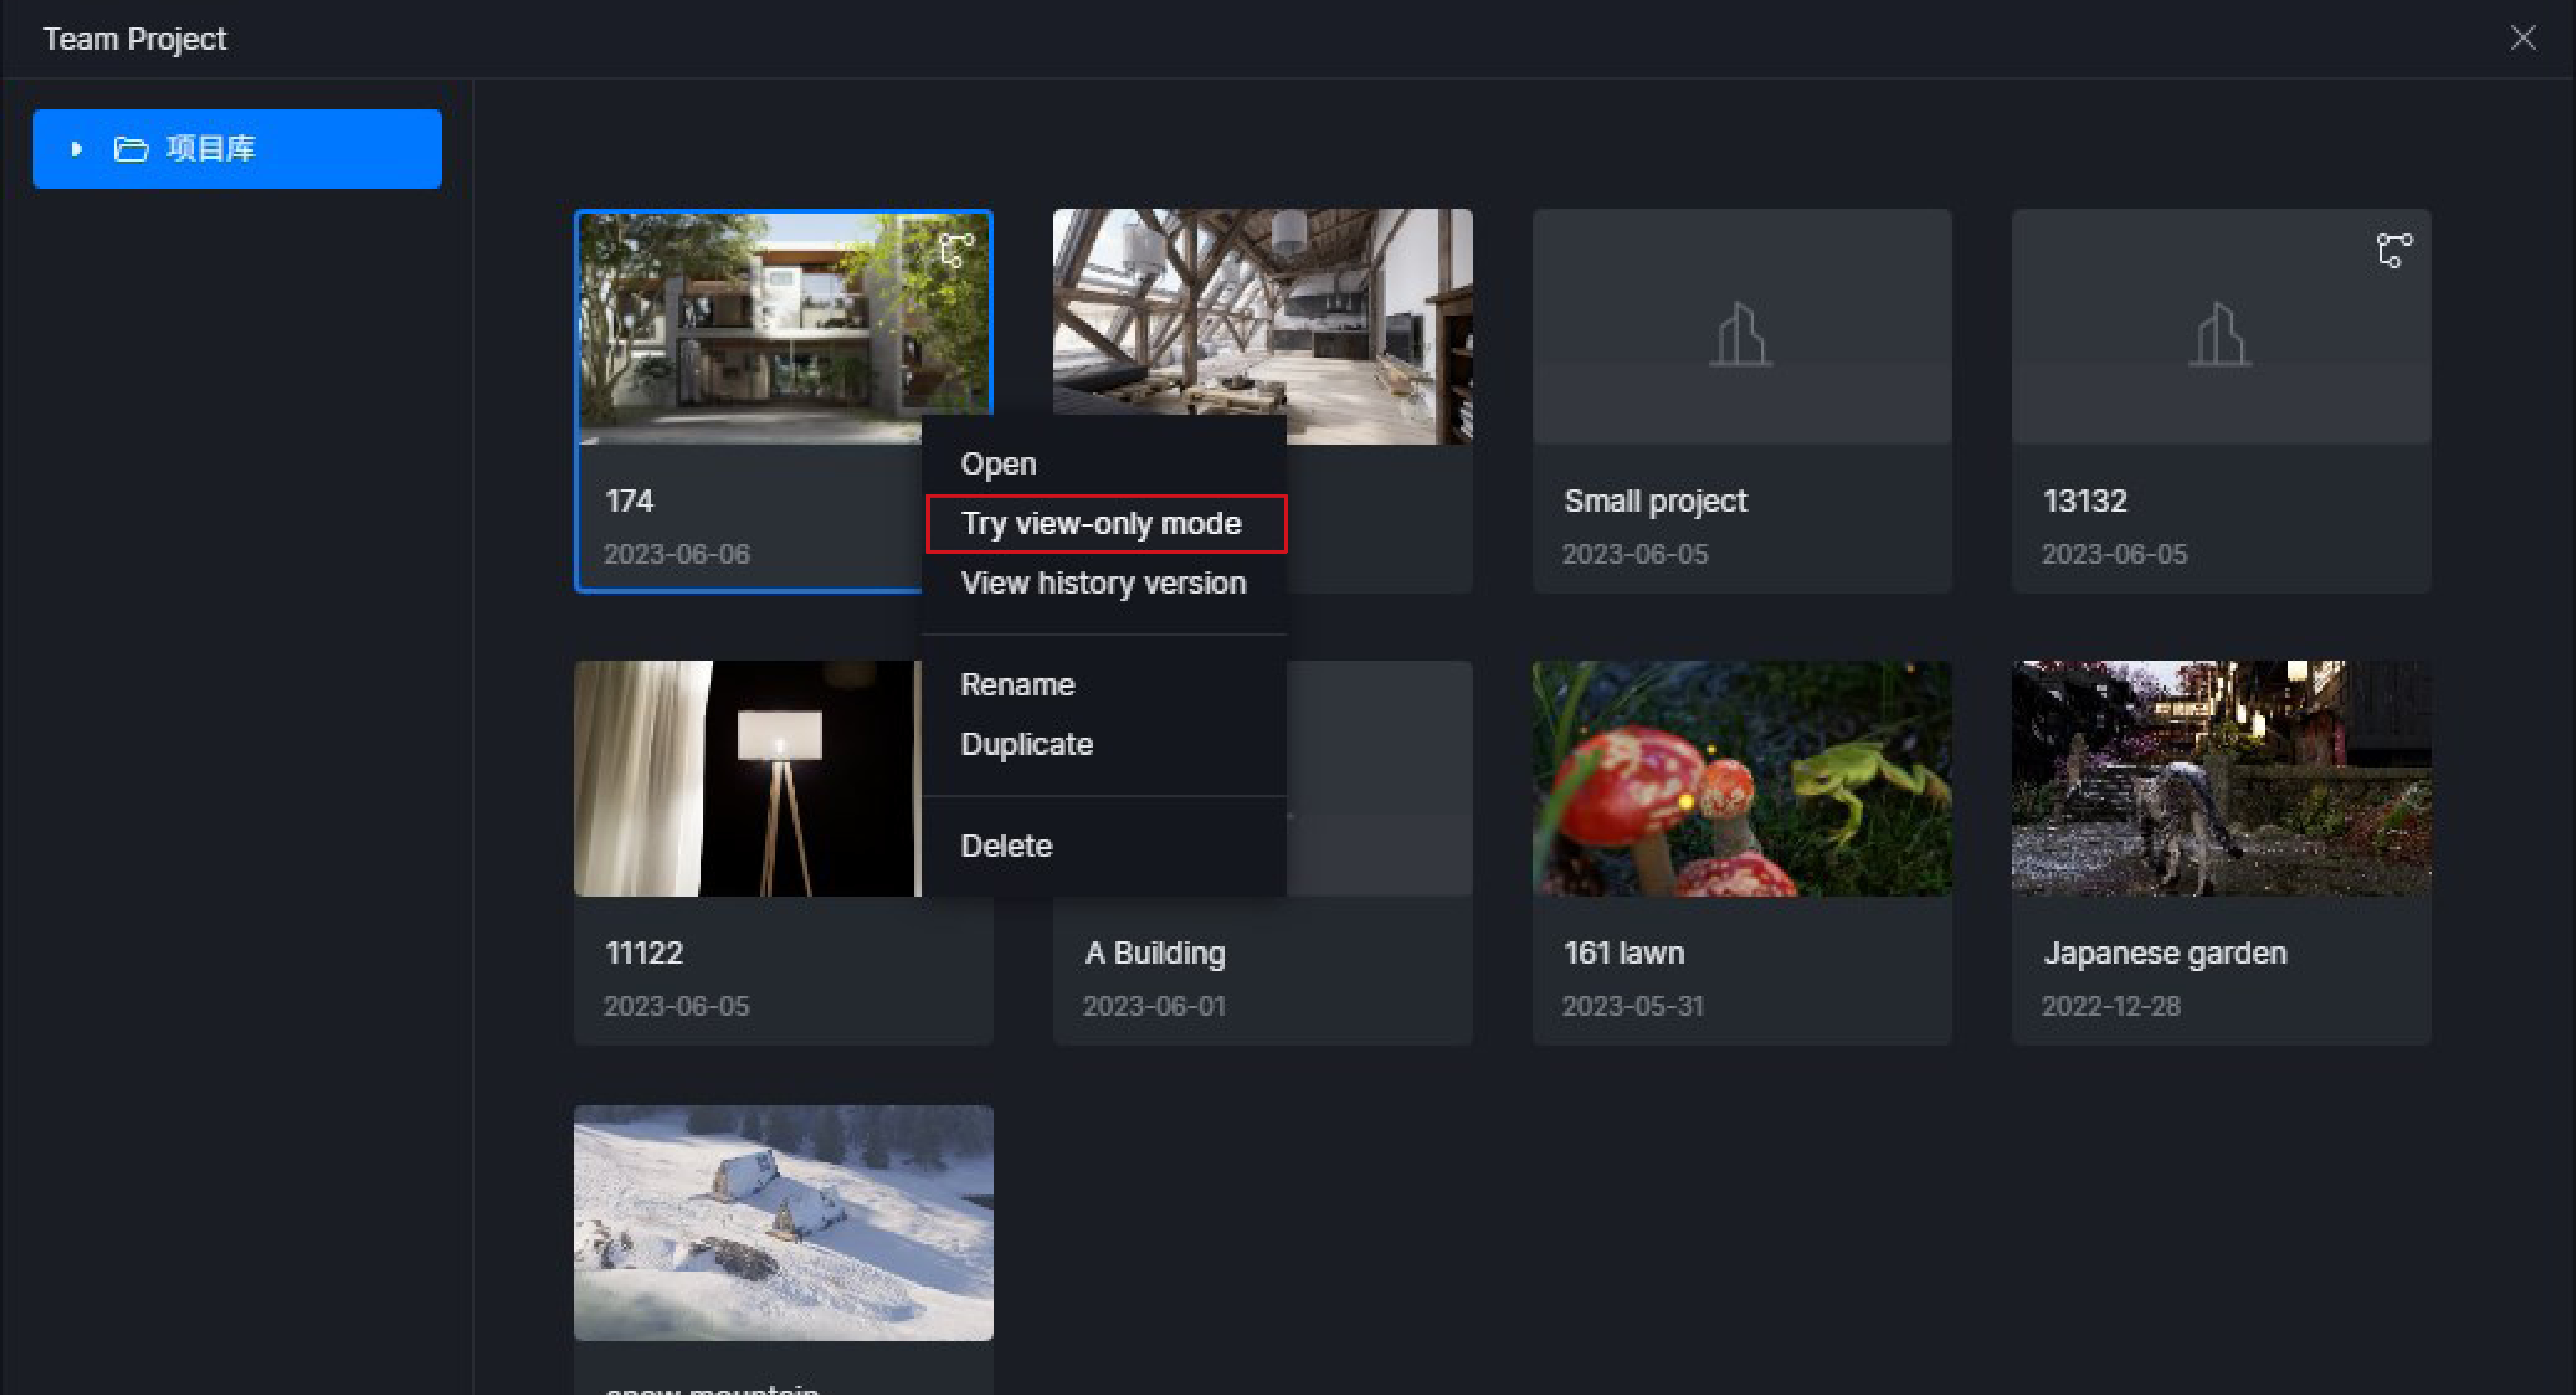
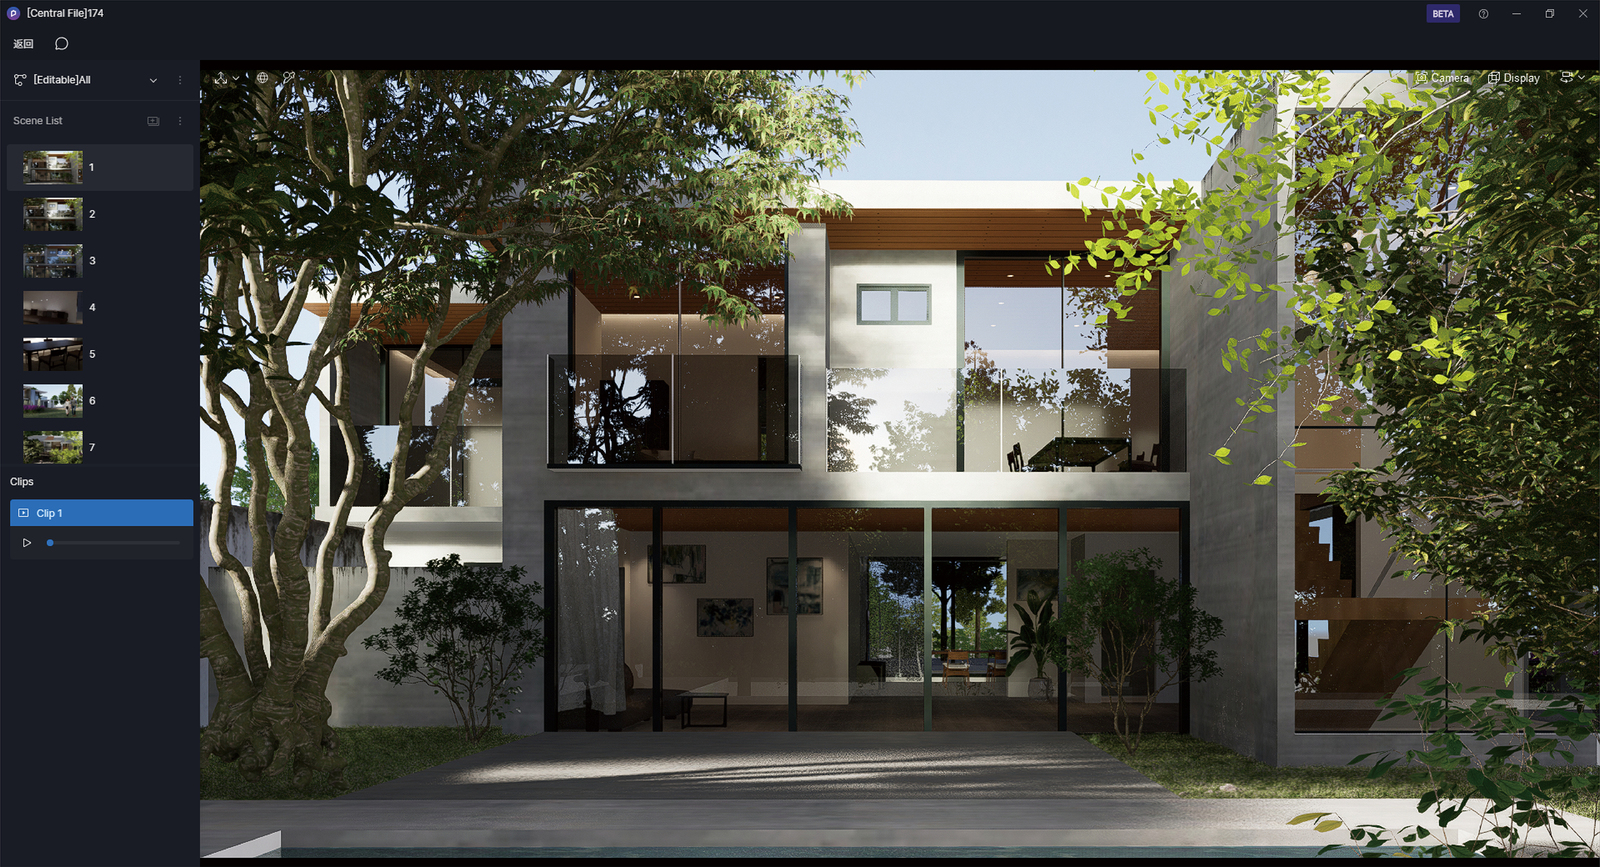
In view-only mode, no changes can be made to the project in any form, but you can view the scenes and videos in the project and add comments.
5. Member Management
Apply for and set up a Teams account
-
Use or register a D5 account to apply for “D5 for Teams”
D5 user registration link -
Send the email of your registered D5 account (for example, enterprise@d5techs.com) to the contact person. We will set this account as the owner of your team, create a subscription plan with your requested amount of seats, and notify you by email.
-
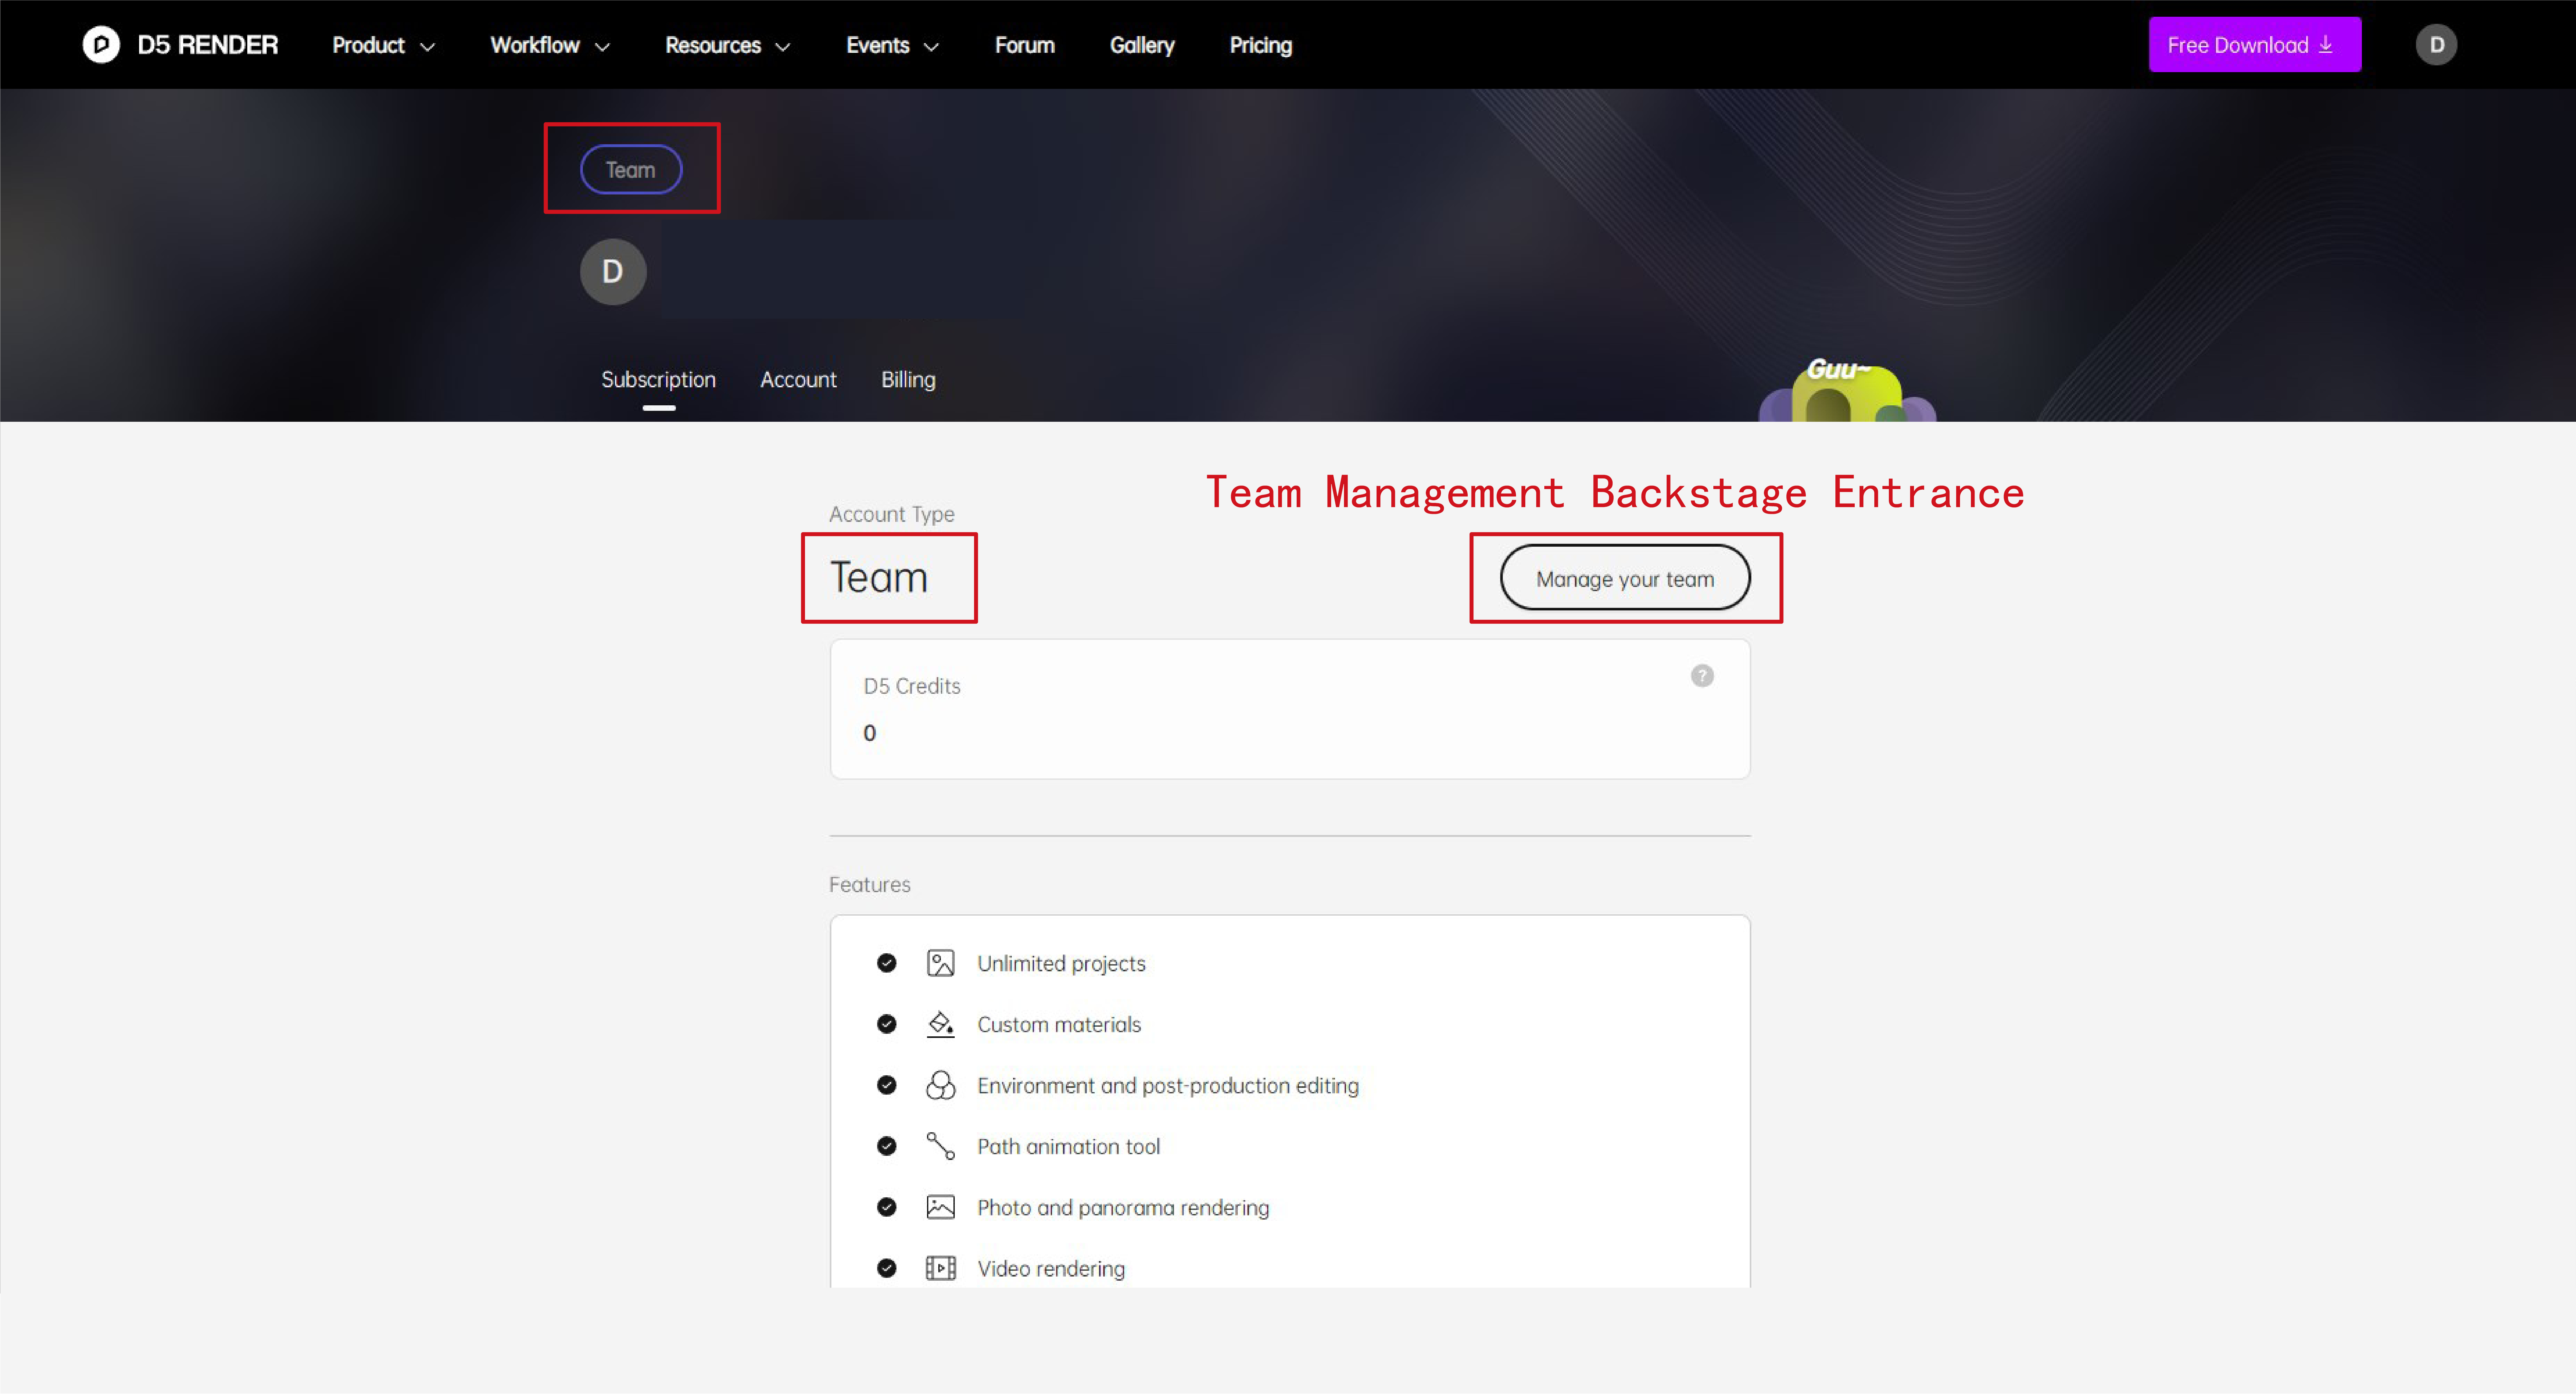
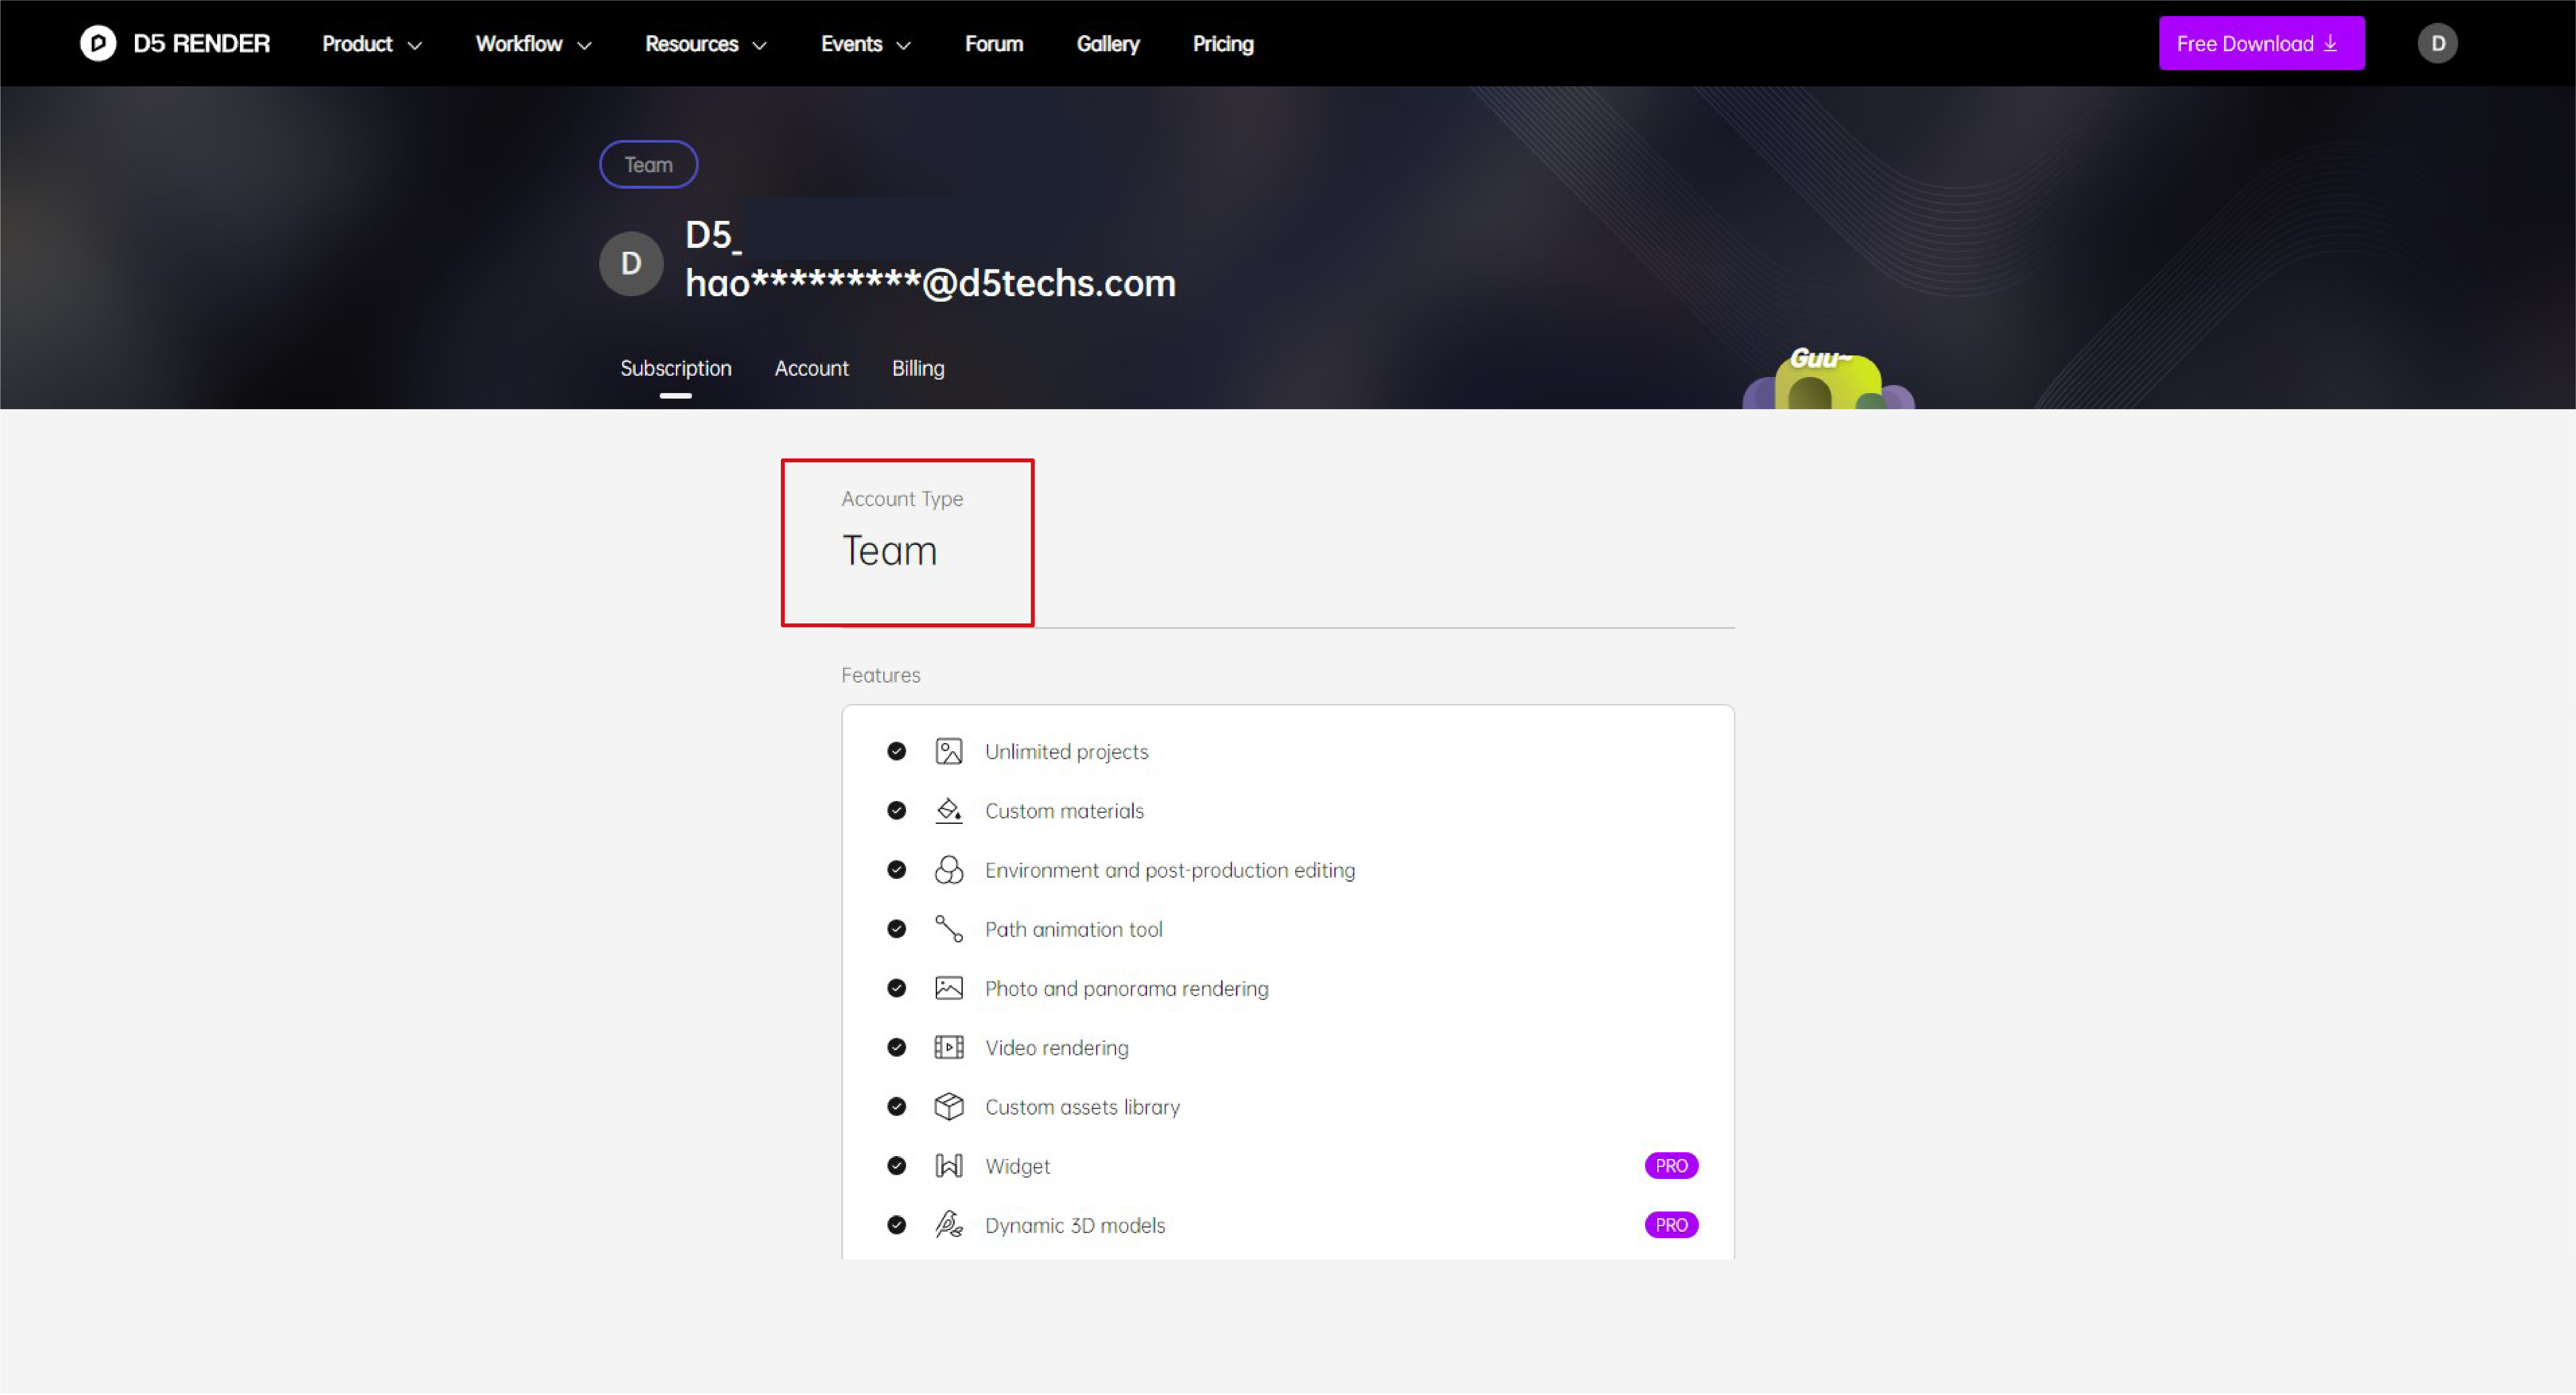
Then you can log in to your D5 account (for example, enterprise@d5techs.com) on https://www.d5render.com/, and go to “My Space” on the upper right.
D5 My Space
- The account type should be “Team”. Click the “Manage your team” button to access team settings and dashboards.
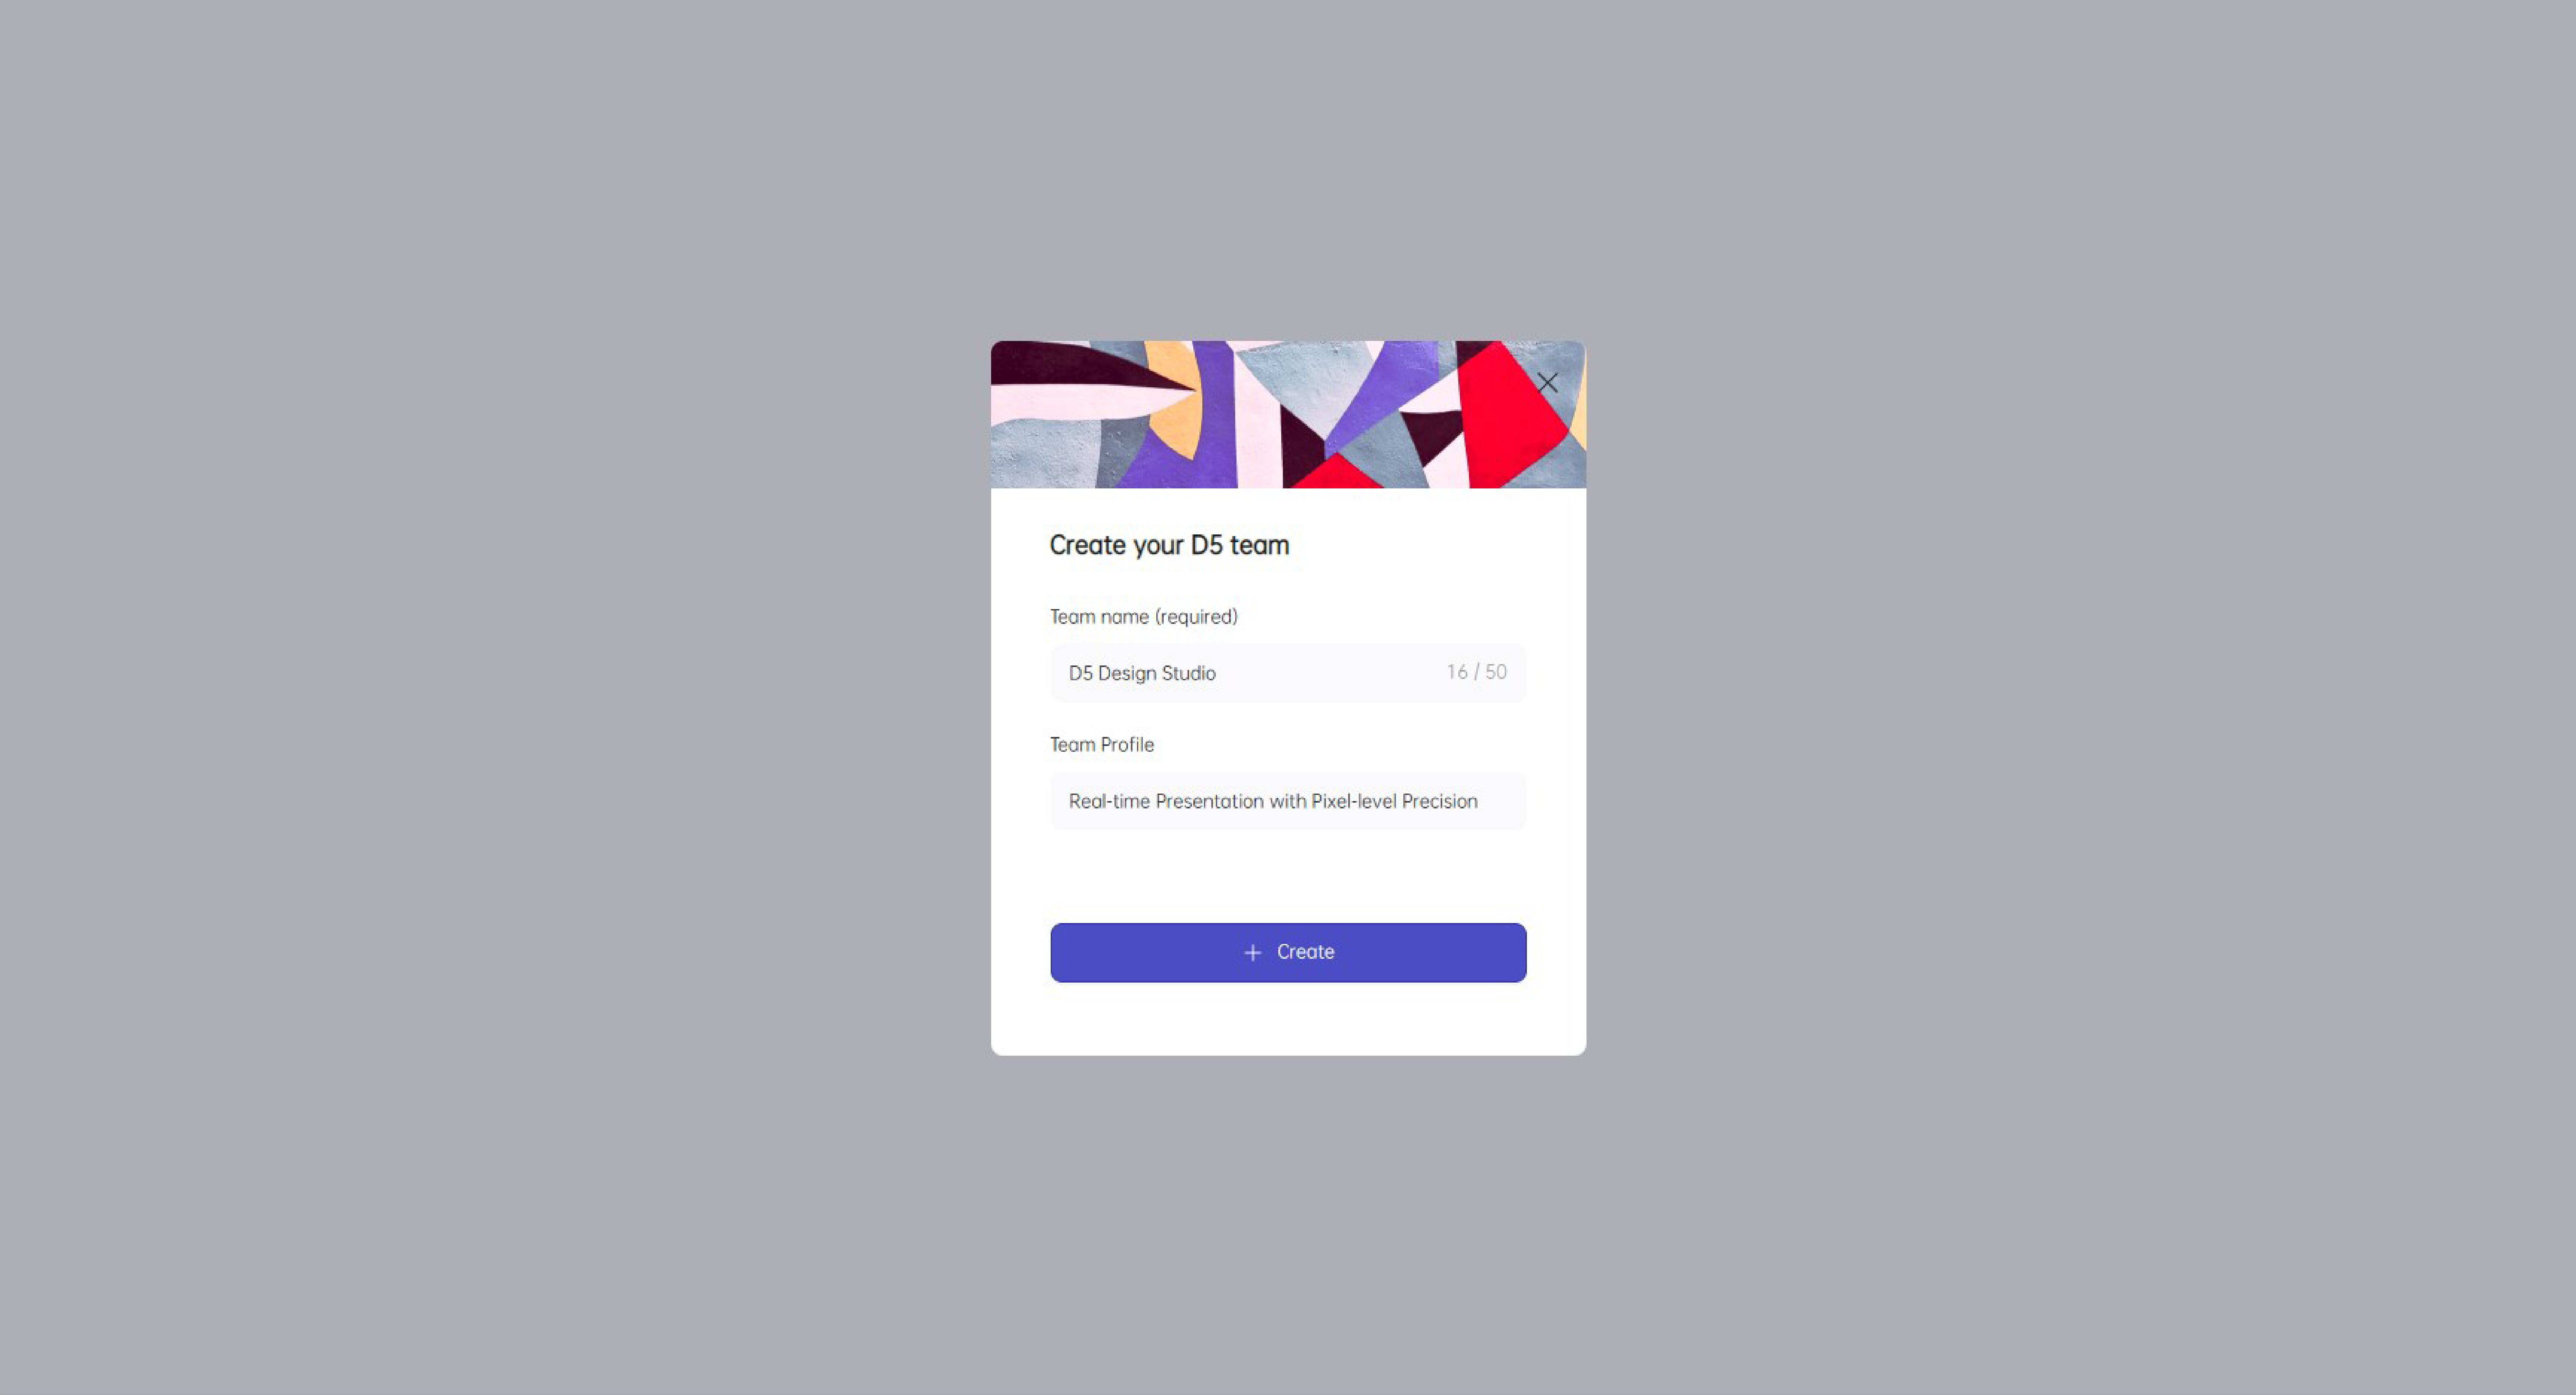
- Upon first entry to the Teams Account Settings, complete the team setup.
-
Naming:
-
More settings:
*Different team roles come with different levels of access permission. The team owner (e.g. enterprise@d5techs.com) can access all pages in teams settings and dashboards.
Invite Team Members
Invite by Email
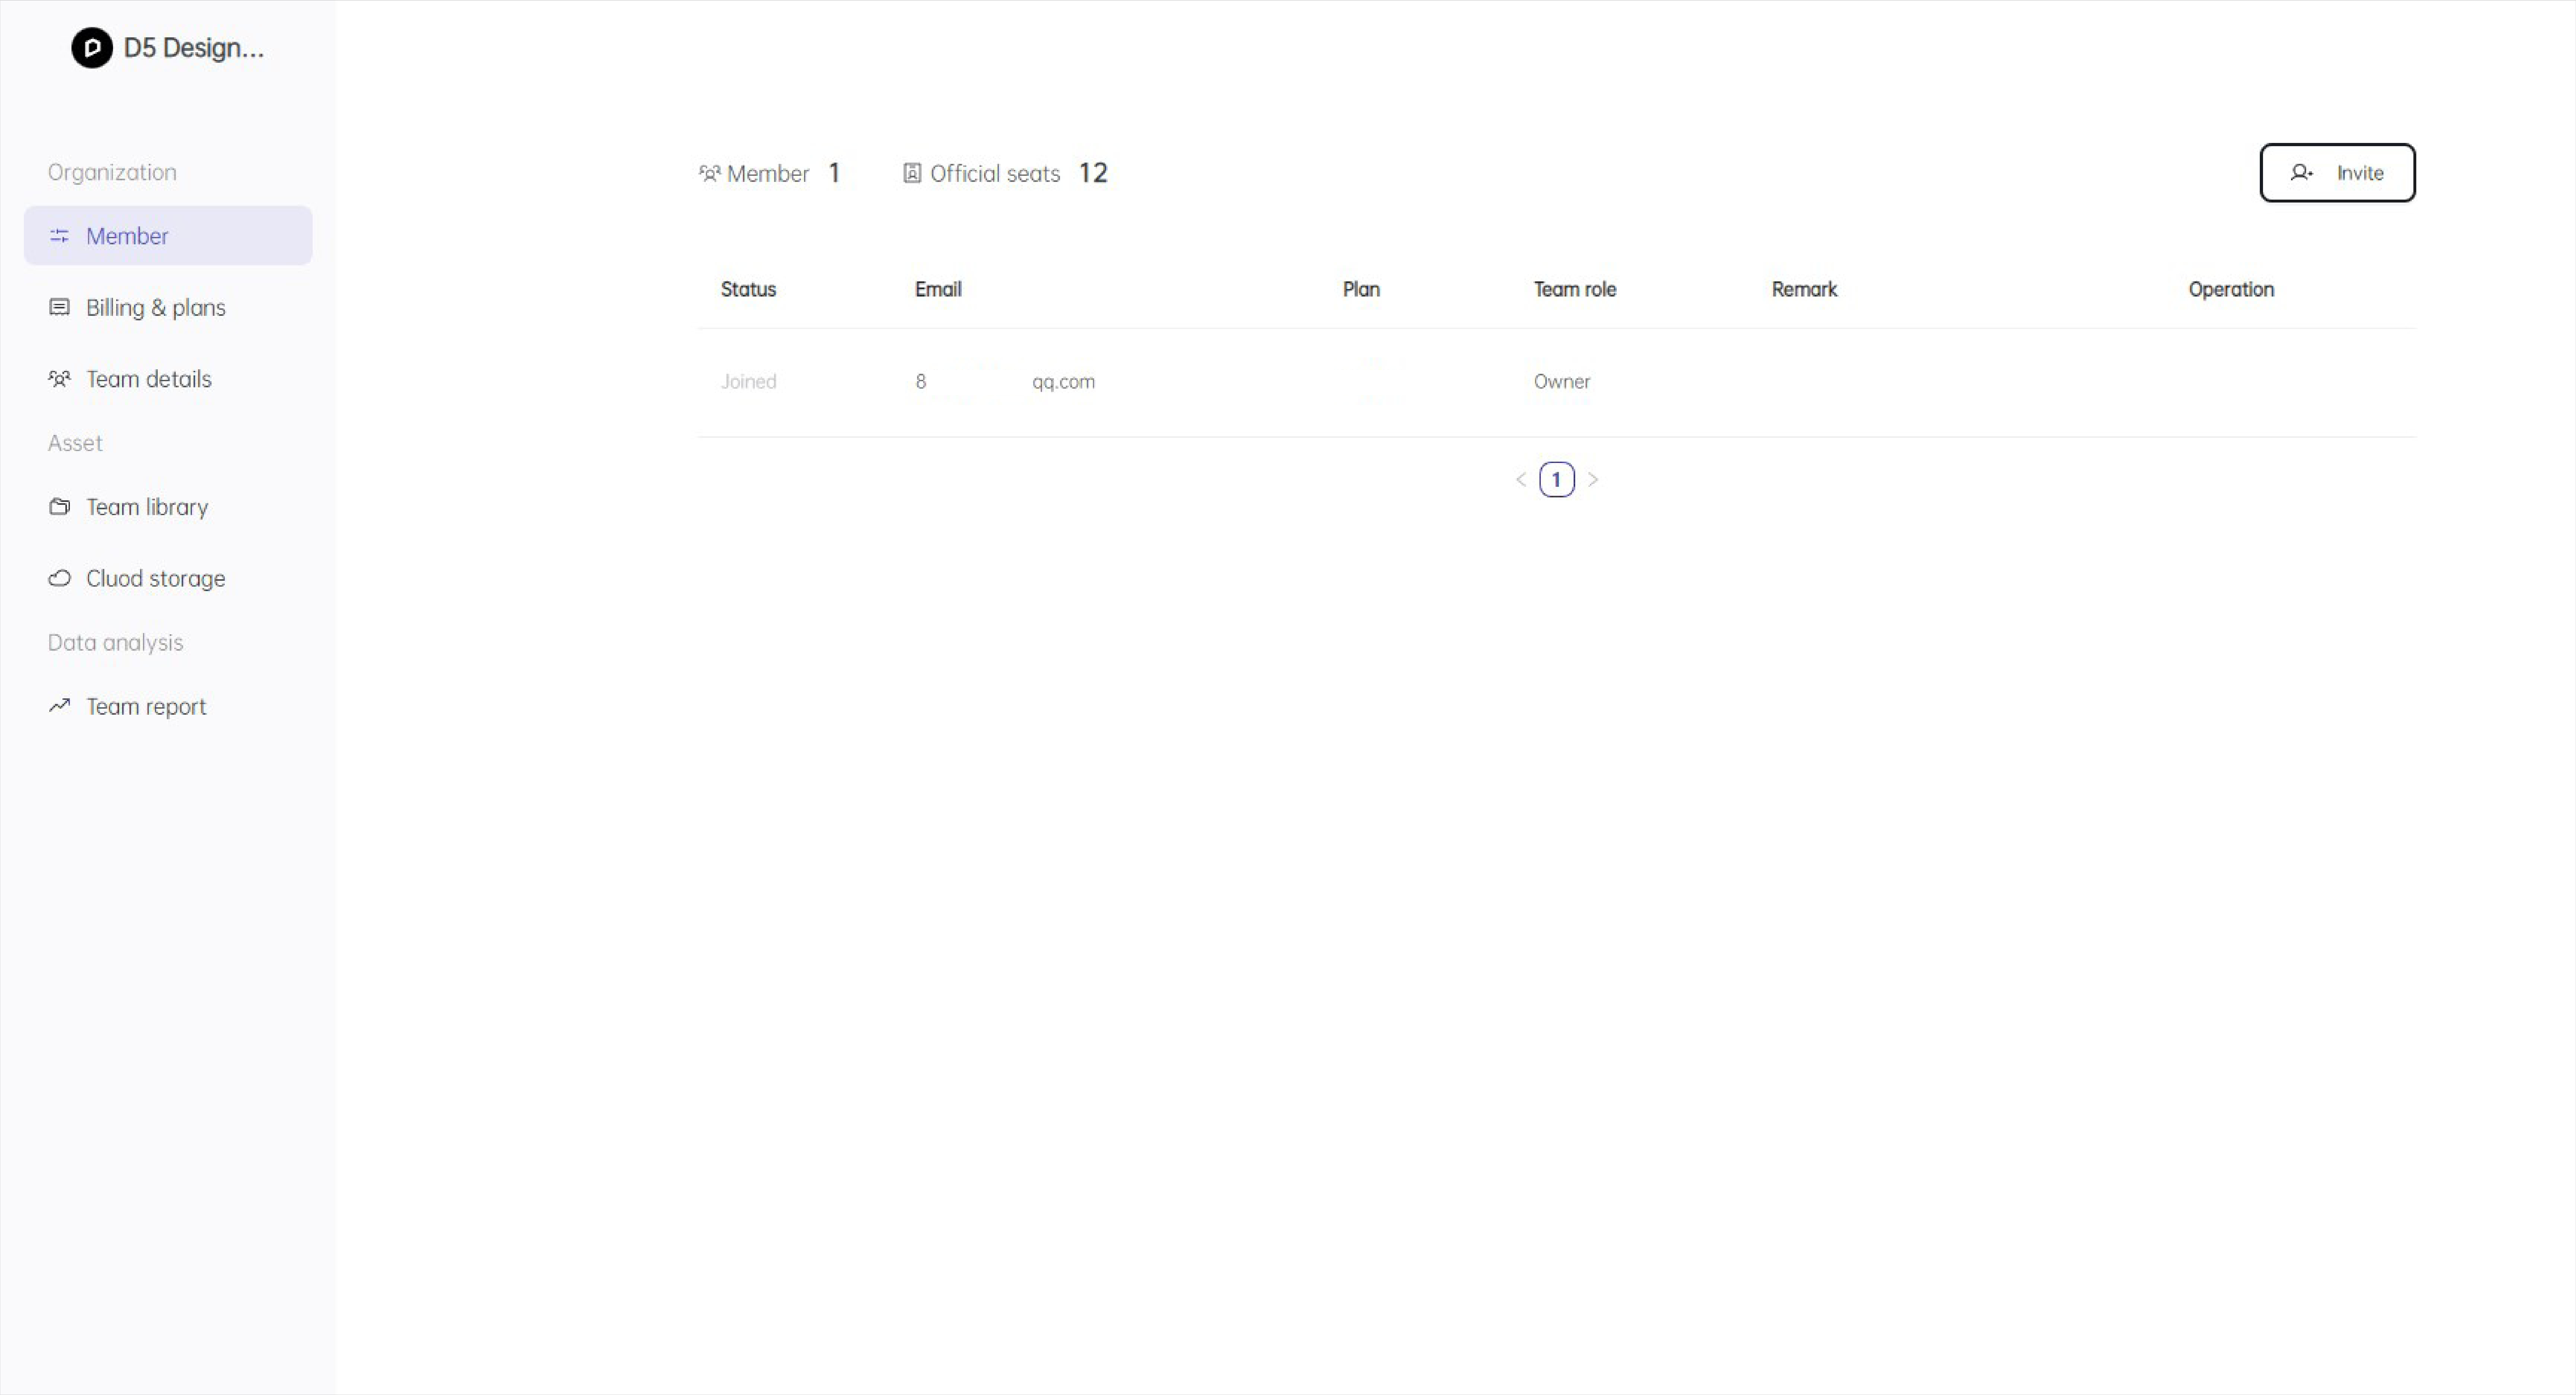
- You can invite new members to join the team via email. On the Members panel, you can see the total number of seats in your current subscription plan and the number of members who have joined.
Note:
Members: A D5 account that has joined the team is considered one member. The number of members cannot exceed the number of the seats.
Seats: The number of accounts allowed to join the team according to your subscription plan.

After clicking on “Invite” and entering the invited member’s account (email), an invitation email will be sent to the invited member’s email. The member can join successfully by clicking “Accept” in the email.
-
If the invitation information is entered incorrectly (e.g. wrong email address), you can cancel the invitation before it is accepted.
-
If the invited member has not yet registered a D5 account, he/she will be given instructions on how to register for one after accepting the invitation.
-
After a successful invitation, you’ll receive a notification email at the email address that sent out the invitation.
Invitation Email↓

After a successful invitation, the invited account’s My Space will display the account type as "Team"↓
Note: Newly joined users are assigned the default role of “Member” and do not have access to the Team settings and dashboard panel. If their role is changed to “Administrator”, they will then have access to those settings.
- The following types of invitations are not supported for now:
Inviting a D5 account that has already joined another team.
Inviting a D5 account with an active “Pro Version” subscription.
Please contact D5 staff if you encounter any of the above issues.
Invite with Link
- Clicking “Invite” supports directly copying the invitation link. After the invited member clicks the invitation link and confirms it, they will automatically join the current team.
Invitation Done
Note: Team and individual account data are not interoperable. (For example: You can only access data stored in your Teams Studio using your Team account)

Manage Team Members
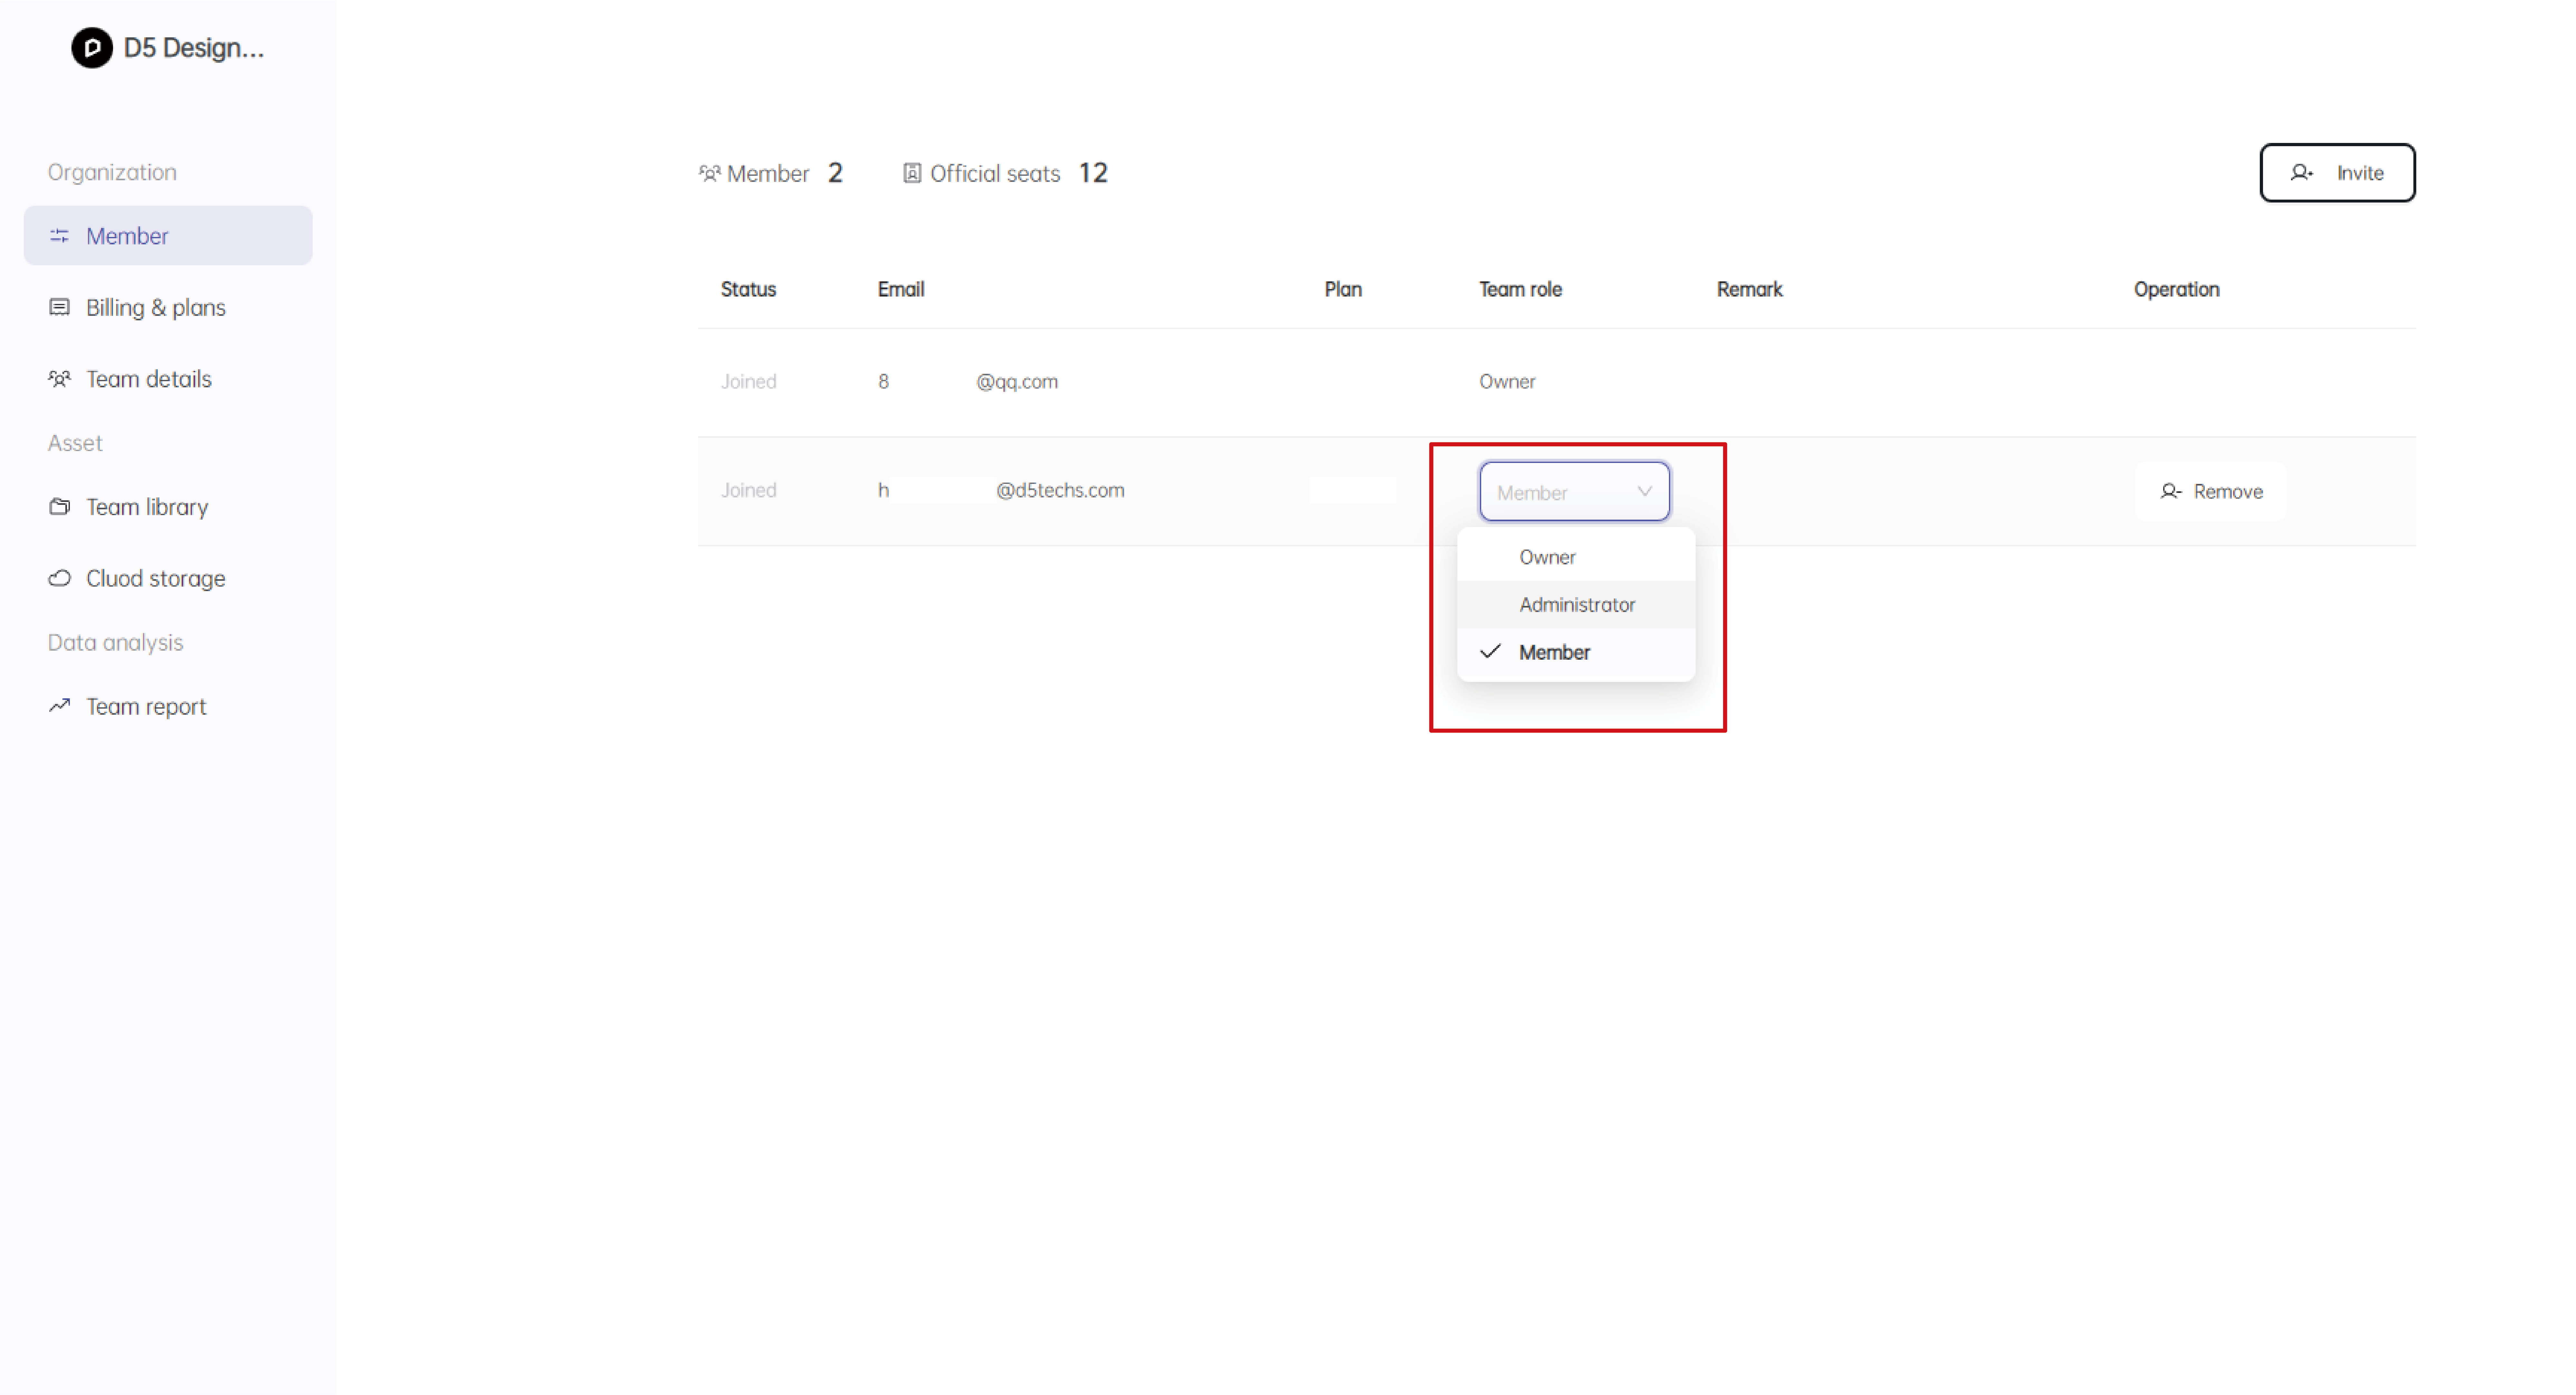
Assign team roles
-
You can set the roles for team members in “Organization” >> “Members” in Team Settings and Dashboards
-
Roles&Accesses:
| Role | Access |
|---|---|
| Owner (1 person only) the role of the owner in the team cannot be changed | 1. has the highest level of permissions in the team; 2. can access all pages of the team settings and dashboards. |
| Account management: invite members; remove members; set roles for members. Subscription Management: view the renewal date of subscriptions. Team details: view and edit team name & profile. Team Library Deployment | |
| Administrator (multiple admin roles supported) | can access some pages of the team settings and dashboards: Account management: invite members; remove members (but not admins or the owner); set members as admin. Team details: view and edit team name & profile. Team Library Deployment |
| Members (default role for a new member that joins the team) | No access to team settings and dashboards |
- D5 for Teams features inside the software are open to all roles in the team
Remove team members
- In “Members” >> “Operation”, you can remove accounts from the team. The removed account will automatically be downgraded to the community version and will not be able to use team assets or access the team settings and dashboards.

Transfer team ownership
-
The current team owner can set any other team member as the new team owner
-
After confirming the transfer of team ownership, the original owner’s role will be changed to administrator, and this operation cannot be reversed.

Note: The credits in the original owner’s account will also be transferred to the new owner’s account.

- After transferring team ownership, the new team owner can manage the original team owner.
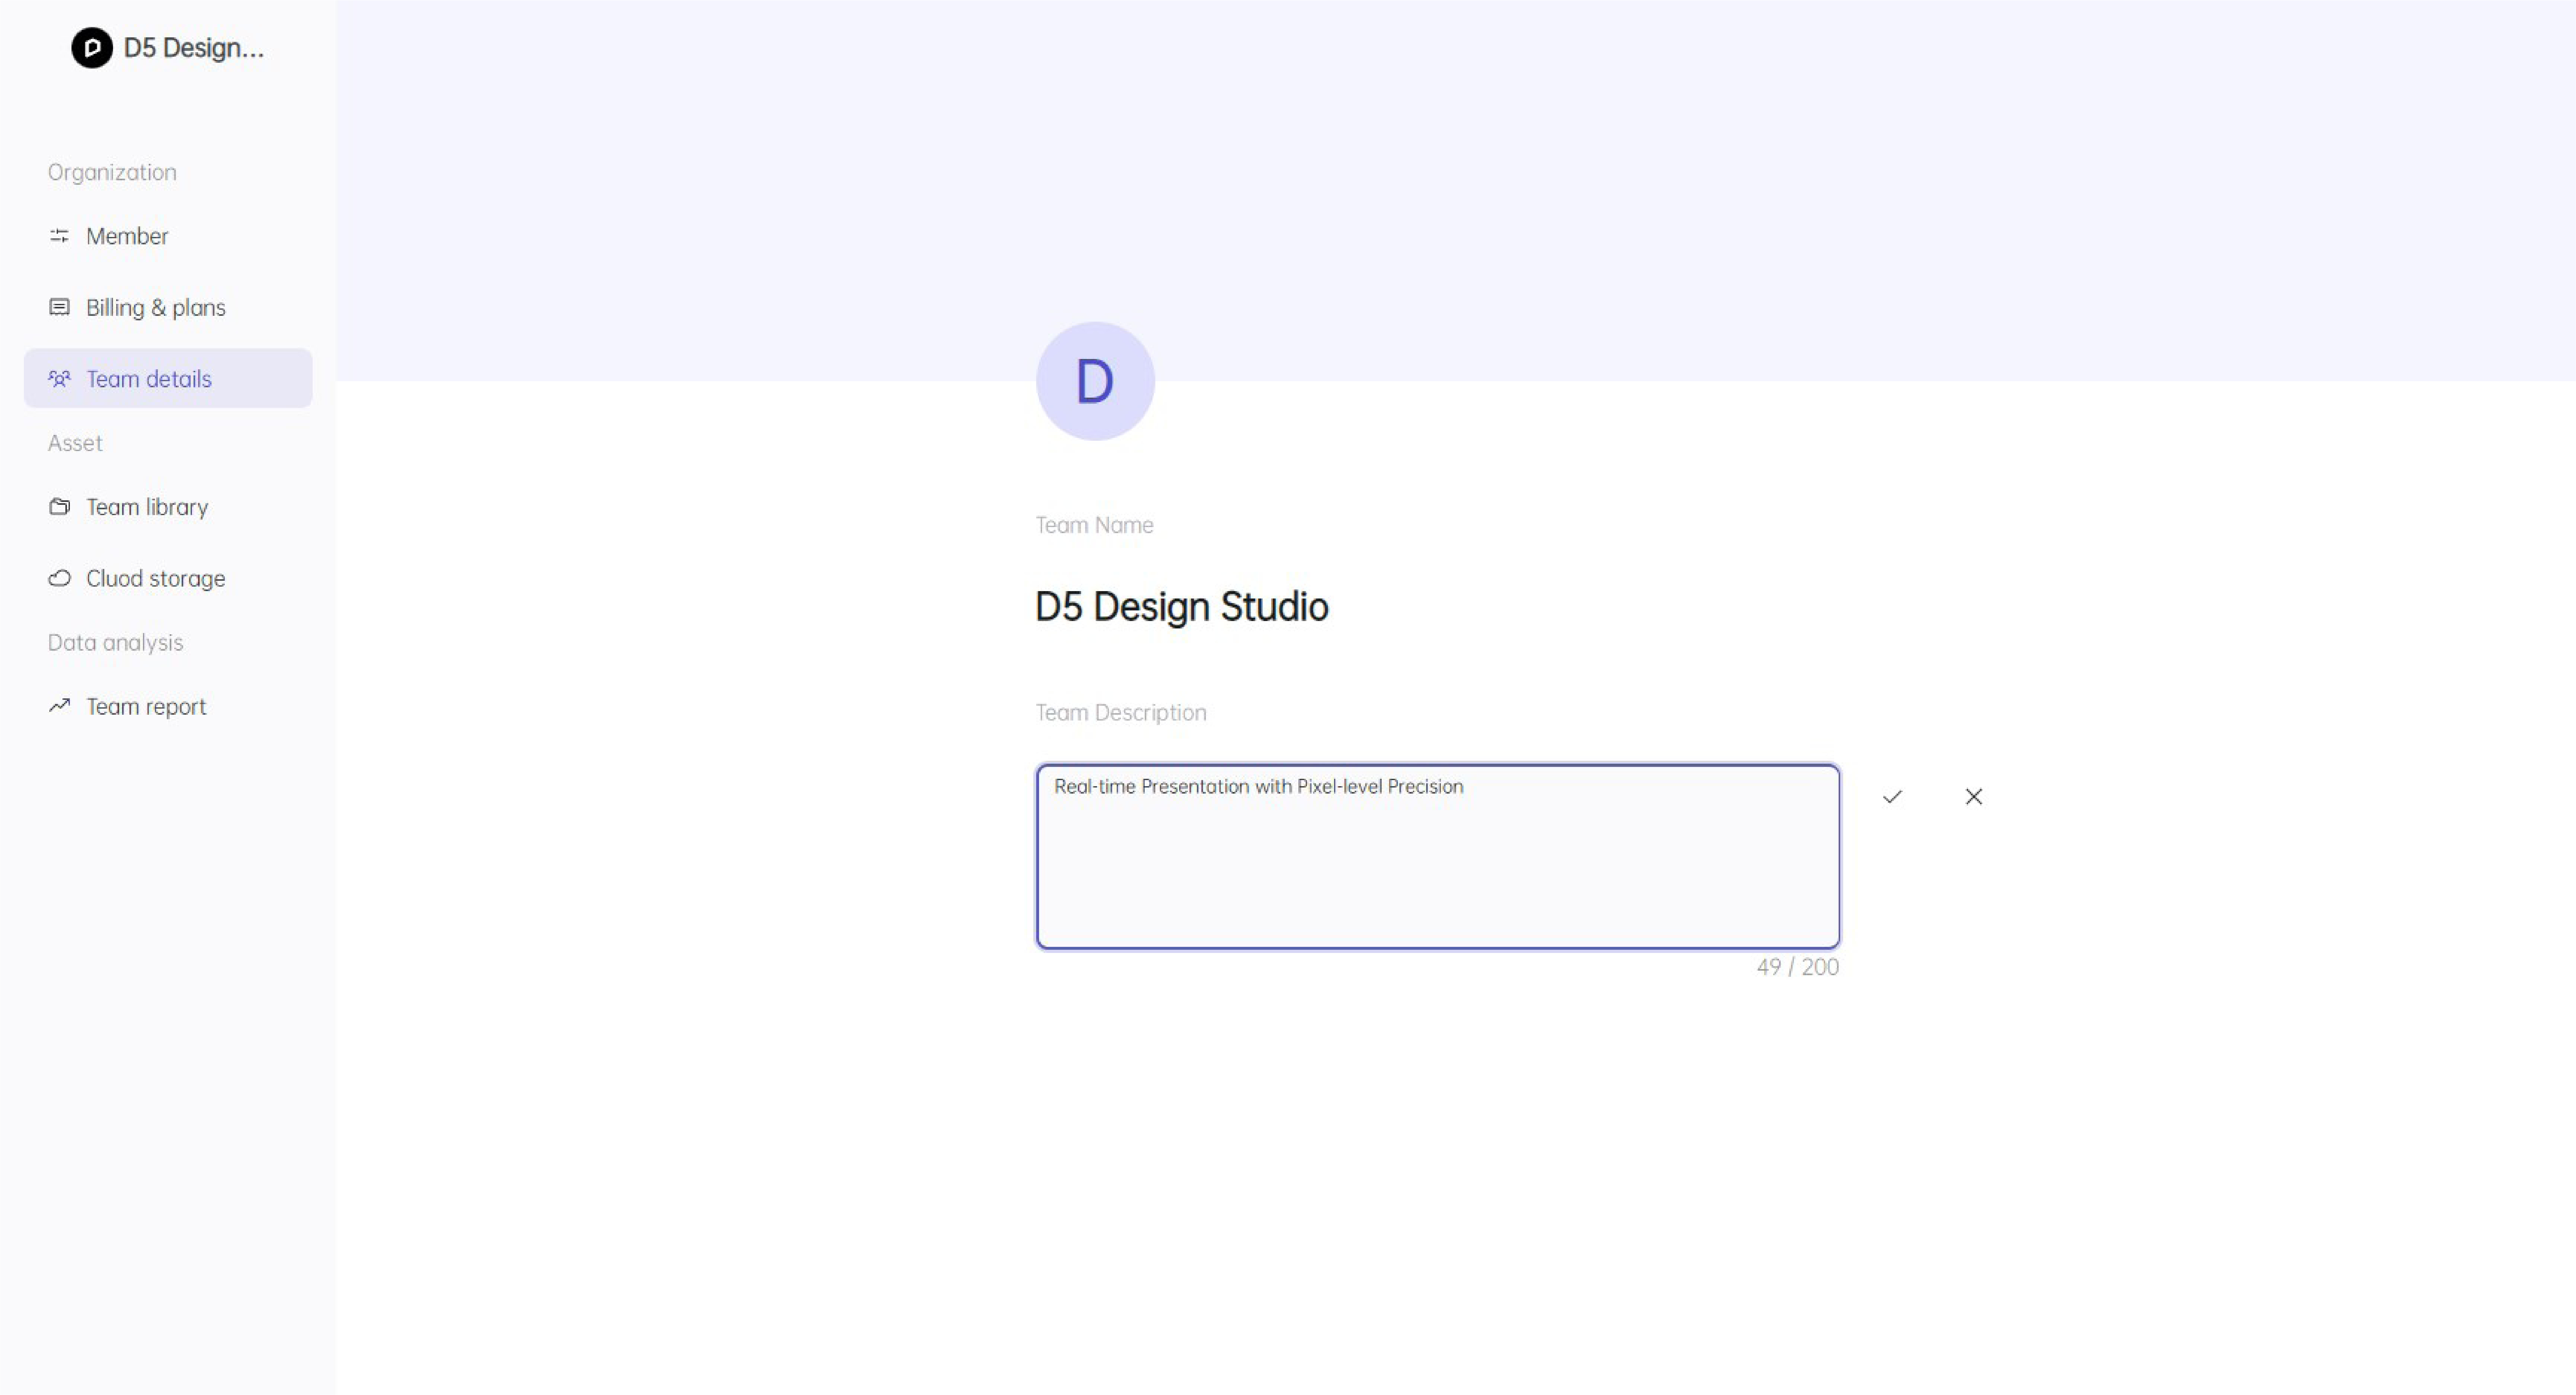
Edit Team Information
Owner & Administrator can edit the name & description of the current team
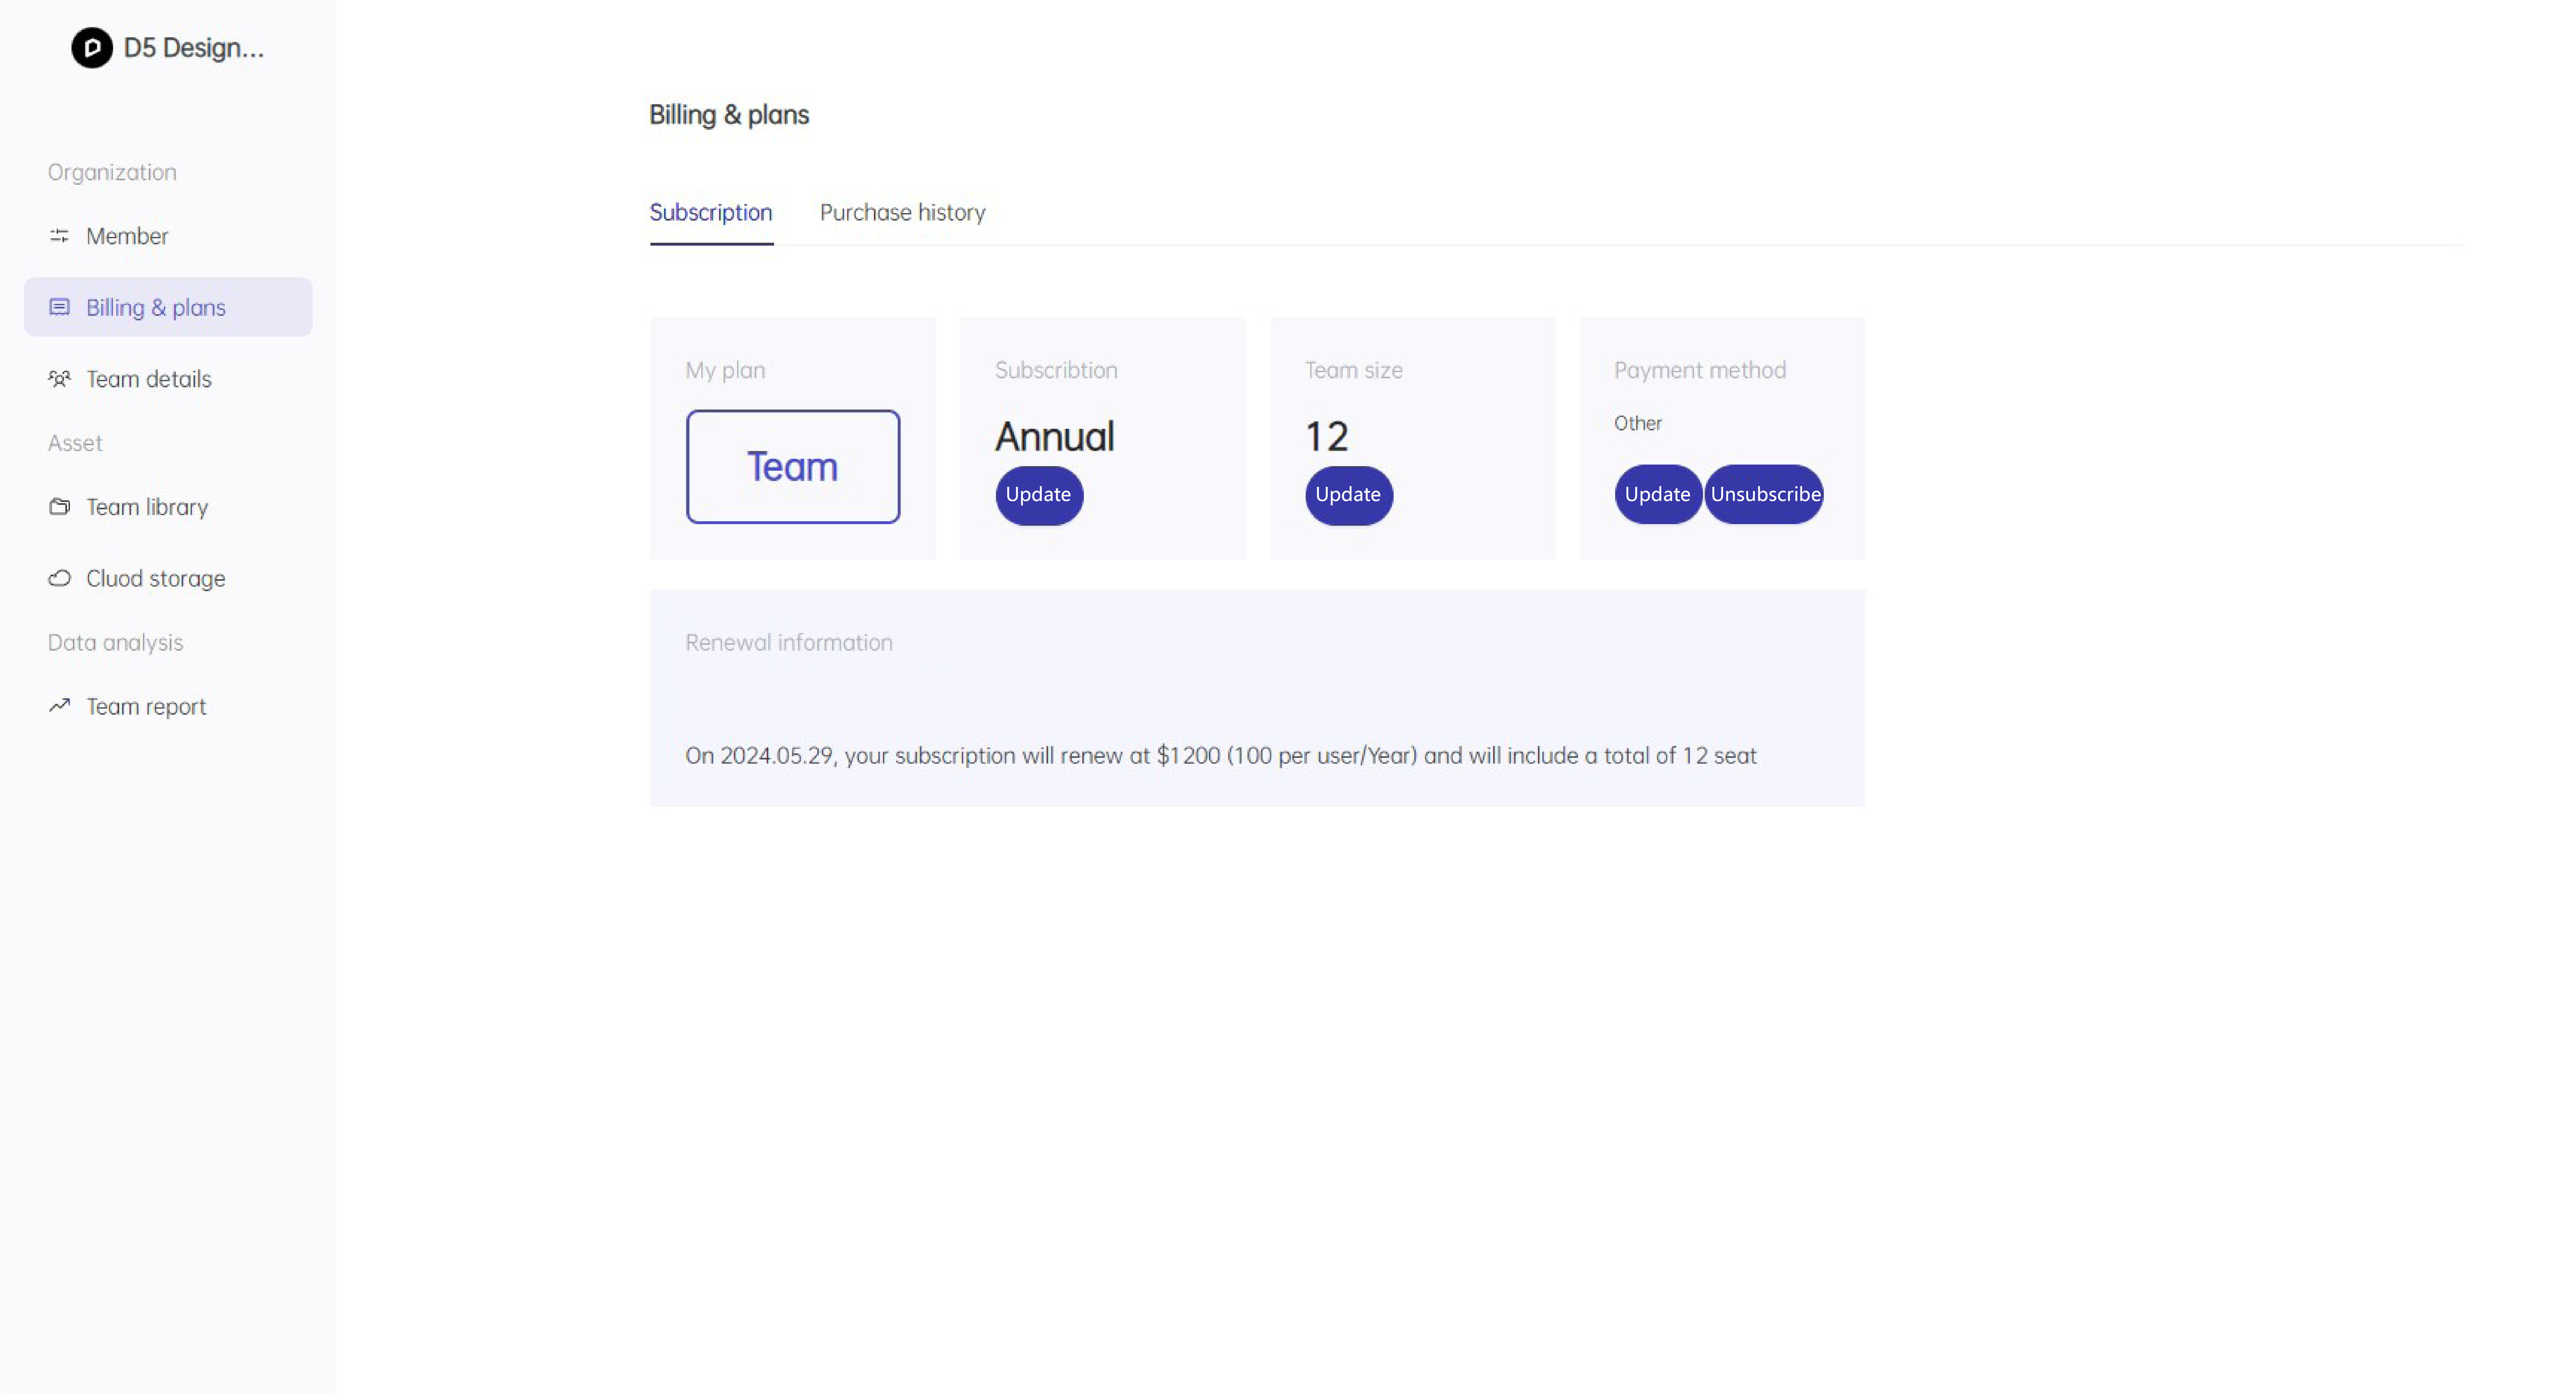
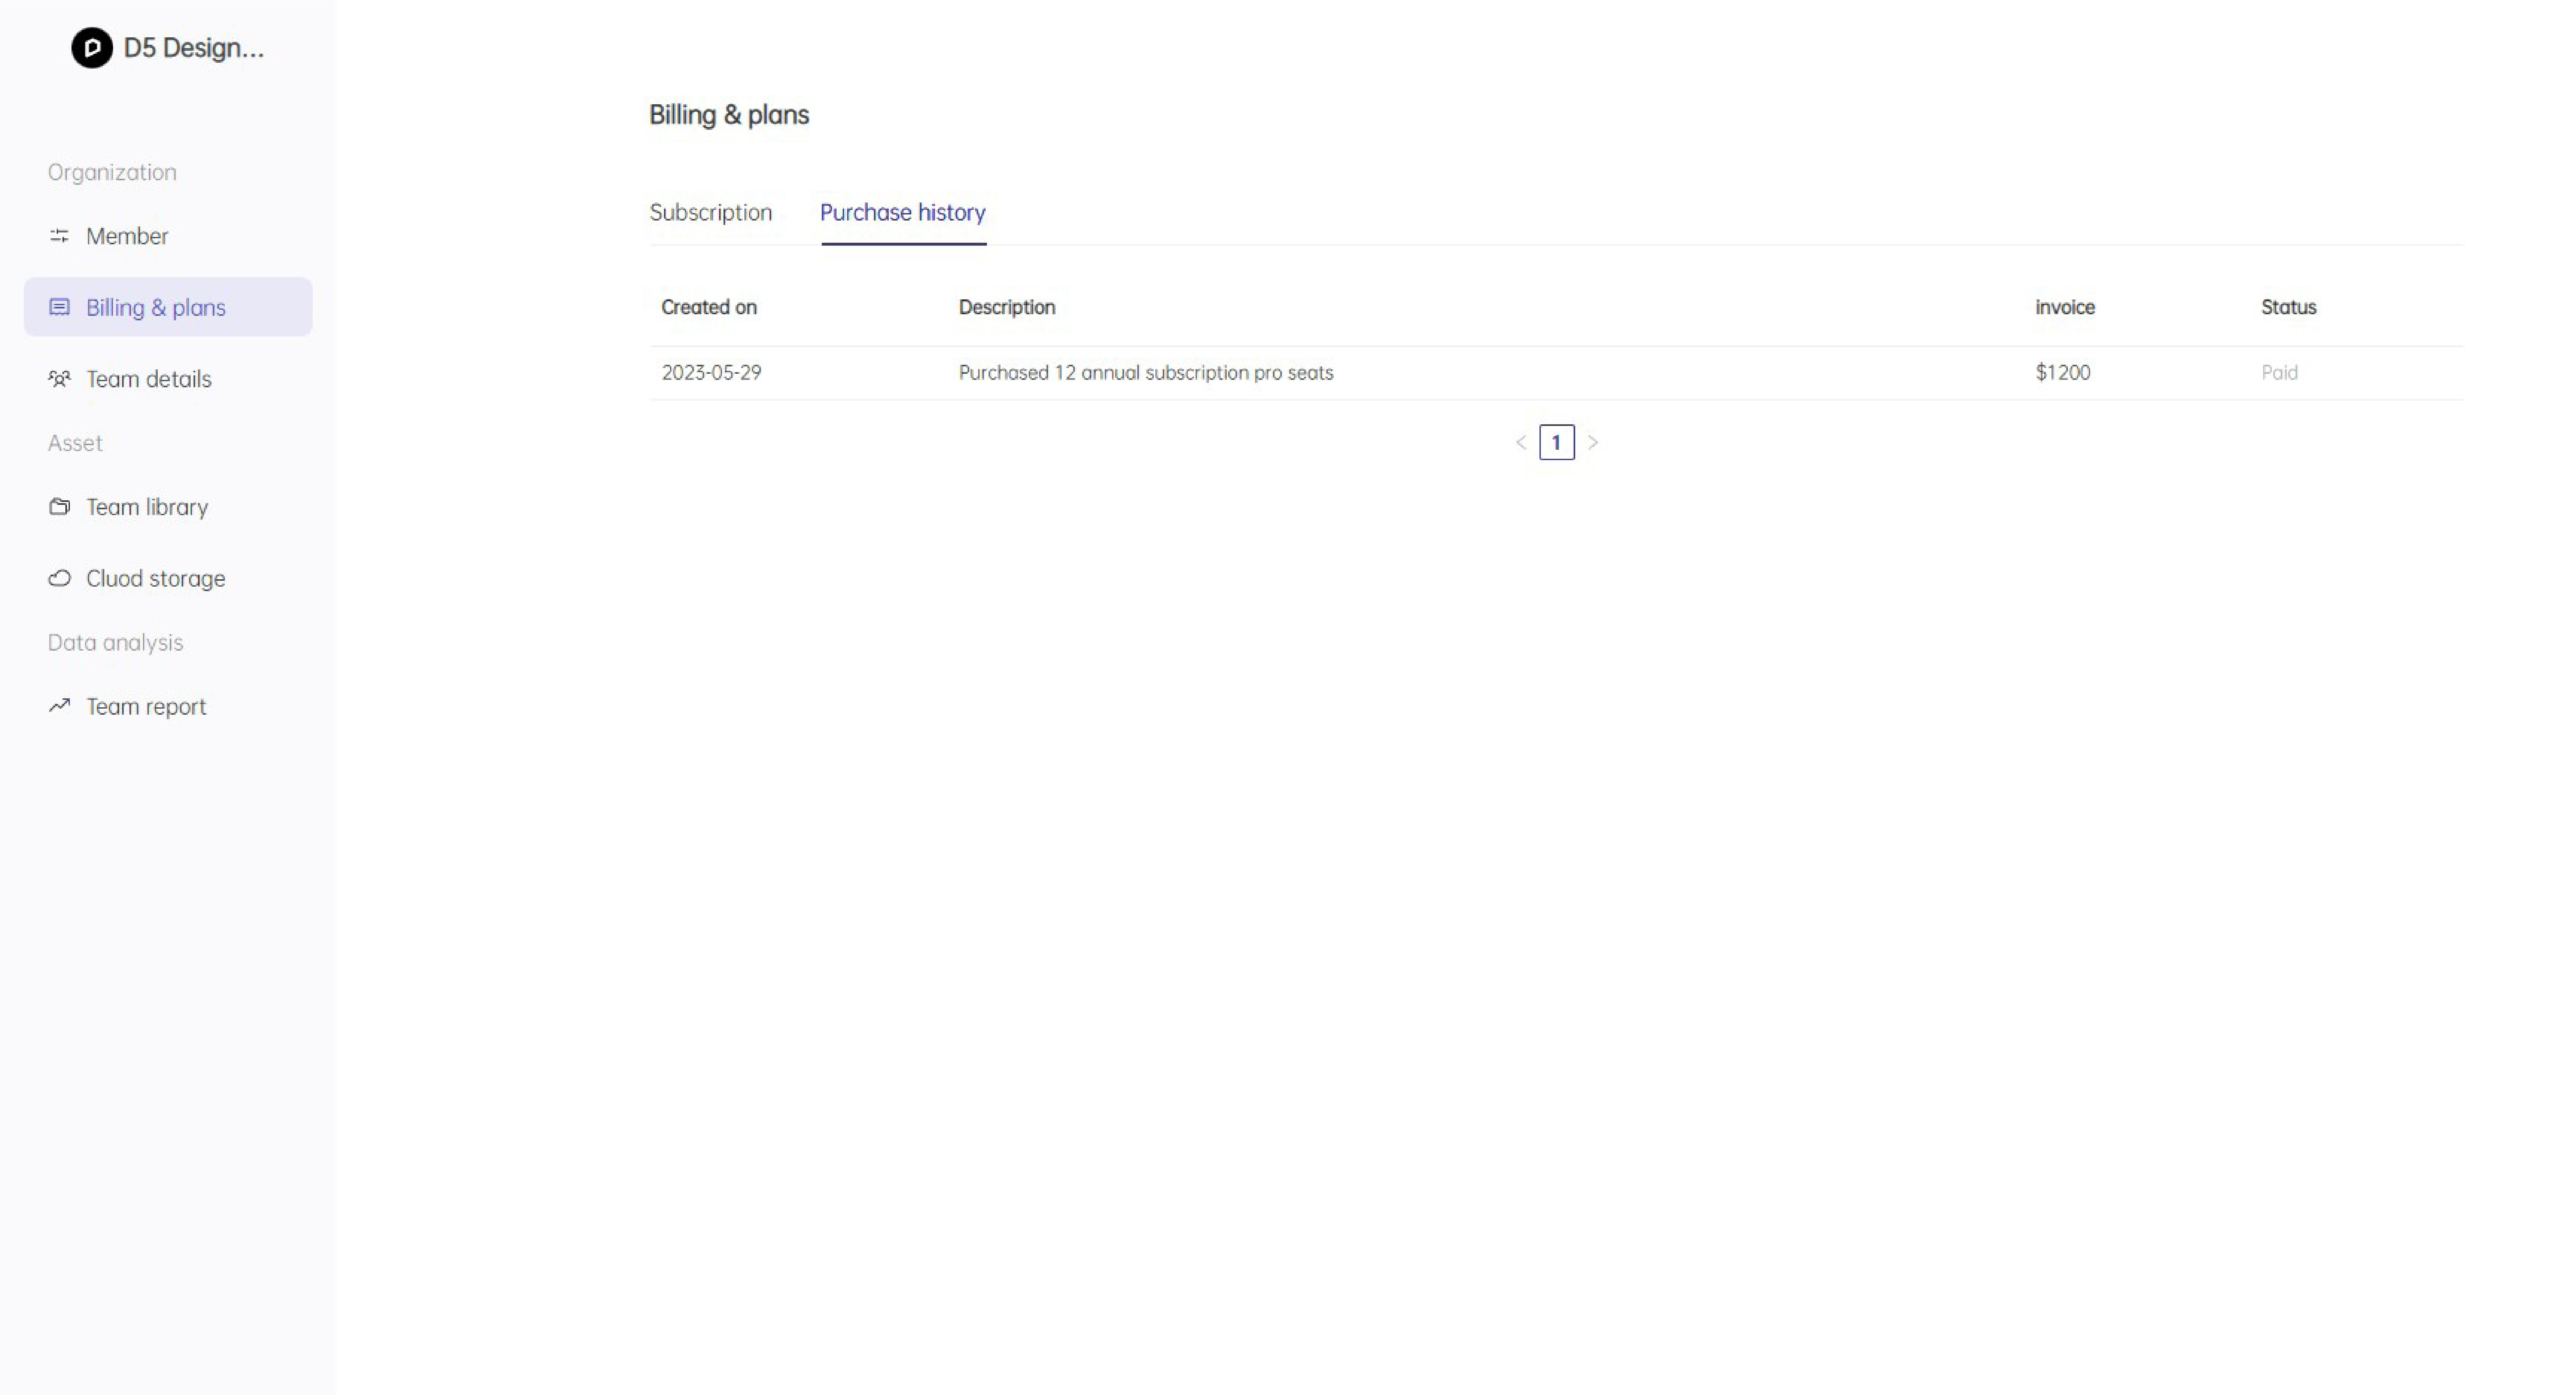
Check team subscription information
Owner can view current Billing & plans, including subscription and purchase history.
Change team subscription information
User self-service subscription changes are not supported at this time. If you need to increase or decrease the number of seats in your group, please contact our sales staff.
6. Data Analysis
Team Data Dashboard
- “Team Report” is a data dashboard in the D5 team management backend, which displays core metrics and charts, mainly for enterprise managers to easily overview their team’s current status. At the moment there are five basic metrics supported:

Active Members
-
The number of weekly unique active users within a specified time range
-
Active members are defined as users who have opened D5 Render with their D5 accounts logged in
Active Member Rate
- The number of unique active users in the team during the current week within a specified time range / the current total number of team members
Number of rendered works
- The total number of rendered works completed by all accounts in the team on a certain day
Number of new projects
- The total number of newly created projects by all accounts in the team on a certain day
Average rendering time:
- The sum of rendering time for all accounts in the team / the number of rendering works on a certain day Time (s)